
That's what one of our clients, Jessica, told us. She was running a small mug store on WooCommerce—sales were okay, but stuck.
Until she discovered personalization.
Until she discovered Cmsmart.
Fast-forward 30 days:
- ✅ Her store was redesigned with AI product options
- ✅ Customers could design their own mugs with 3D preview
- ✅ AOV jumped by 42% — and she finally felt in control
Want to learn how she did it (and how you can too)?
🎓 Join our FREE 30-Day Email Course:
"Personalize, Launch & Scale – The Smart Ecommerce Way"
You'll get:
- ✔ 1 lesson a day, straight to your inbox
- ✔ Real store examples, demos & playbooks
- ✔ No tech jargon. Just strategy that works.


Understanding Your Target Audience
Who Is This Tutorial For?
Whether you’re a custom bag entrepreneur, a merchandising manager, or a WooCommerce developer setting up stores for your clients, this guide is tailored to help you master Cmsmart Product Designer’s full potential.
Here’s who will benefit the most:
Custom Bag Brands & Startups: If you’re launching a new line of personalized bags—from tote bags and backpacks to laptop sleeves—you need a flexible and user-friendly design tool that your customers can easily use.
Corporate Merchandising & Gifting Companies: Offering branded bags for events or internal use? This tutorial helps you configure the tool to meet strict brand guidelines.
WooCommerce Store Developers: Building a Web-to-Print solution for clients? Cmsmart Product Designer provides a scalable way to integrate custom bag design with WooCommerce.
Print-on-Demand Fulfillment Platforms: Managing hundreds of SKUs with unique customization options? This tutorial helps you set up consistent design areas and templates.
What Problems Does a Bag Customizer Ecommerce Solve?
A fully-configured bag customizer eliminates many headaches faced by ecommerce owners and customers alike:
Error Reduction: Prevents misaligned or cropped artwork, thanks to precise design zones, safe areas, and bleed lines.
Enhanced Customer Confidence: Real-time previews and easy editing make customers more likely to complete purchases.
Operational Efficiency: Fewer manual corrections and approval steps translate into faster order processing.
Revenue Growth: Personalized products often command higher prices and drive repeat business.
Industry Growth and Revenue Potential
According to Grand View Research, the global custom bags and tote market is expected to grow at a CAGR of 6.8% through 2030, driven by consumer demand for personalized products. With ecommerce platforms like WooCommerce and powerful tools like Cmsmart Product Designer, businesses can easily tap into this expanding market.
Here’s why this is crucial:
Personalization Drives Loyalty: 80% of customers are more likely to purchase from a brand that offers personalization options (source: Epsilon).
Higher Margins: Customizable products typically generate 20-30% higher profit margins than standard SKUs.
Market Trend: Eco-friendly and premium materials like organic cotton and vegan leather are popular among conscious consumers, expanding the niche for custom bag ecommerce.
Laying the Foundation for Your Bag Customizer Store
Setting up your ecommerce site with Cmsmart Product Designer is the first step toward creating a seamless custom bag shopping experience. This section covers everything from installation to initial configuration, designed for both technical and non-technical users.
How to Install Cmsmart Product Designer on WooCommerce
Purchase and Download
Visit Cmsmart Product Designer and choose the plan that fits your business needs. Once purchased, download the plugin ZIP file.
Upload to WordPress
In your WordPress admin dashboard, go to
Plugins > Add New > Upload Plugin.Select the ZIP file and click Install Now.
Once uploaded, click Activate Plugin.
Activate Your License
After activation, navigate to
Cmsmart Product Designer > License.Enter the license key provided with your purchase.
Click Activate to unlock full functionality.
Verify Plugin Setup
Check that the plugin appears in your dashboard menu. Look for
Product DesignerorCmsmart Personalizationto access configuration settings.Core Setup: Plugin Activation and Initial Configurations
Once the plugin is active, let’s configure the essential settings:
Default Product Configuration:
Navigate to
Product Designer > Settings > General.Choose your default measurement unit (mm, cm, inches) and DPI (300 recommended for print-quality results).
Email Notifications:
Set up automatic email notifications for design approvals, rejections, or required edits.
Frontend Options:
Enable responsive design to support mobile users.
Activate customer upload functionality to allow importing external artwork (PDF, PNG, JPG).
Multi-Language Support:
If you serve a global audience, enable multiple language options under
Settings > Language.Overview of Key Features and How They Work
Cmsmart Product Designer provides a rich toolkit for ecommerce bag customization:
Multi-View Setup: Create multiple design views (e.g., front, top, inside) so customers can personalize different parts of the bag.
Dynamic Pricing: Pricing adjusts based on selected materials, design area size, or complex features like embroidery vs. print.
Design Area Control: Define precise zones where customers can place text, images, or clipart, ensuring designs stay within print boundaries.
Template Library: Pre-save commonly used layouts (e.g., standard tote bags, backpacks) to speed up new product creation.
Real-Time Preview: Customers can instantly see how their designs will look on the product, including adjustments for resolution and alignment.
Configuring Product Customization Options
A successful bag customizer ecommerce store hinges on clear, well-defined customization options. With Cmsmart Product Designer, you’ll learn how to create multiple views, define design areas, and configure swatches and materials that your customers will love.
Defining Product Views for Bags
Your bag customizer can support multiple views to let customers personalize different areas of the product:
Front View: Showcases the primary design area for logos, text, or images.
Top View: Perfect for customizing handles, zippers, and trims.
Inside View: Ideal for interior panels, linings, or pockets.
To set this up:
Navigate to
Product Designer > Product Configurations.For each product (e.g., Tote Bag, Backpack), add multiple views by selecting “Add View.”
Assign clear labels to each view (e.g., Front, Top, Inside).
Set view dimensions to match real product sizes. For example:
Front View: 300mm x 400mm
Top View: 120mm x 100mm
Related Resource:
Learn more about multi-view setup on Cmsmart Community Guide.
Setting Up Customizable Attributes (Handles, Panels, Zippers)
To give customers flexibility:
Add attributes for each customizable component:
Handles
Side Panels
Middle Block
Zipper Type
Assign swatches or image samples (e.g., leather, canvas, various colors).
Here’s how:
Navigate to
Products > Attributes.Create attributes like “Handle Material” or “Panel Color.”
In
Product Designer > Product Config, link these attributes to their respective views.Upload images for each material swatch.
Swatch and Material Setup for a Premium Experience
A professional bag customizer requires high-quality material swatches and color selections:
Leather types (e.g., genuine leather, vegan leather)
Fabric options (e.g., cotton, canvas)
Color choices (e.g., black, tan, royal blue)
Steps:
Navigate to
Product Designer > Material Library.Upload swatch images and assign them to attributes.
Ensure high-resolution images for clarity.
Link swatches to each product and view combination.
Explaining Essential Terms: Design Area, Safe Zone, Bleed, DPI, Cut Lines
Here’s a breakdown of crucial customization concepts for non-technical users:
Design Area: The exact space where a customer’s design can be placed. Anything outside this area might be cut off in production.
Safe Zone: A margin inside the design area ensuring no critical elements (text, logos) are lost during trimming.
Bleed: Extra area around the design, typically 3mm, allowing for minor trimming errors.
DPI (Dots Per Inch): Print resolution. Set at 300 DPI for sharp results.
Cut Line: The final boundary of the product where the design is trimmed.
Friendly Tip:
Imagine drawing on a tote bag with a pencil—Cmsmart Product Designer defines where you can draw (Design Area), where you should keep important details (Safe Zone), and how much extra area you leave for safety (Bleed).
Additional Resources to Deepen Learning
Cmsmart Product Designer Plugin
Cmsmart Ecommerce Personalization Solutions
Custom Dimension and Area Setup Tutorial
Dynamic Pricing for Custom Products
Creating an Engaging Frontend Experience
The frontend experience—the part your customers see and interact with—can make or break your bag customizer ecommerce site. With Cmsmart Product Designer, you can create a smooth, engaging design environment that encourages customers to finalize their custom bags confidently.
Responsive Design for Desktop and Mobile
Today, over 50% of ecommerce purchases happen on mobile devices. It’s essential to provide a responsive design interface that works seamlessly across:
Desktop browsers: For large, detailed previews.
Mobile devices: For users customizing bags on the go.
Tablets: For a hybrid experience with touch functionality.
Steps to ensure responsiveness:
Navigate to
Product Designer > Settings > Frontend Options.Enable responsive design to automatically adjust layout for different devices.
Test on various devices and browsers to ensure UI consistency.
Setting Up Real-Time Previews and Live Editing
Real-time preview is one of Cmsmart Product Designer’s strongest selling points. It allows customers to:
See their designs instantly on the product mockup.
Preview how design elements look in scale and position.
Receive alerts for errors like low resolution or design outside safe zones.
Here’s how to configure it:
Navigate to
Product Designer > Product Config > Frontend Options.Enable Live Preview and Error Alerts.
Define preview areas linked to product views (Front, Top, Inside).
Customers will see changes reflected immediately, building confidence in their design choices.
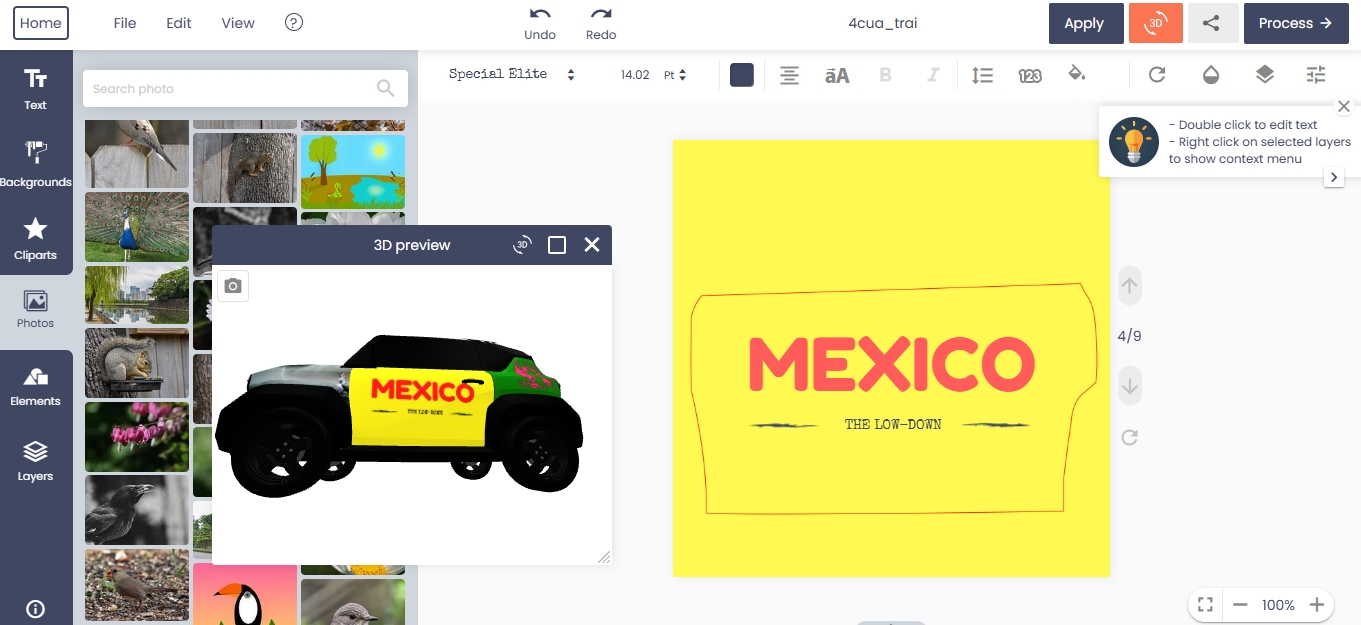
Tips for Using 3D View for Bag Customizer
For premium stores, adding a 3D preview can elevate the shopping experience. Cmsmart supports 3D mockups for select product types, including bags.
Steps:
Upload a 3D model of your bag design (consult with Cmsmart if needed for model format).
Link design areas to the 3D model surface.
Enable 3D View in the product configuration.
Related Resource:
How to Setup Visual Layout in Cmsmart Product Designer
Enhancing the Customer Journey with Friendly Features
Here’s how you can make the bag customization process intuitive and satisfying:
Use highlight colors for safe zones and cut lines to guide users visually.
Provide clear, concise tooltips on design elements (e.g., “This is the handle customization area”).
Offer a reset button to let customers start over easily.
Include a preview PDF option so users can download their design for review before checkout.
Example Resources for Visual Learning
Watch the Bag Customizer Tutorial on YouTube
Explore Cmsmart Bag Product Designer’s Live Demo
Cmsmart Personalization Platform
Pricing and Revenue Strategies
A successful bag customizer ecommerce site not only provides a seamless design experience but also maximizes profitability. Cmsmart Product Designer supports dynamic pricing models, allowing you to implement flexible pricing based on materials, design areas, and other factors that directly influence your revenue.
Configuring Dynamic Pricing for Custom Components
Dynamic pricing means adjusting the price based on the options customers select. For example, using premium materials like leather or adding extra design elements (like embroidery) can increase the price. Here’s how to set it up:
Go to
Product Designer > Product Configuration.Select your bag product (e.g., Custom Tote Bag).
For each attribute (e.g., Handle Material, Side Panel Color), assign pricing options:
Fixed price per component (e.g., +$5 for leather handles).
Percentage-based adjustments (e.g., +10% for premium canvas).
Enable Dependent Quantity if the price should change based on the number of customizations (e.g., handle color + side panel customization).
Using Material-Based Pricing and Swatch Options
Different materials command different price points. With Cmsmart Product Designer, you can:
Set individual prices for materials (e.g., vegan leather vs. organic cotton).
Add swatches with clear visuals to communicate material quality.
Link swatches to the design area, ensuring price changes reflect in real-time.
Here’s how:
Upload swatch images under
Material Library.Assign pricing to each swatch (e.g., leather +$10, cotton base price).
Link swatches to views and attributes in the product configuration.
Related Resource:
Dynamic Pricing Setup for Product Customization
Tips for Cross-Selling and Upselling Accessories
Increase revenue per customer by offering complementary products:
Cross-sell bag accessories like straps, tags, or pouches on the product page.
Bundle offers: “Add a matching pouch for 20% off.”
Use upsell popups at checkout: “Upgrade to premium material for only $5 more.”
How to Display Pricing Transparently
Make sure your customers always know what they’re paying for:
Display pricing breakdowns next to each customization option.
Show total price updates in real-time as they make changes.
Include tax and shipping estimates in the cart summary.
Link to Learn More:
Explore how Cmsmart Personalization Solutions can enhance ecommerce revenue: Cmsmart Ecommerce Personalization Solutions.
Pricing Best Practices for Custom Bag Stores
Use dynamic pricing rules to encourage upgrades (e.g., premium handles, larger print area).
Keep the base product price competitive while offering profitable customizations.
Leverage bundle discounts to incentivize higher-value purchases.
Streamlining Backend Operations
Behind every successful bag customizer store is an efficient backend operation. With Cmsmart Product Designer, you can manage everything from design approvals to high-volume orders while maintaining a smooth customer experience.
Automating Order Processing with Cmsmart Product Designer
Once a customer finalizes their custom bag design, the system can automatically handle:
Design submission: Customers submit their designs via the product page.
Automatic validation: The system checks for issues like missing files, low-resolution images, or incomplete designs.
Approval or rejection workflows: Admins can approve or reject designs directly from the WooCommerce dashboard.
Here’s how to configure it:
Navigate to
Product Designer > Order Management.Enable automatic notifications for approvals and rejections.
Set design validation rules (e.g., resolution threshold, safe zone compliance).
Managing High-Volume Custom Orders
Handling hundreds or even thousands of orders requires scalable processes. Cmsmart supports:
Batch processing: Review and approve multiple designs at once.
Order tagging: Automatically categorize orders based on product type, customization complexity, or design status.
Export-ready files: Generate print files (PDF, SVG) directly from the approved design submissions.
Steps:
Under
Order Management, filter orders by status (e.g., Pending Approval).Use bulk actions to approve, reject, or export files.
Export high-resolution print files for production.
Related Resource:
Learn about efficient order processing on Cmsmart Community Tutorials.
Managing Templates and Preconfigured Layouts
Templates simplify operations by predefining design areas and settings for popular bag types. This reduces setup time and maintains design consistency.
To create a template:
Go to
Product Designer > Templates.Define the product (e.g., Tote Bag) with its design areas, safe zones, and swatches.
Save the template for future use across multiple products.
Benefits:
Faster setup for new products.
Reduced errors from manually configuring each product.
Consistent customer experience.
Automating Approval Steps with Safe Zone Validation
Safe zones are essential for high-quality print outcomes. Cmsmart Product Designer can:
Automatically warn customers when design elements are too close to the edge.
Flag low-resolution uploads before checkout.
Alert admins of potential design issues in the backend.
Steps:
Under
Product Configuration, enable Safe Zone Alerts.Define the threshold margin (e.g., 3mm inside the design area).
Configure automatic emails or dashboard notifications for issues.
Link for Further Reading:
See how to configure safe zones and error alerts in the Cmsmart Setup Guide.
Benefits of a Streamlined Workflow
Reduces manual intervention and approval delays.
Ensures consistent design quality across orders.
Scales with business growth, handling bulk customizations efficiently.
Marketing and SEO Optimization for Bag Customizer Ecommerce
Your bag customizer store is only as successful as its marketing strategy. To attract customers and convert them into buyers, you need a blend of SEO, content marketing, and smart upselling—all tailored to highlight your store’s personalization capabilities.
Essential Keywords for Ecommerce Personalization
Including the right keywords ensures your store ranks higher in search engines, drawing traffic from users actively searching for custom bags. Focus on:
Primary Keywords: custom bag designer, personalized bag ecommerce, ecommerce bag customizer
Long-Tail Keywords: WooCommerce product personalization, tote bag customizer, setup Cmsmart Product Designer for bags
High-Intent Phrases: build your own custom bag online, bag design area configuration tutorial
Incorporate these keywords naturally into product pages, blog posts, and meta descriptions. For instance:
Product Titles: “Custom Tote Bag with Personalized Handles and Panels”
Meta Descriptions: “Learn how to build your own custom bag using Cmsmart’s powerful product personalization tools.”
Content Marketing Ideas for Custom Bag Stores
Content marketing drives organic traffic and builds brand credibility. Here are some content ideas:
Tutorial Videos: Show customers how to use the bag customizer with step-by-step guidance.
Case Studies: Share success stories from brands that have grown using Cmsmart Product Designer.
Blog Posts: Write about the benefits of personalized bags, design tips, or industry trends.
Example blog topics:
“Top 5 Custom Bag Design Tips for First-Time Buyers”
“How Cmsmart’s Personalization Tools Enhance Your Custom Bag Store”
Leveraging Social Media and Influencer Partnerships
Social media platforms amplify your brand’s reach and build trust:
Use Instagram and Pinterest to showcase customer designs.
Partner with influencers or micro-influencers in the fashion and lifestyle sectors.
Launch social contests: “Design Your Dream Tote” with user-generated content.
How to Use Cmsmart Personalization Solutions for Full Customization
Cmsmart offers a suite of tools that seamlessly integrate with WooCommerce, supporting:
Multiple product views and design areas.
Real-time previews and error warnings.
Dynamic pricing models.
Automated order processing.
Learn more about Cmsmart Personalization Solutions here:
Cmsmart Ecommerce Personalization Solutions
Building High-Impact Landing Pages and Blog Content
Each product or service you offer should have a dedicated landing page optimized for SEO:
Include clear, keyword-rich headlines.
Use customer testimonials and case studies.
Embed demo videos, such as:
Bag Customizer Tutorial
Cmsmart Product Designer Setup
Upselling Techniques for Custom Bag Accessories
Maximize revenue by suggesting relevant add-ons:
Display accessory recommendations on product pages.
Use popups at checkout to upsell matching straps, pouches, or tags.
Create bundle deals: “Save 15% when you add a matching accessory.”
Advanced Customization Features
Once you’ve configured the basics, it’s time to unlock the advanced customization options that will make your bag customizer store truly stand out. Cmsmart Product Designer offers powerful features to enhance both the customer experience and operational efficiency.
Enabling Template Libraries and Preconfigured Layouts
Templates allow you to save time and maintain consistency across products:
What It Is: A saved configuration of design areas, swatches, and product views for specific bag types (e.g., tote bags, backpacks).
Why It Matters: Templates eliminate the need to manually configure each new product, reducing errors and setup time.
Steps to create a template:
Go to
Product Designer > Templates.Click “Add New Template” and select the product type.
Configure design areas, safe zones, and swatches.
Save and apply the template to multiple products.
Working with Custom Shapes and Print Boundaries
Custom bag designs often require non-standard shapes (e.g., circles for logos, irregular panels). Cmsmart Product Designer supports:
Custom Shape Areas: Upload SVG or shape files to define complex design zones.
Precise Print Boundaries: Align digital designs with physical bag dimensions.
Steps:
Navigate to
Product Designer > Product Configuration.Select the product and view.
Upload the custom shape file under “Design Area.”
Test with a sample design to ensure alignment.
Related Tutorial:
Custom Dimension and Shape Setup
Integrating Additional Tools: Price Matrix, Get Quote, and Beyond
Cmsmart’s ecosystem includes tools that can extend functionality:
Price Matrix Table: Configure complex pricing rules based on design size, material, and quantity.
Learn More About Price Matrix Table
Get Quote Feature: Let customers submit design specifications and request custom quotes.
Advanced File Export Options: Export print-ready files (PDF, SVG) with custom bleed and DPI settings.
Additional Cmsmart Resources to Explore
Cmsmart Personalization Platform
Cmsmart Product Designer Plugin
Final Conclusion
You’ve now explored every essential aspect of setting up a high-converting custom bag ecommerce store using Cmsmart Product Designer. From configuring dynamic pricing and multi-view customization areas to enhancing customer experience and streamlining backend operations, you’re equipped to deliver a seamless and engaging personalization journey for your customers.
Here are the key takeaways:
User Engagement: Cmsmart Product Designer empowers customers to design custom bags with precision, fostering loyalty and driving conversions.
Revenue Growth: Dynamic pricing, premium swatches, and upselling strategies increase average order value and overall sales.
Operational Efficiency: Automated validation tools, batch processing, and templates streamline order workflows and reduce errors.
Scalability: Whether you’re handling B2C or high-volume B2B orders, Cmsmart’s solution adapts to your business growth.
David Nguyen
Founder & CEO, Cmsmart Ecommerce (a division of Netbase JSC)
With over 20 years of experience in business strategy and ecommerce technology, David Nguyen has empowered hundreds of online retailers around the world to scale smarter and faster. As the visionary behind Cmsmart, he has driven the development of personalization solutions and product-customization tools that deepen customer engagement and boost average order values. His commitment to creativity, practical strategy and results-driven outcomes has earned Cmsmart a reputation as a trusted partner for small, medium and enterprise-level ecommerce brands.
Contact Me via WhatsApp: https://wa.me/84937869689
Email: [email protected]
Let’s talk about how your ecommerce store can grow.
If you're ready to transform your store with tailored solutions that drive engagement and revenue, send me a message on WhatsApp or email today — and our team will connect with you right away.
Direct contact & support
Need help fast? Message me anytime: