TABLE OF CONTENTS
Contact Us
Please fill out the Customization Request form if you need any customization

TABLE OF CONTENTS
Contact Us
Please fill out the Customization Request form if you need any customization
Related Post

Germany has always been a global leader in cycling, known for its engineering precision and innovation. But the way people buy bikes is changing. E-commerce has reshaped consumer expectations,...

Welcome to the Cmsmart Store 5.0 tutorial, your comprehensive guide to building and managing an eCommerce store on WordPress. Whether you're a business owner looking to create an online...

In a digital age where the online presence of your printing business is paramount, the design of your website sets the stage for success. Enter CMSmart's newest breakthrough: Printshop...
Other Usefull Contents
You can see many success stories from our customers, and you may be one of them in the future
What secrets behind Teespring's success? How does Teespring make money from print on demand business model? All of them will be clarified in this article.
Read More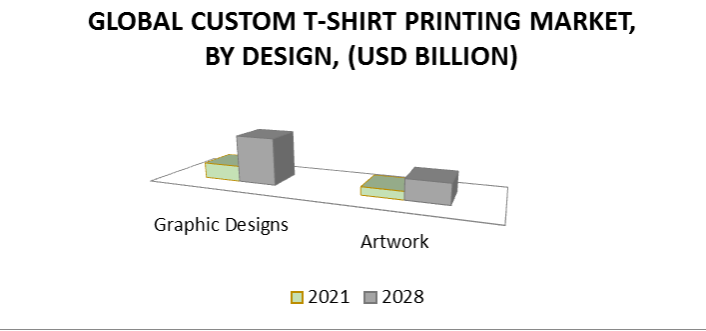
T-shirt business is always a potential market for all of you but how to make a successful business? What is the golden key to help you stand out from the competitors? Let's find the answer with CMSMART
Read More
Having a professional eBay store that has all the needed functionality can play an important role in making your store successful. Check out top 5 professional eBay store templates
Read More


Each platform will have different structures, as a user I feel Shopify is a fairly easy to use platform, a friendly interface for most people. This article we will help you understand the basic structure of Shopify and hope with this article you can set up your own website.
In this article, I will divide the sections into separate modules for you to understand more easily. Let's find out.
MODULE 1: BASIC SETTINGS
To make basic settings for Shopify, go to Settings> General
Here you please complete information about your Store such as address, currency you use and especially information to log into the Store.
This is where you can adjust your Store information when you need to switch to a different product and want a new Store name for yourself.
Important parts:
Example: [email protected]
NOTE: Do not use virtual addresses fake / fake information, because the account will be locked when detected.
MODULE 2: PRODUCTS/COLLECTIONS
2.1 PRODUCTS
This is where you will post your products, create product collections and inventory.
Select "Add product" to add your first product.
Important items:
You can add options by "Add variant" if your product has different options such as "Size" (for fashion products), "Color", ...
At the end there is "Edit website SEO", a preview of how your product will display on Google search. You can edit the title, description and URL handle, don't forget to add important keywords to your title and description.
Continue posting until your product inventory is complete.
2.2 COLLECTIONS
You need to create collections for products with same category, same brand, ...
The Collections section is right below Products.
Select "Create collection" to create your collection.
You need to upload the collection image to represent the collection. About Collection type:
Conditions
The conditions you can choose from include: Product Type, Vendor, Tags, Title, Price, Weight, ....
Collection also has an Edit Website SEO section to optimize SEO like the product, so remember to edit it for a chance to display on Google.
MODULE 3: ONLINE STORE
The Online store module is where you customize the interface of themes, posts, blogs, domain names, ... however because customizing the theme is important, there will be a separate module for this section.
3.1 Theme
We already have a detailed article on this section. You can check Here
3.2 Pages
Is where you will post articles like about your company, policies & terms, guidelines, recruitment, ...
Select "Add page" to add page.
Posting articles is similar to product posting, with title and description, as well as SEO optimization at the end of each post.
Create a "Contact" page with the form
Create a similar Contact page, but in the right corner, under "Template suffix", choose "page.contact".
3.3 Blog Posts
Blog section you are not required to have, but if any will help a lot for SEO optimization. You can post blog posts related to shopping trends, beauty tips, tips, ...
At the Blog posts interface, select "Create blog post" to post your blog.
Important:
3.4 Menu Nagivation
You go to Main Menu to customize the main menu.
You can link each menu item to collections, pages or blogs.
3.5 Preferences
At the Preference, you will edit the following:
You can refer to the video below:
Above are the basic structures of Shopify that we introduce to you. In the next part, we will introduce more details for your reference.If there are any problems with using the product, please contact us to get the best support. Thanks for reading the article