Developing printing technology will be a part enhance life quality. If do you not have experience in photoshop, but you also want you or your customer can create their own design as customizing T-shirts, mugs, pillows, photos, canvas, business cards, phone cases and so on. It is very easy if your site integrated WordPress Online Product designer. WordPress Online product designer plugin is the best extension and indispensable condition for all printing website at this time.
This is a new powerful design tool that helps customers customize multiple printing products, create a complete solution for the printing business. WordPress Online Product designer is a responsive plugin packed with exclusive functionality that provides customers a great experience with the high-quality outcome. With customizable product collection, customers can get a vast artwork gallery with flexible custom options like clipart, Google font, color, style and so on. The user also adds text & number or personalized image. An online product designer simplifies a creating product process, suitable for all kinds of customers.
The design tool is easy to install and provide final outcome in the printing process. Come with many ideal features, this plugin enables the users to showcase unique ideas and make an awesome design through smooth clickable options like rotating, dragging and flipping of text & picture. The designed outcome can be shared through many social channels. Besides, an administrator can set up the price as well as manage information of your customer or all designed product easier.
You can design anything - You can design as the bag, banner, bookmark, business card, button, calendar, cap, catalog, cd cover, certificate, door hangers, envelope, invitation, label, lettering, phone case, mouse pad, mug, notepad, photo album, poll sign, postcard, posters, shoe, signage, sticker, tag, t-shirt, x stands,…
HIGHLIGHT FEATURE
Add text and curved text
Add art features
Uploading Images
Free Hand Drawing
Add QR Code
Powerful Layers
Powerful Help Tool
Easy preview with zoom function
Get photo dropbox, google drive
Assign a user as a designer
Share Design
Design Profile Template page
Save design for later
Export Design to SVG
Export design to JPG high revolution, CMYK mode, and ICC profile
Order again the previous order which includes design file
Get design from the wishlist, cart and design Store
Upload Design without custom design
Update the gallery page
Above is a short introduction to the product WordPress online Design plugin. For more details about the product, please visit the WordPress NB Designer Plugin. If you want to try this product, please access the WordPress Online Design Plugin Demo. If you like this product and have any questions, please contact our Sales Consultant Manage or give your question here. Thank you for reading and keep following us to get more information in the next article! Bye, See you soon!
As you know, for a website, especially in printing, having a range of products is not enough, because the needs of customers are unlimited, you need a tool to help your customers get what they want.
Woocommerce product designer plugin is the solution for you. It will ensure that your customers can have printing products bringing their own style, make them be unique among the crowd. The strength of this WordPress plugin is motivating the creativity of everybody.
Preferred products must always come with the outstanding features. To be a plugin that is popular and trusted by thousands of customers, Woocommerce Product Designer must have outstanding features that are not available in any other equivalent products. So what are those highlight features?
Let's go and see how it suits you!
1. Add text and curved text in NBdesigner
Shopper can add text with various colors, fonts, and sizes. Especially, they can curve text in their design and edit anything of text as shadow, pattern, rotate, opacity, outline, line height, background, etc. View detail here: Add text in Wordpress online design plugin
Any text and font are available for your choice.
There are plenty of fonts being included in Font Category, shopper can find it by pressing ‘More button’.
Font style includes italic, bold, underline with full type of alignment such as left, center, right or justified.
Font color is varied.
Text background is available and changeable.
Text pattern is available.
Creating text shadow according to dimension X or Y. Shadow blur, opacity, shadow color also can be changeable.
Line height, font size and opacity are changeable.
Outline’s color and size are changeable.
Text layer can be measured.
Text can be turned, curved or rotated/reversed.
Spacing is changeable.
Default style such as arc, straight, small to large, large to small top, large to small bottom is changeable.
2. Add art feature Easily
You can add art, change colors, move, resize, rotate and delete art, flip, center function and so on
Art’s color can be customized.It not only give an easy way to manage color but also allows customers to change color of each part on this image
Art can be rotated and changed its opacity.
Art can be zoomed in or zoomed out.
Art can be moved or deleted.
Multiple arts can be added.
3. You can upload images quickly
If shopper don’t satisfied with sample picture, they can upload images as they want. They also can select from different many sources as Facebook or enter image’s url.
Picture can be uploaded from local, url or social network such as Facebook.
Temporarily saved uploaded files for later use.
Uploaded file is typed as PNG, JPG, GIF. Its maximum size can be adjusted in backend.
Art can be zoomed or rotated.
Creating text shadow according to dimension X or Y. Shadow blur, opacity, shadow color also can be changeable.
Picture’s opacity can be customized.
Four types of quick-changing picture are available.
Picture can be turned via tool.
Picture crop styles are varied such as crop tool, lasso tool, heart shape, round or star shape, etc. The picture can be reset back to its origin.
4. Improving UX with free-hand drawing
Especially, you also can use many available brush to draw, you can create your own signature.
Drawing brushes such as pencil, circle, spray, pattern, square, texture are available for different choices.
Brush and brush width color can be changed.
Add available geometries as rectangle, circle, triangle, line and polygon. And can change color, rotate, opacity.
Picture can be turned or zoomed.
Picture’s opacity can be customized.
5. More professional by add QR code feature
You can create QR code and then add to your design
Text or QR codes can be added into picture.
Picture can be zoomed.
Picture can be moved or rotated.
6. Powerful layers
Drag and drop to sort layers and change layers of items
Layer position can be dragged to different positions.
Layer(s) can be deleted partly or entirely.
Scroll can be created when multiple layers exist.
Certain buttons are used to quickly change layer’s position.
Layer can be displayed or hided easily.
7. Powerful help tool
More tools are included extension as next, zoom in, zoom out… All buttons are arranged clearly for convenient use.
Double player
Next to the left, right, up or down
Layer can be reversed from left to right or from above to below.
Vertical align, horizontal align
Layer can be zoomed.
Layer can be deleted.
8. Easy preview with Zoom function
After designing, you can preview it with zoom and view function
Review all design.
Zoom in for details.
Popup full screen.
9. Other features of woocommerce product online design
Easy to use. Shopper can easily use this product, it is very friendly with customers, and special it is very simple to use.
Compatible with WooCommerce. This plugin is an extension of WooCommerce plugin that allows your users to design products easily
100% responsive and mobile friendly. You can design on any device as desktop, tablet or mobile
Various fonts. There are many fonts are included in this product. Admin also can add more fonts if they want
Easy manage products with online design. Products with online design on Front-end will be add on checkbox to distingue with Product without online design
Flexible config. You can set size upload, preview thumbnail size, thumbnail quality, show customer design in cart, show customer design in order, admin notifications,….
Easy view detail design of customer. After customer design, admin can view detail design of customer in order management page in backend
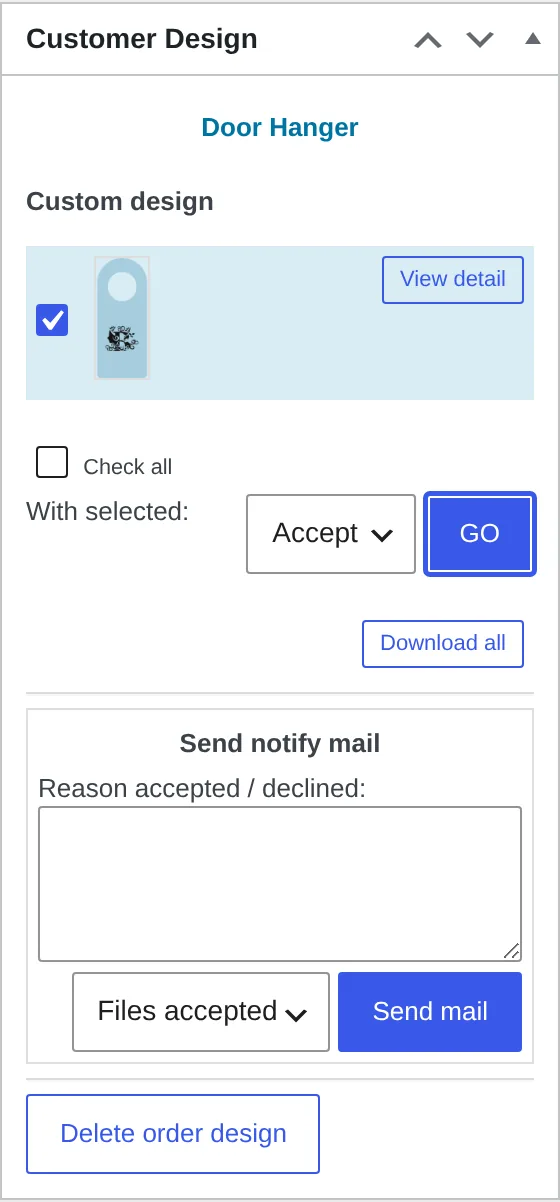
Accept or decline design and send email. After receiving your design, Administrator will consider and send an email notification to customersto inform that their design is accepted or rejected.
Customer design again easily. If your design is rejected, please go to your account to design again. You can design until approving.
Power helpdesk. The customer can easily design with power helpdesk.
Above are some highlight features in the WooCommerce Product Designer plugin. I hope the post brought you much useful information. If you want to try this plugin, please click WordPress Online Product Design DEMO! If you have any questions about the product, please contact the CMSmart Support team or Mr.Vincent at the contact information below. They will answer all of your questions. Remembering to use coupon code MAR_DL to get 18% discount for this item.
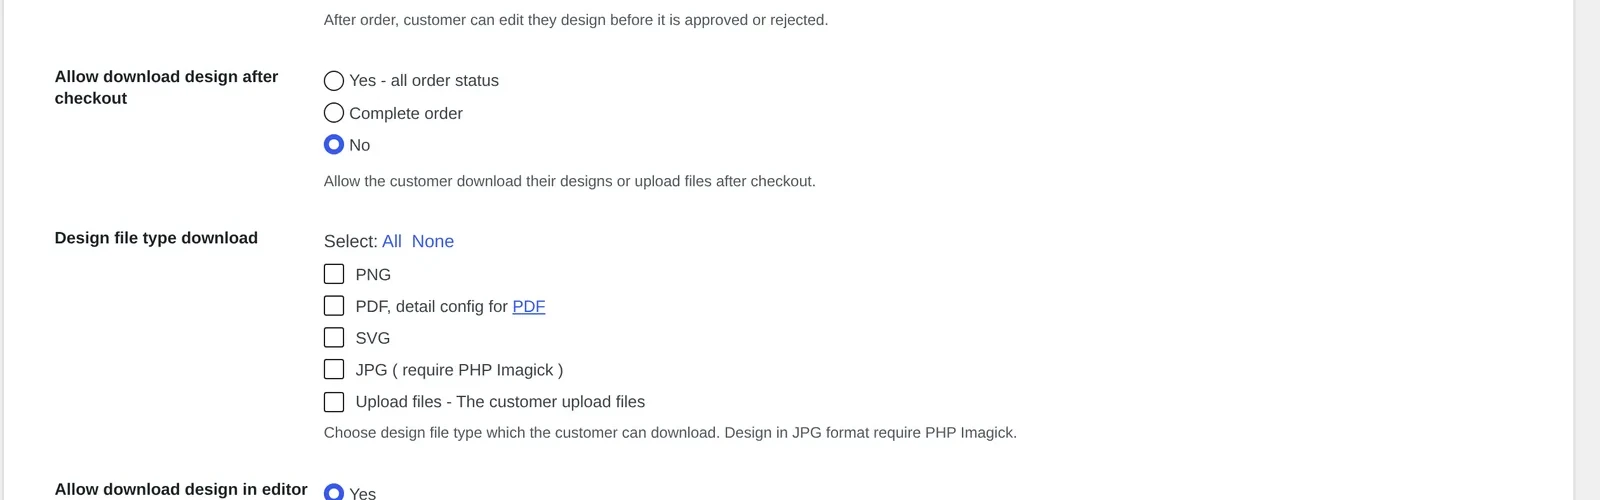
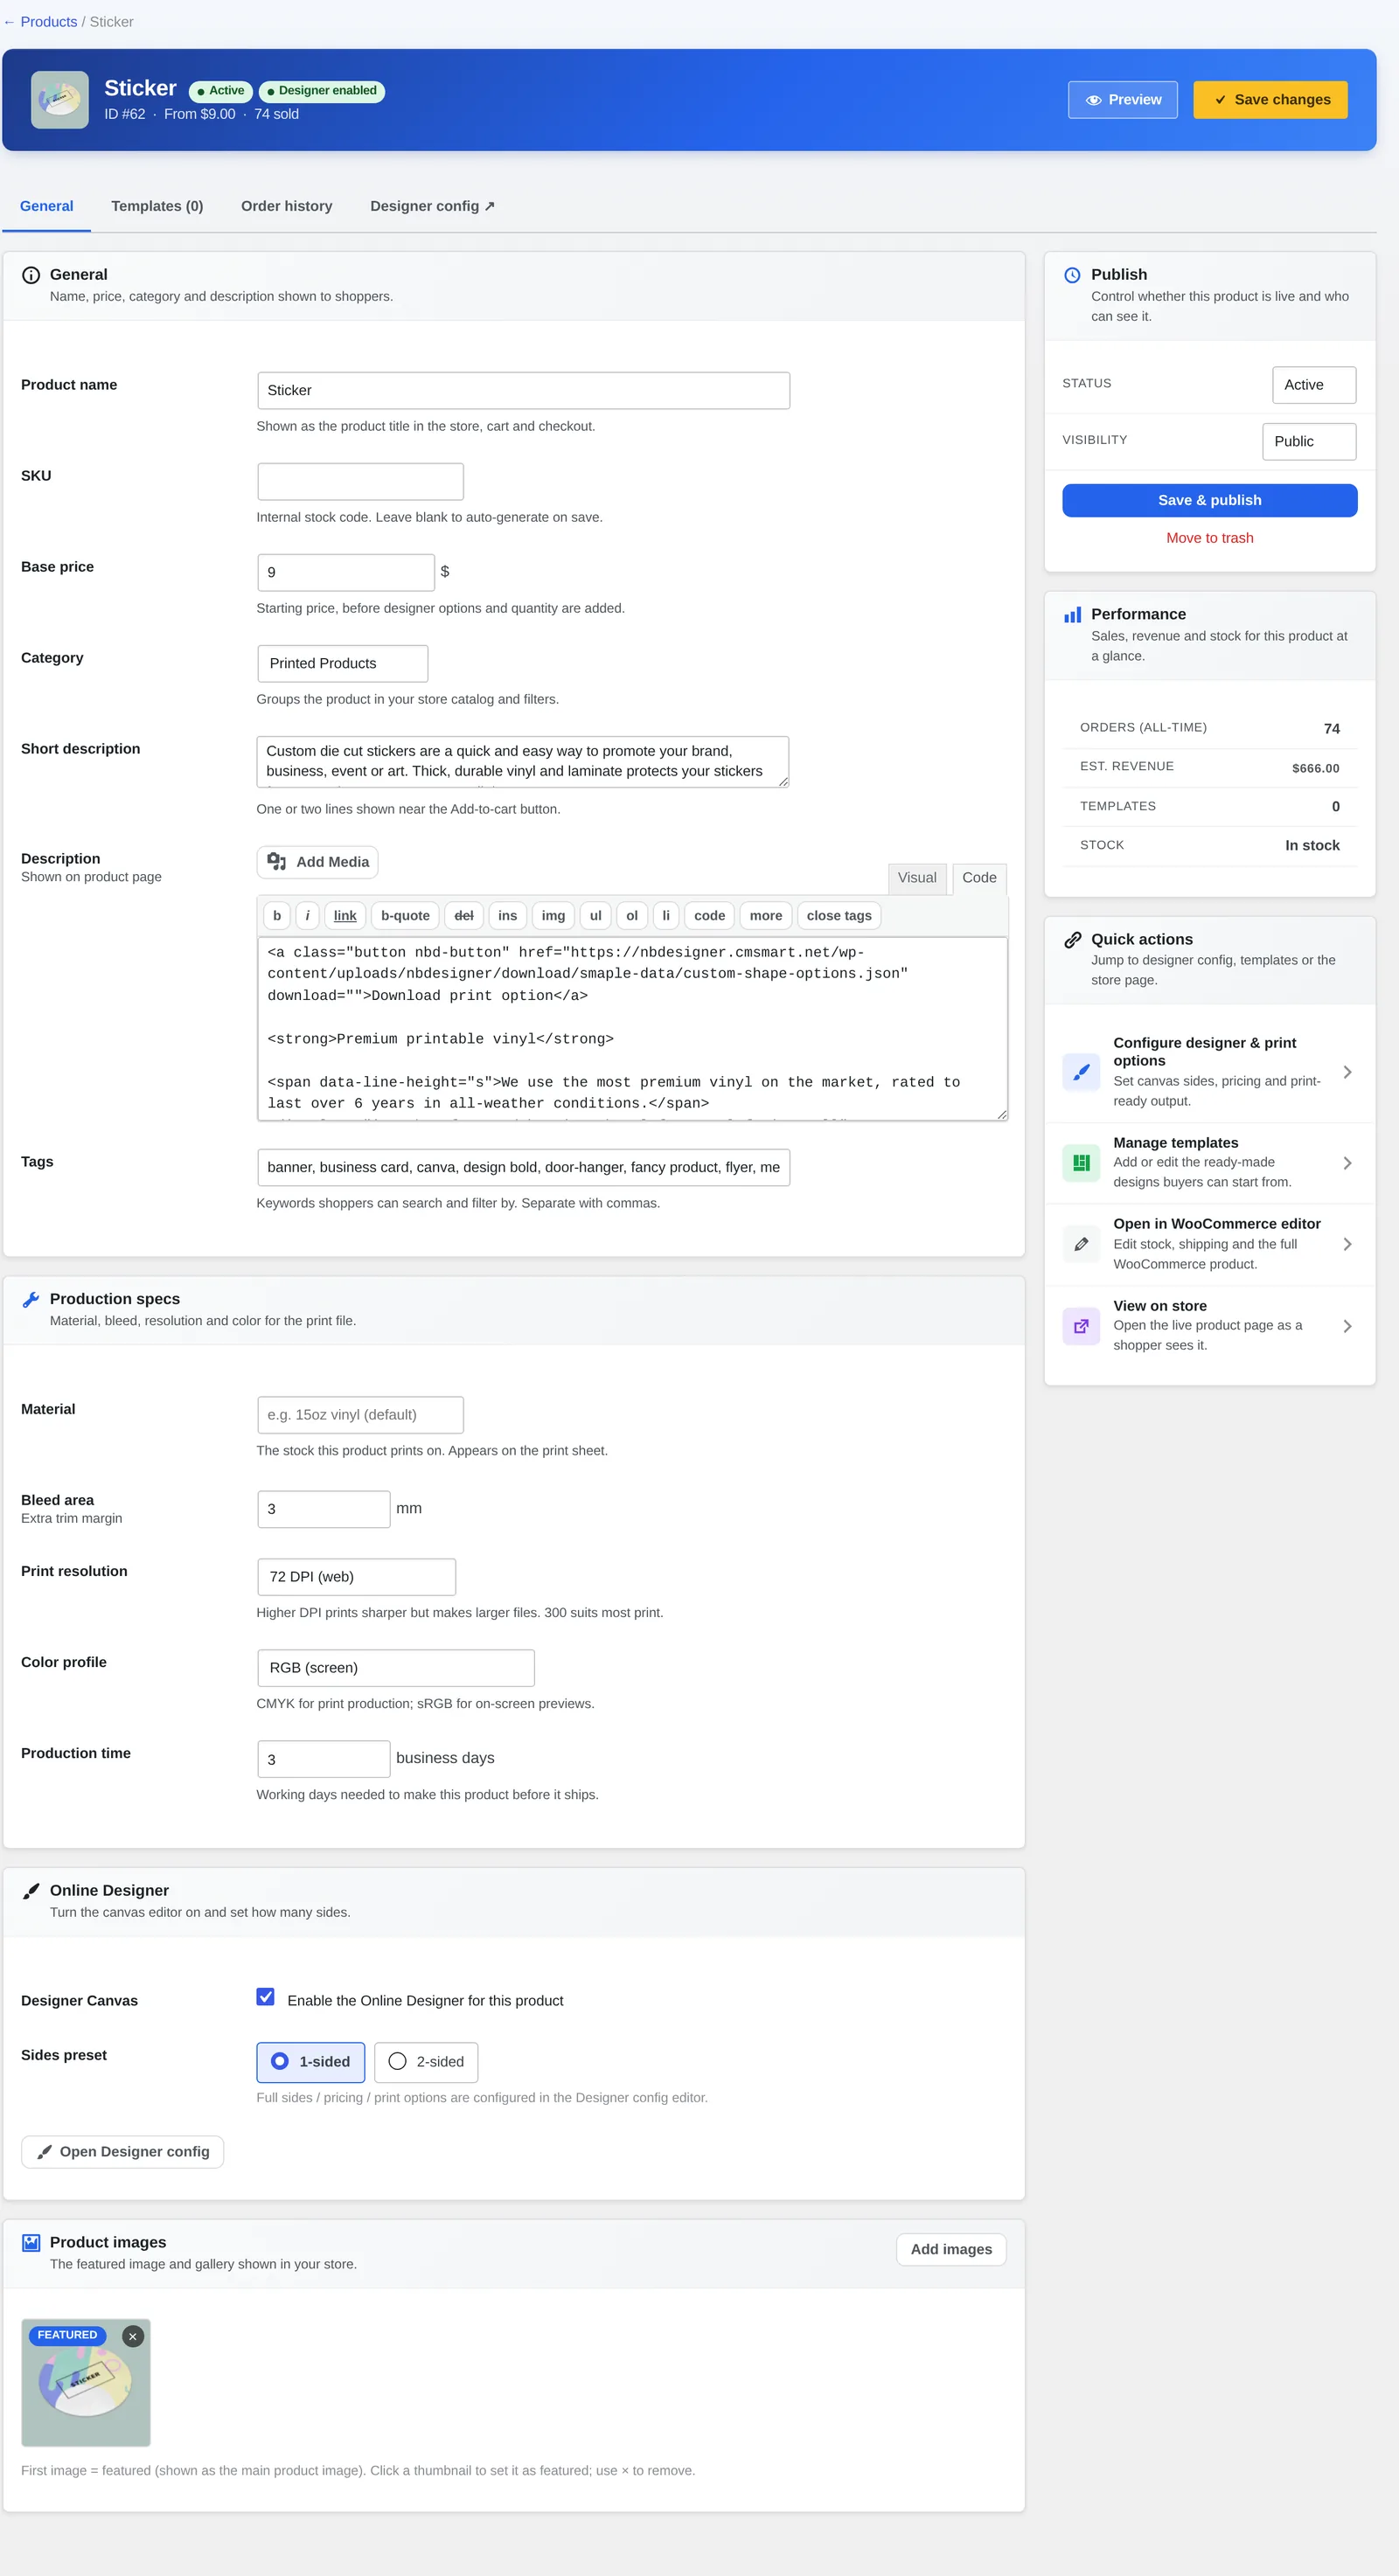
Applies to Cmsmart Product Designer (NBDesigner) 2.17.0 · Updated October 2026. Confirms the WordPress, WooCommerce and PHP versions NBDesigner needs today, plus the server settings its upload and print-ready PDF pipeline depend on.
In short
Get the server right once and you stop losing hours to blank product pages, failed logins to the online designer, or print-ready PDFs that time out mid-render.
NBDesigner's in-browser canvas and server-side rendering lean on specific PHP extensions, upload limits, and your WordPress/WooCommerce version — not just "WordPress runs fine."
It takes a five-minute PHP info check, a handful of php.ini values, and — if your host won't change them — Cmsmart can configure or migrate the hosting as part of setup.
NBDesigner system requirements are more specific than a generic WordPress checklist: Cmsmart Product Designer can look perfect in the demo and still show a blank product page, refuse to save a design, or hand you a print file with the wrong colors the moment it lands on a server that misses a few exact settings — and nearly every one of those failures traces back to PHP, WooCommerce, or an upload limit your host configured years ago and never revisited.
What does it cost you when your server misses NBDesigner's requirements?
Cmsmart Product Designer (NBDesigner) runs its own JavaScript canvas plus server-side PDF rendering, so a host that satisfies a generic WordPress checklist can still miss the PHP extensions, upload limits or WooCommerce version NBDesigner needs — blank product pages, stuck logins to the online designer, and failed print-ready exports usually trace back to exactly one of these gaps.
The pattern repeats across support tickets from print shops and POD stores alike:
Blank or partially loaded product page. The designer's modern editor needs enough PHP memory and a current browser-facing build of WordPress/WooCommerce; a tight memory_limit or an ancient PHP build cuts the page off mid-render.
"Can't log in to admin Online Designer" or the selected product shows blank. Classic symptoms of a low PHP configuration limit (execution time, memory) rather than a broken install.
JPG proof downloads fail silently. NBDesigner's own Settings screen flags this directly: JPG design downloads need the PHP Imagick extension enabled, or that one file type never generates.
Uploads get truncated or rejected. NBDesigner's own Upload design settings let you cap file size per product (Cmsmart's demo store sets this to 100 MB) — but if the host's upload_max_filesize is lower than that, the host silently wins and customers see a rejected upload.
Print-ready PDFs stall or render with missing colors. The cloud and server renderers depend on the same PHP extensions (ImageMagick/GD) and a reachable Ghostscript binary; when one is missing, the Overview screen raises a system-health alert instead of a finished PDF.
The cost rarely shows up as a single outage — it shows up as a support ticket cycle: (hours your team or your host spends diagnosing) × (your blended hourly rate) + (orders paused while the designer is down) × (your average order value). On a store doing even a few web-to-print orders a day, that formula adds up fast, and it repeats every time a host-level update quietly changes a PHP setting.
NBDesigner's own settings screen calls out the PHP extension a feature needs — JPG downloads require PHP Imagick.
What does a correctly provisioned product designer look like for your store?
When your server already matches NBDesigner's requirements, Cmsmart Product Designer opens instantly on every device, saves every design on the first try, and hands production a print-ready PDF with no manual troubleshooting — the infrastructure disappears and only the buying and designing experience is left.
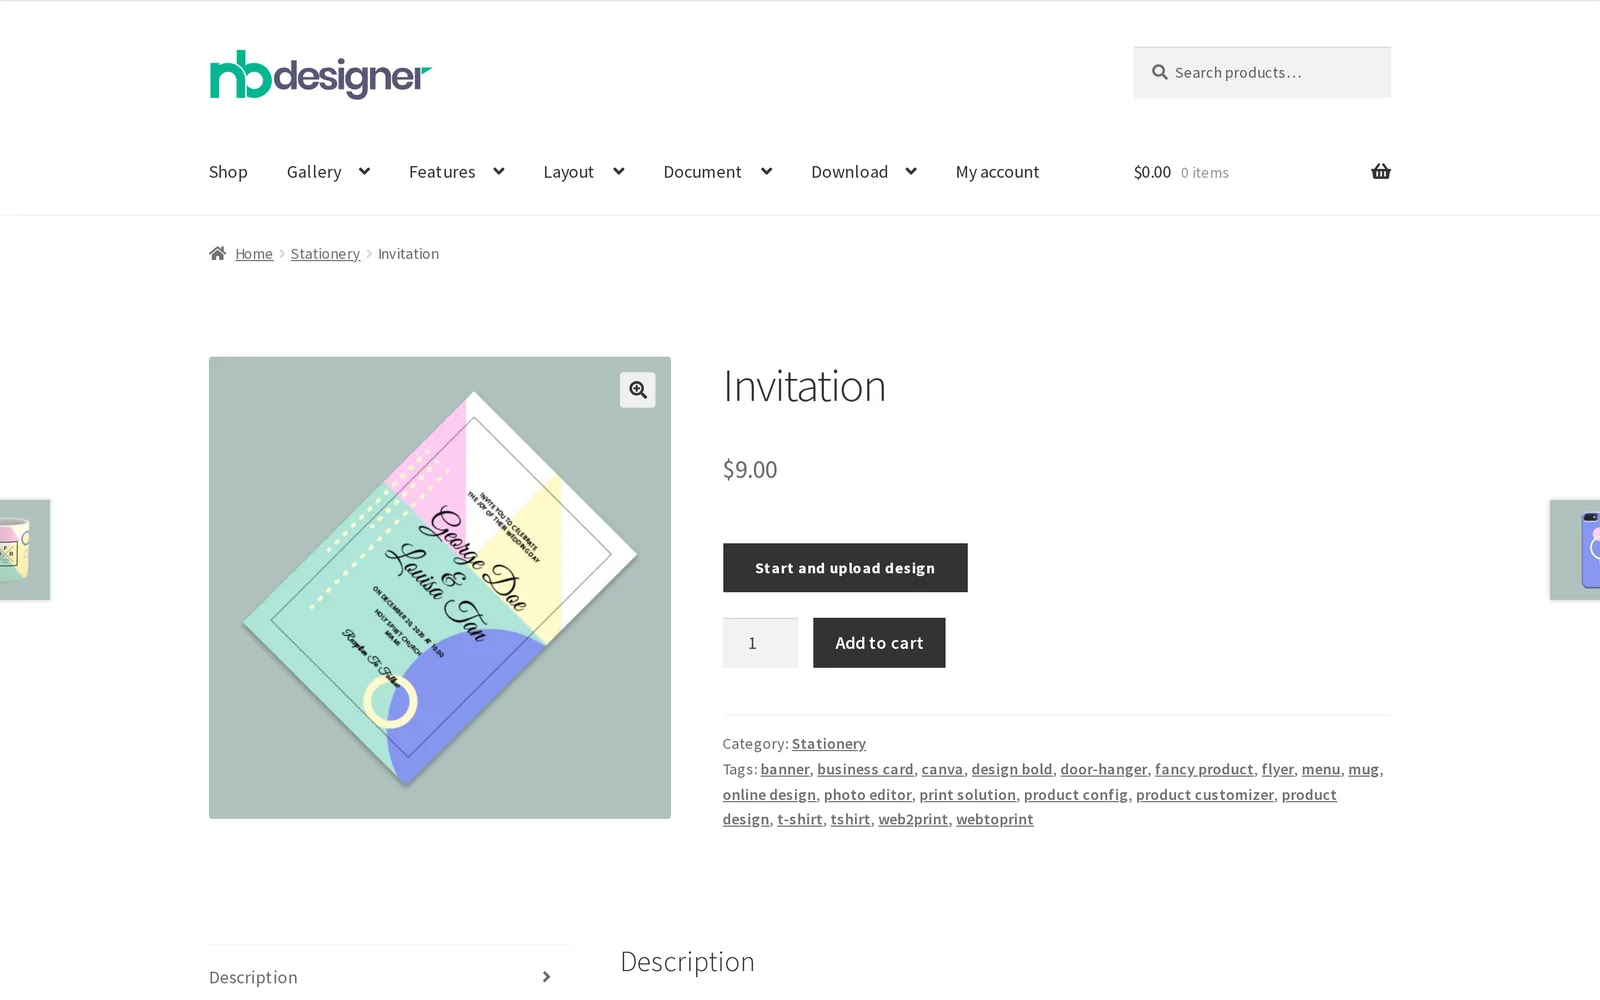
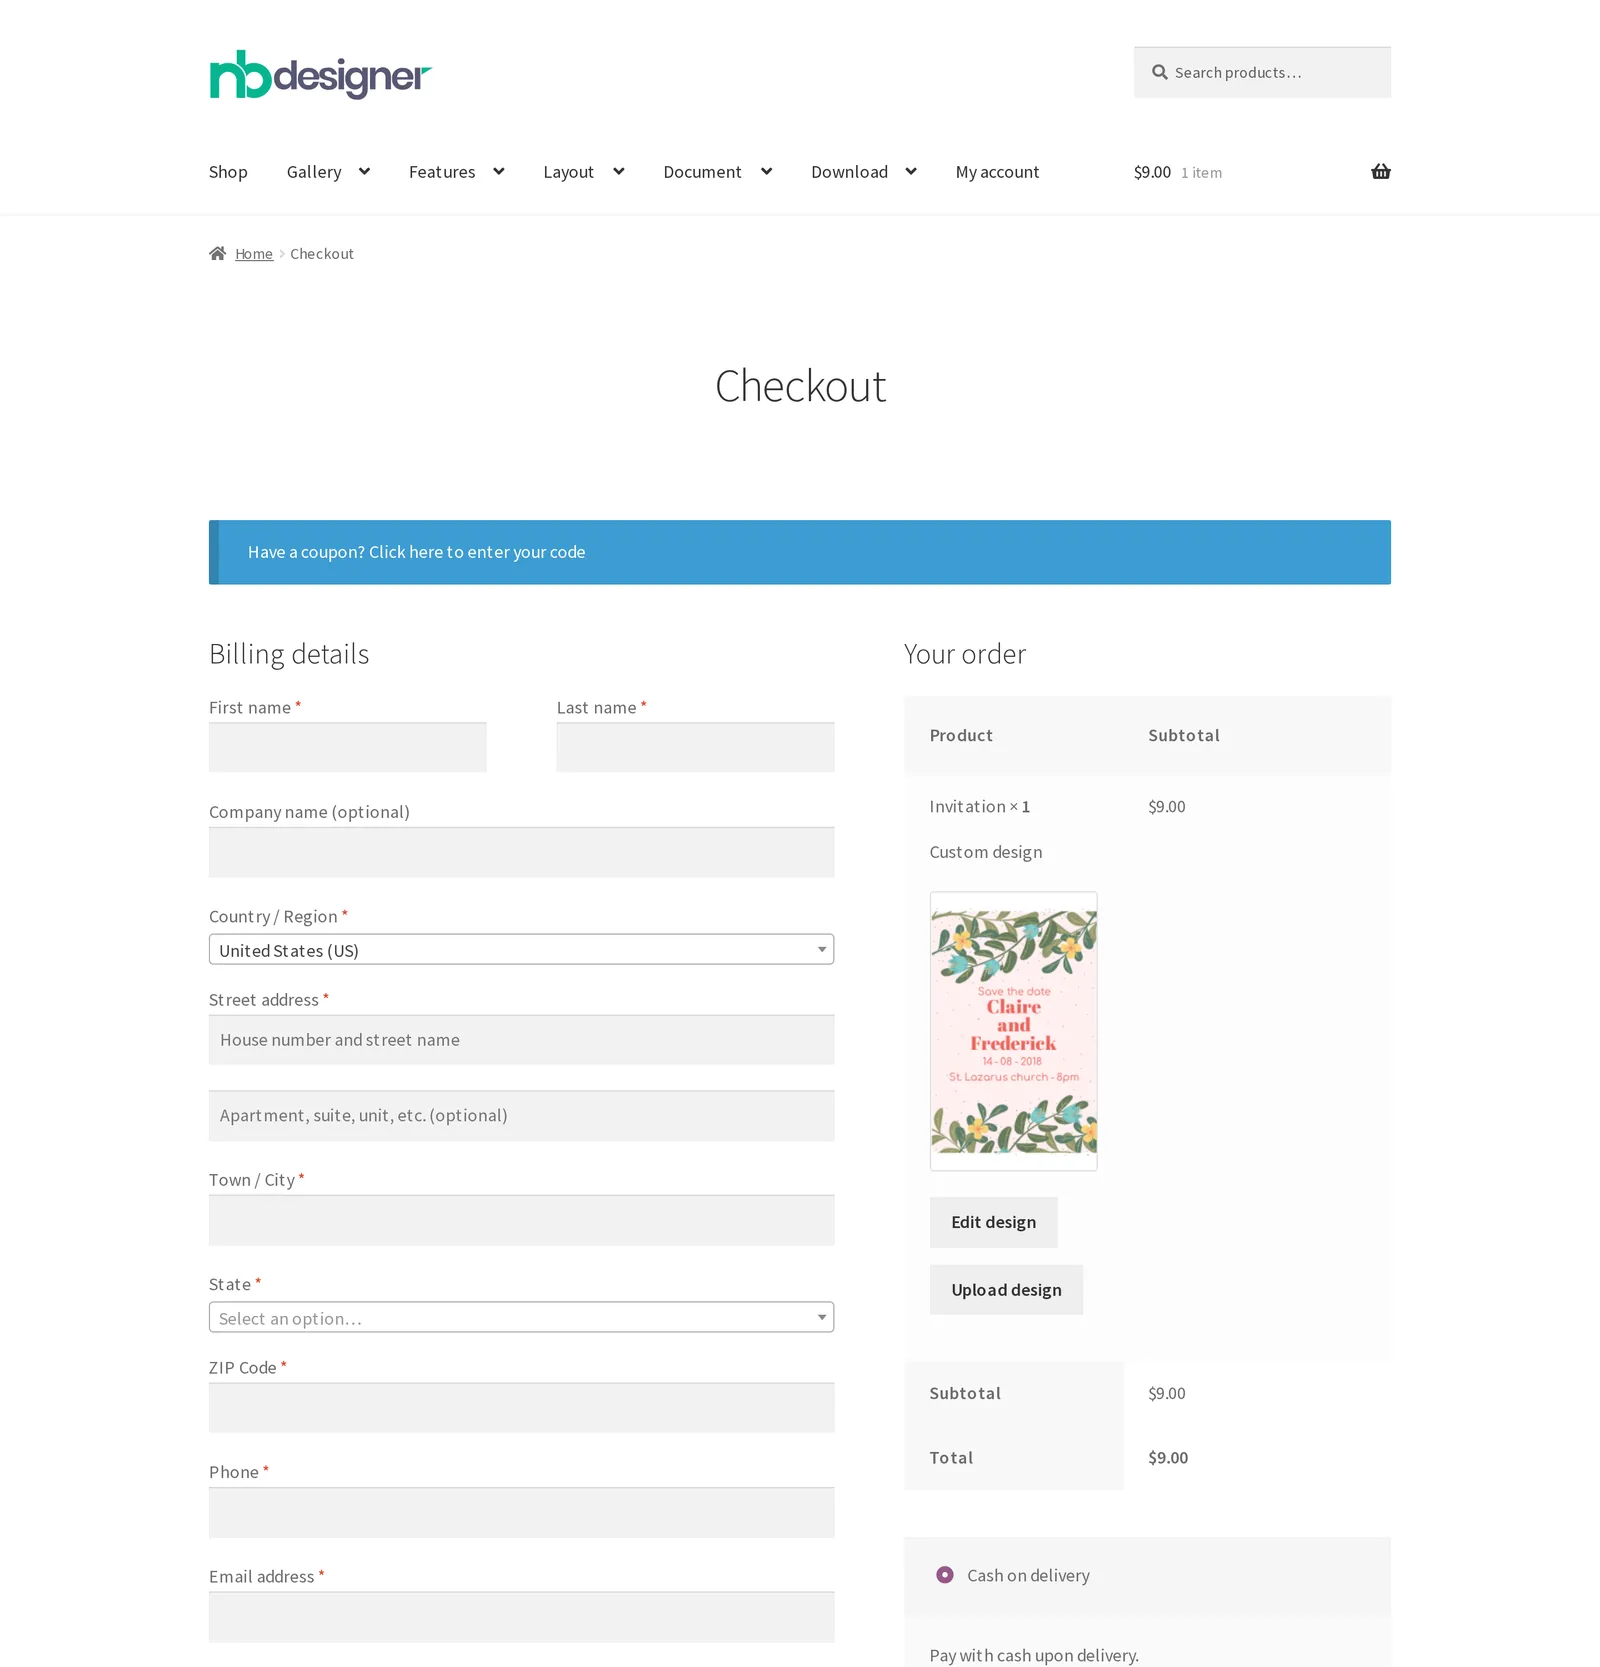
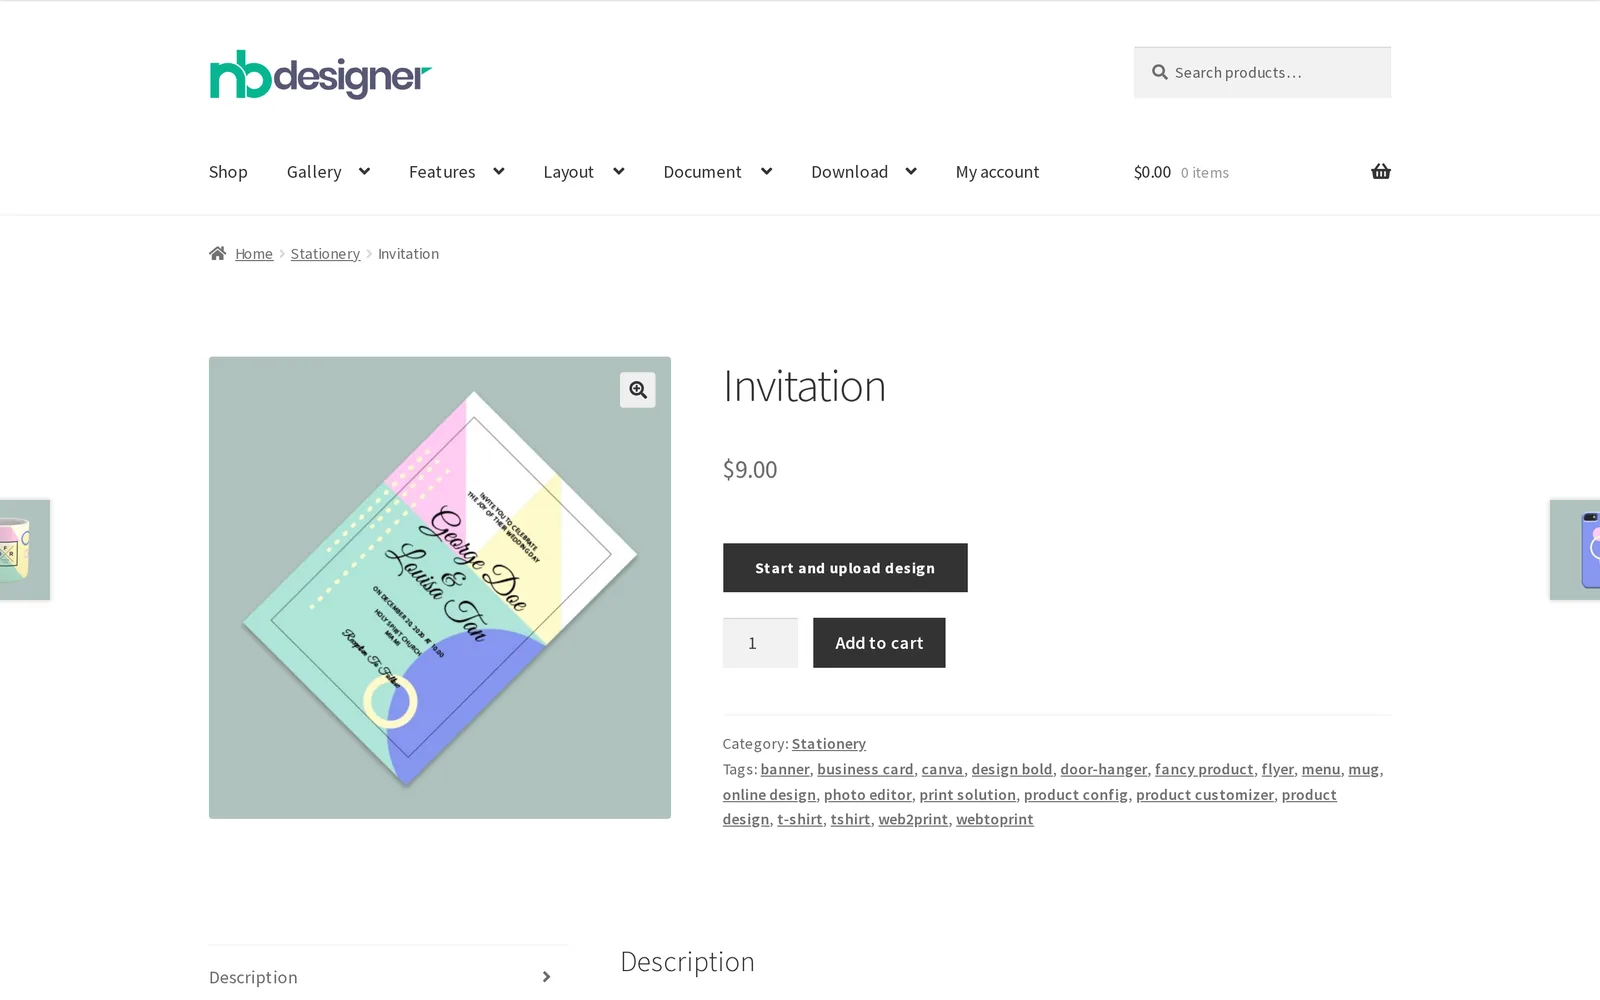
Example scenario: a buyer opens your invitation product page on their phone at 10 p.m., taps the design button, builds their layout in the online editor, and adds it to cart without a stalled spinner or an unresponsive page. At checkout, the design preview travels with the line item. The next morning, your team opens the order, clicks Create PDF once, and a print-ready file with the correct bleed and color profile is sitting in the downloads list before the first coffee, instead of stuck in a queue because Ghostscript couldn't be found.
Cmsmart insight: in our setup work, the single most common reason a designer that worked fine in testing breaks in production is a shared-hosting plan that silently reset upload_max_filesize or disabled an image extension during a routine host update. Check the server values again after any hosting-side change, not just at launch.
How does Cmsmart's product designer stack meet NBDesigner system requirements?
Cmsmart Product Designer (NBDesigner) is built on five layers — WordPress/WooCommerce core, the PHP runtime and its extensions, upload handling, the print-ready output pipeline, and the license/update layer — and Cmsmart verifies all five are correctly configured as part of every setup engagement, in the plugin today or built around it as custom development.
Five building blocks, and what each one needs to run well:
WordPress + WooCommerce core — the storefront, cart and checkout NBDesigner's design data attaches to.
PHP runtime and extensions — Imagick or GD for image processing, JSON support, and enough memory/execution time for the modern editor and the server-side renderer.
Upload and storage settings — upload_max_filesize, allow_url_fopen, and fix_pathinfo, which NBDesigner's own system-check guidance calls out directly.
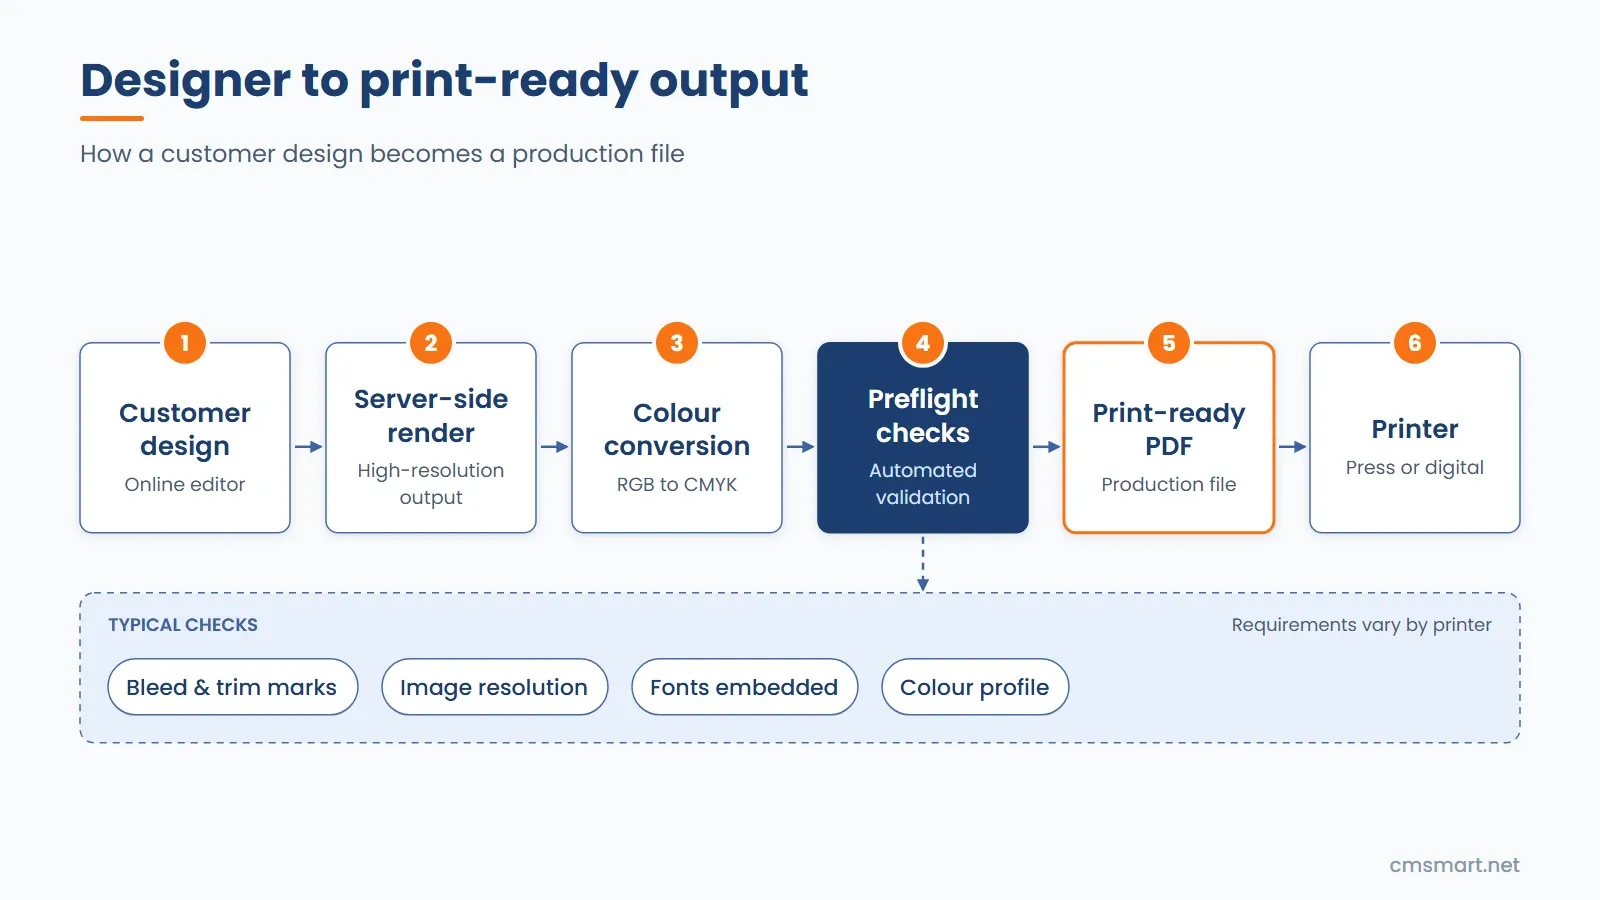
Output pipeline — Ghostscript/ImageMagick (or Cmsmart Cloud's managed rendering) turning a saved design into a print-ready PDF with bleed, embedded fonts and the right color profile.
License, updates and health — the Plugins screen and NBDesigner's Overview screen, which raises a system-health alert the moment ImageMagick, GD, Ghostscript or the uploads directory stop behaving (added in the 2.10.0 changelog), rather than letting a render fail silently.
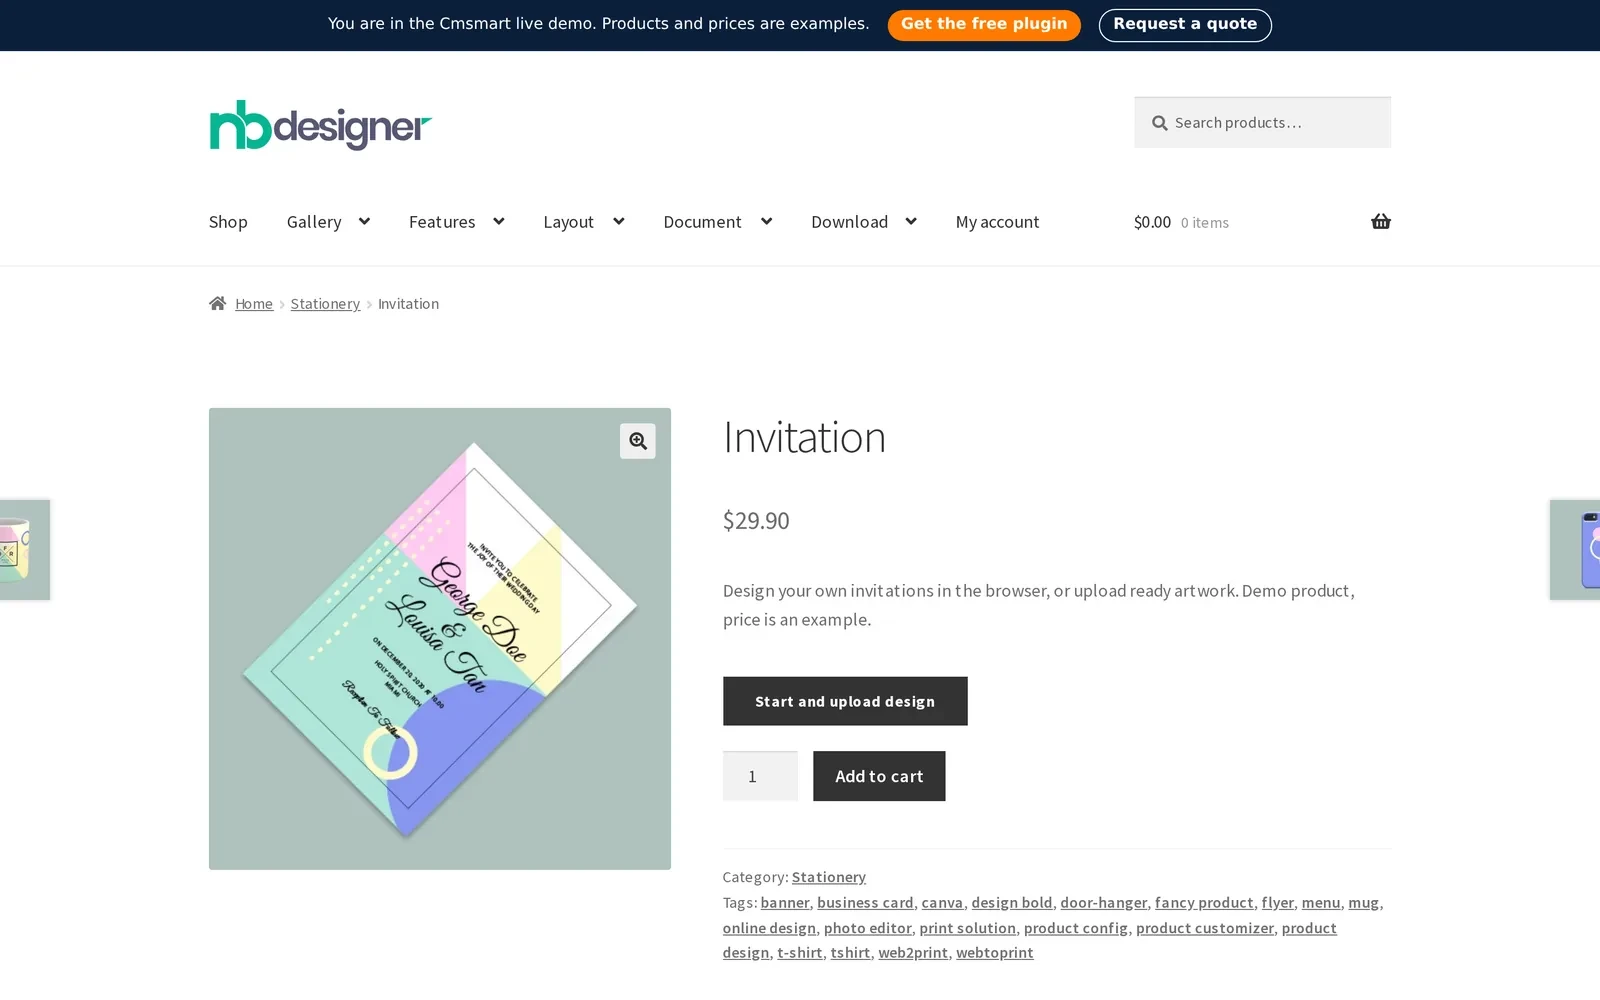
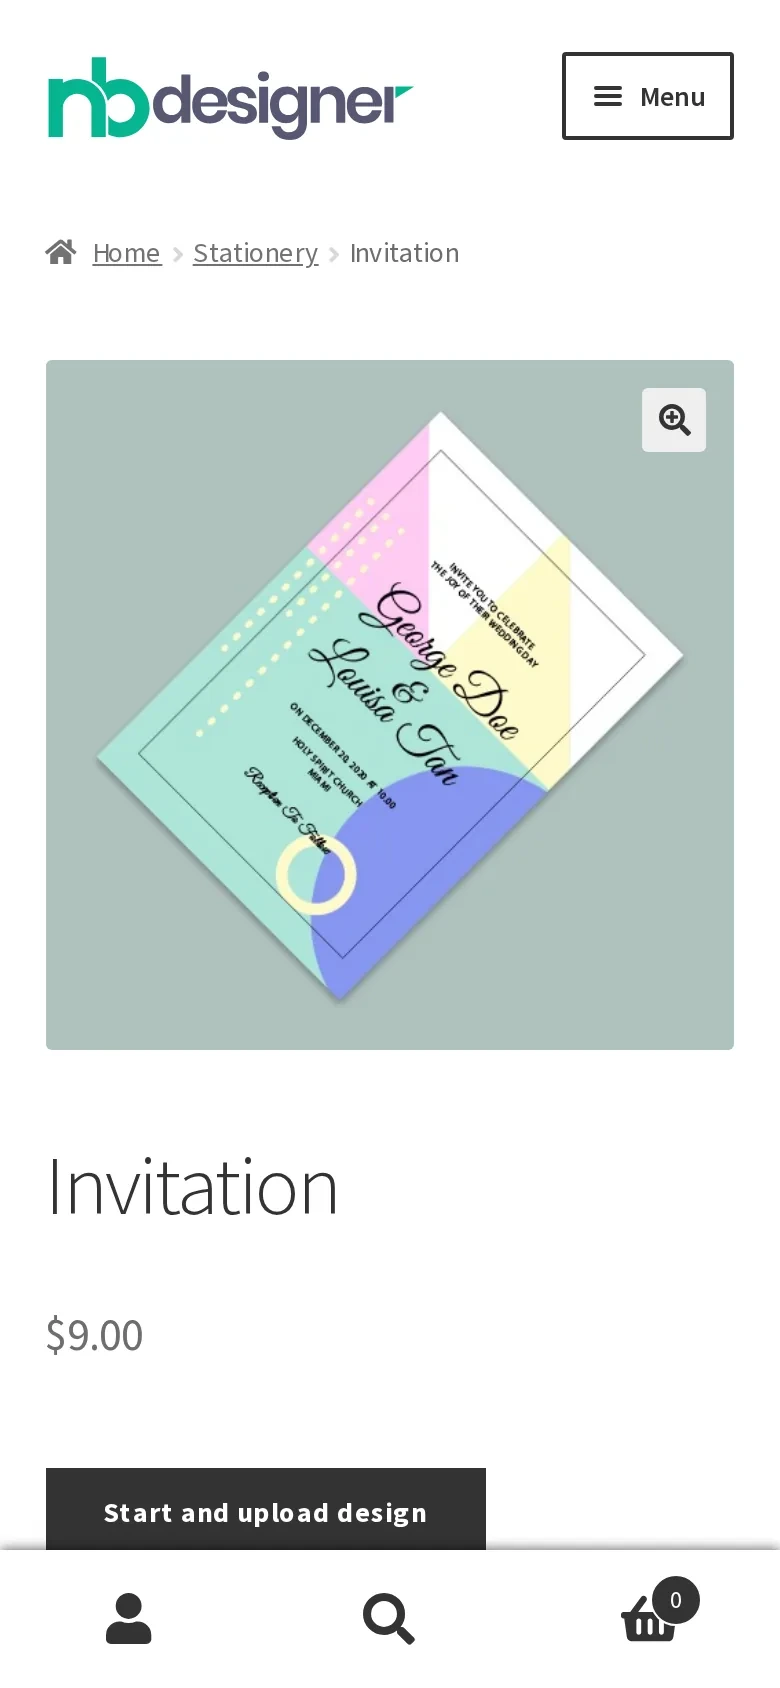
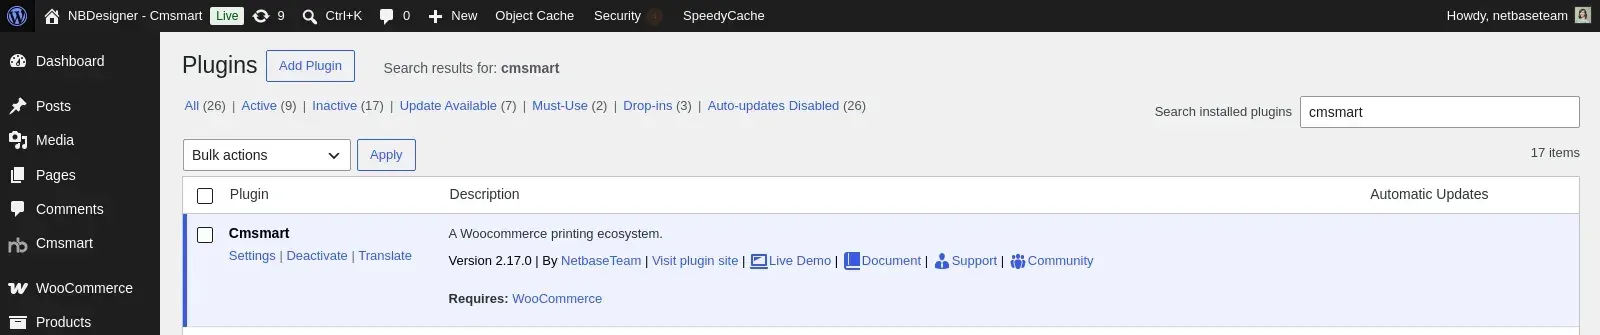
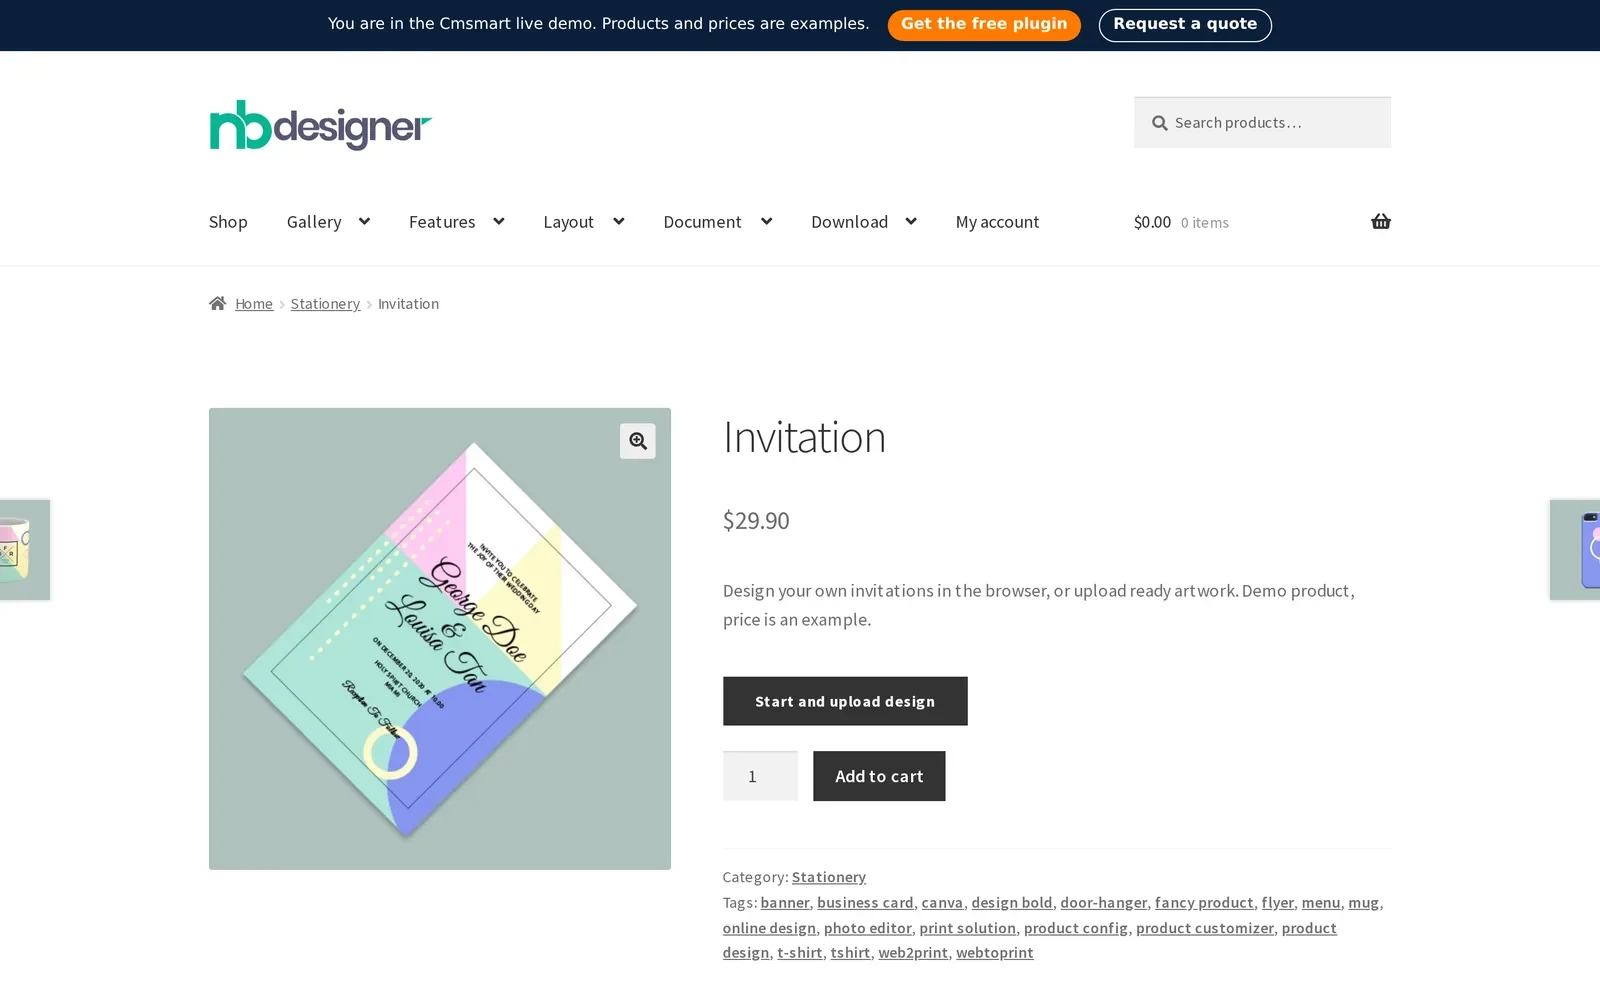
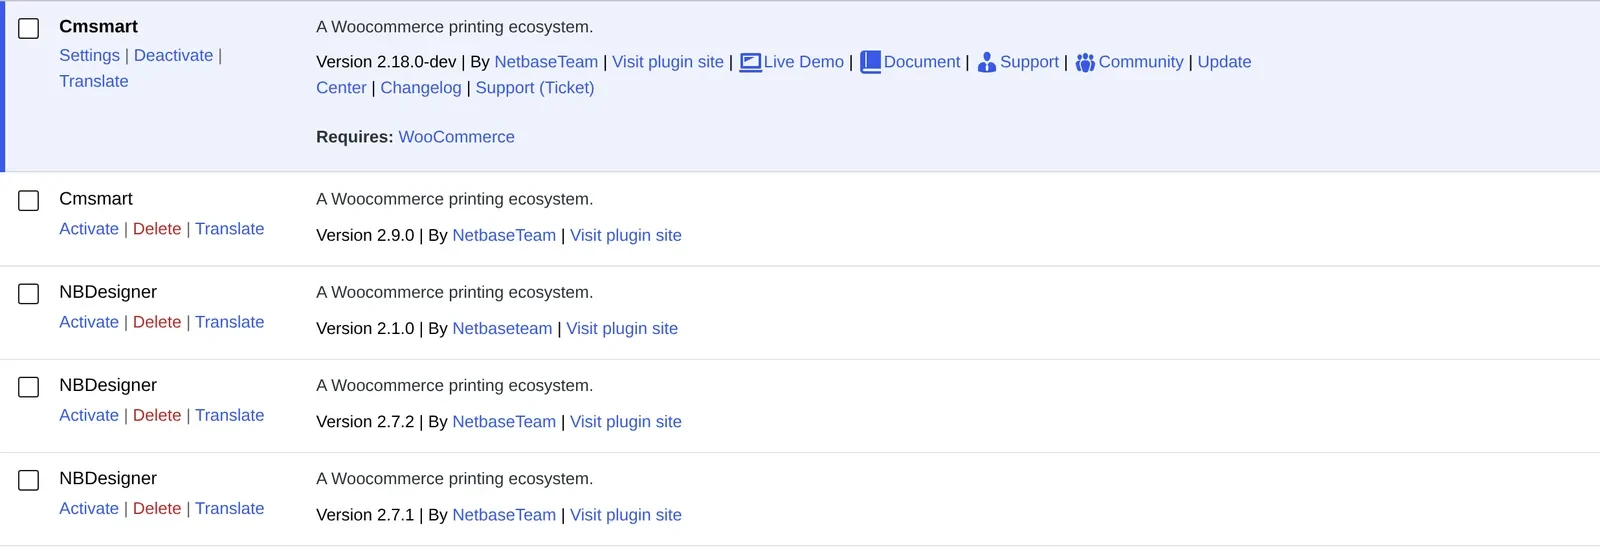
The Plugins screen confirms the version you're running and lists WooCommerce as NBDesigner's one hard plugin dependency (this capture is from a newer development build; your own Plugins screen will show the 2.17.x release number).What a correctly provisioned storefront looks like: the product page and "Start and upload design" button load without delay.
Planning the upgrade path when your store still runs an older stack across multiple sites
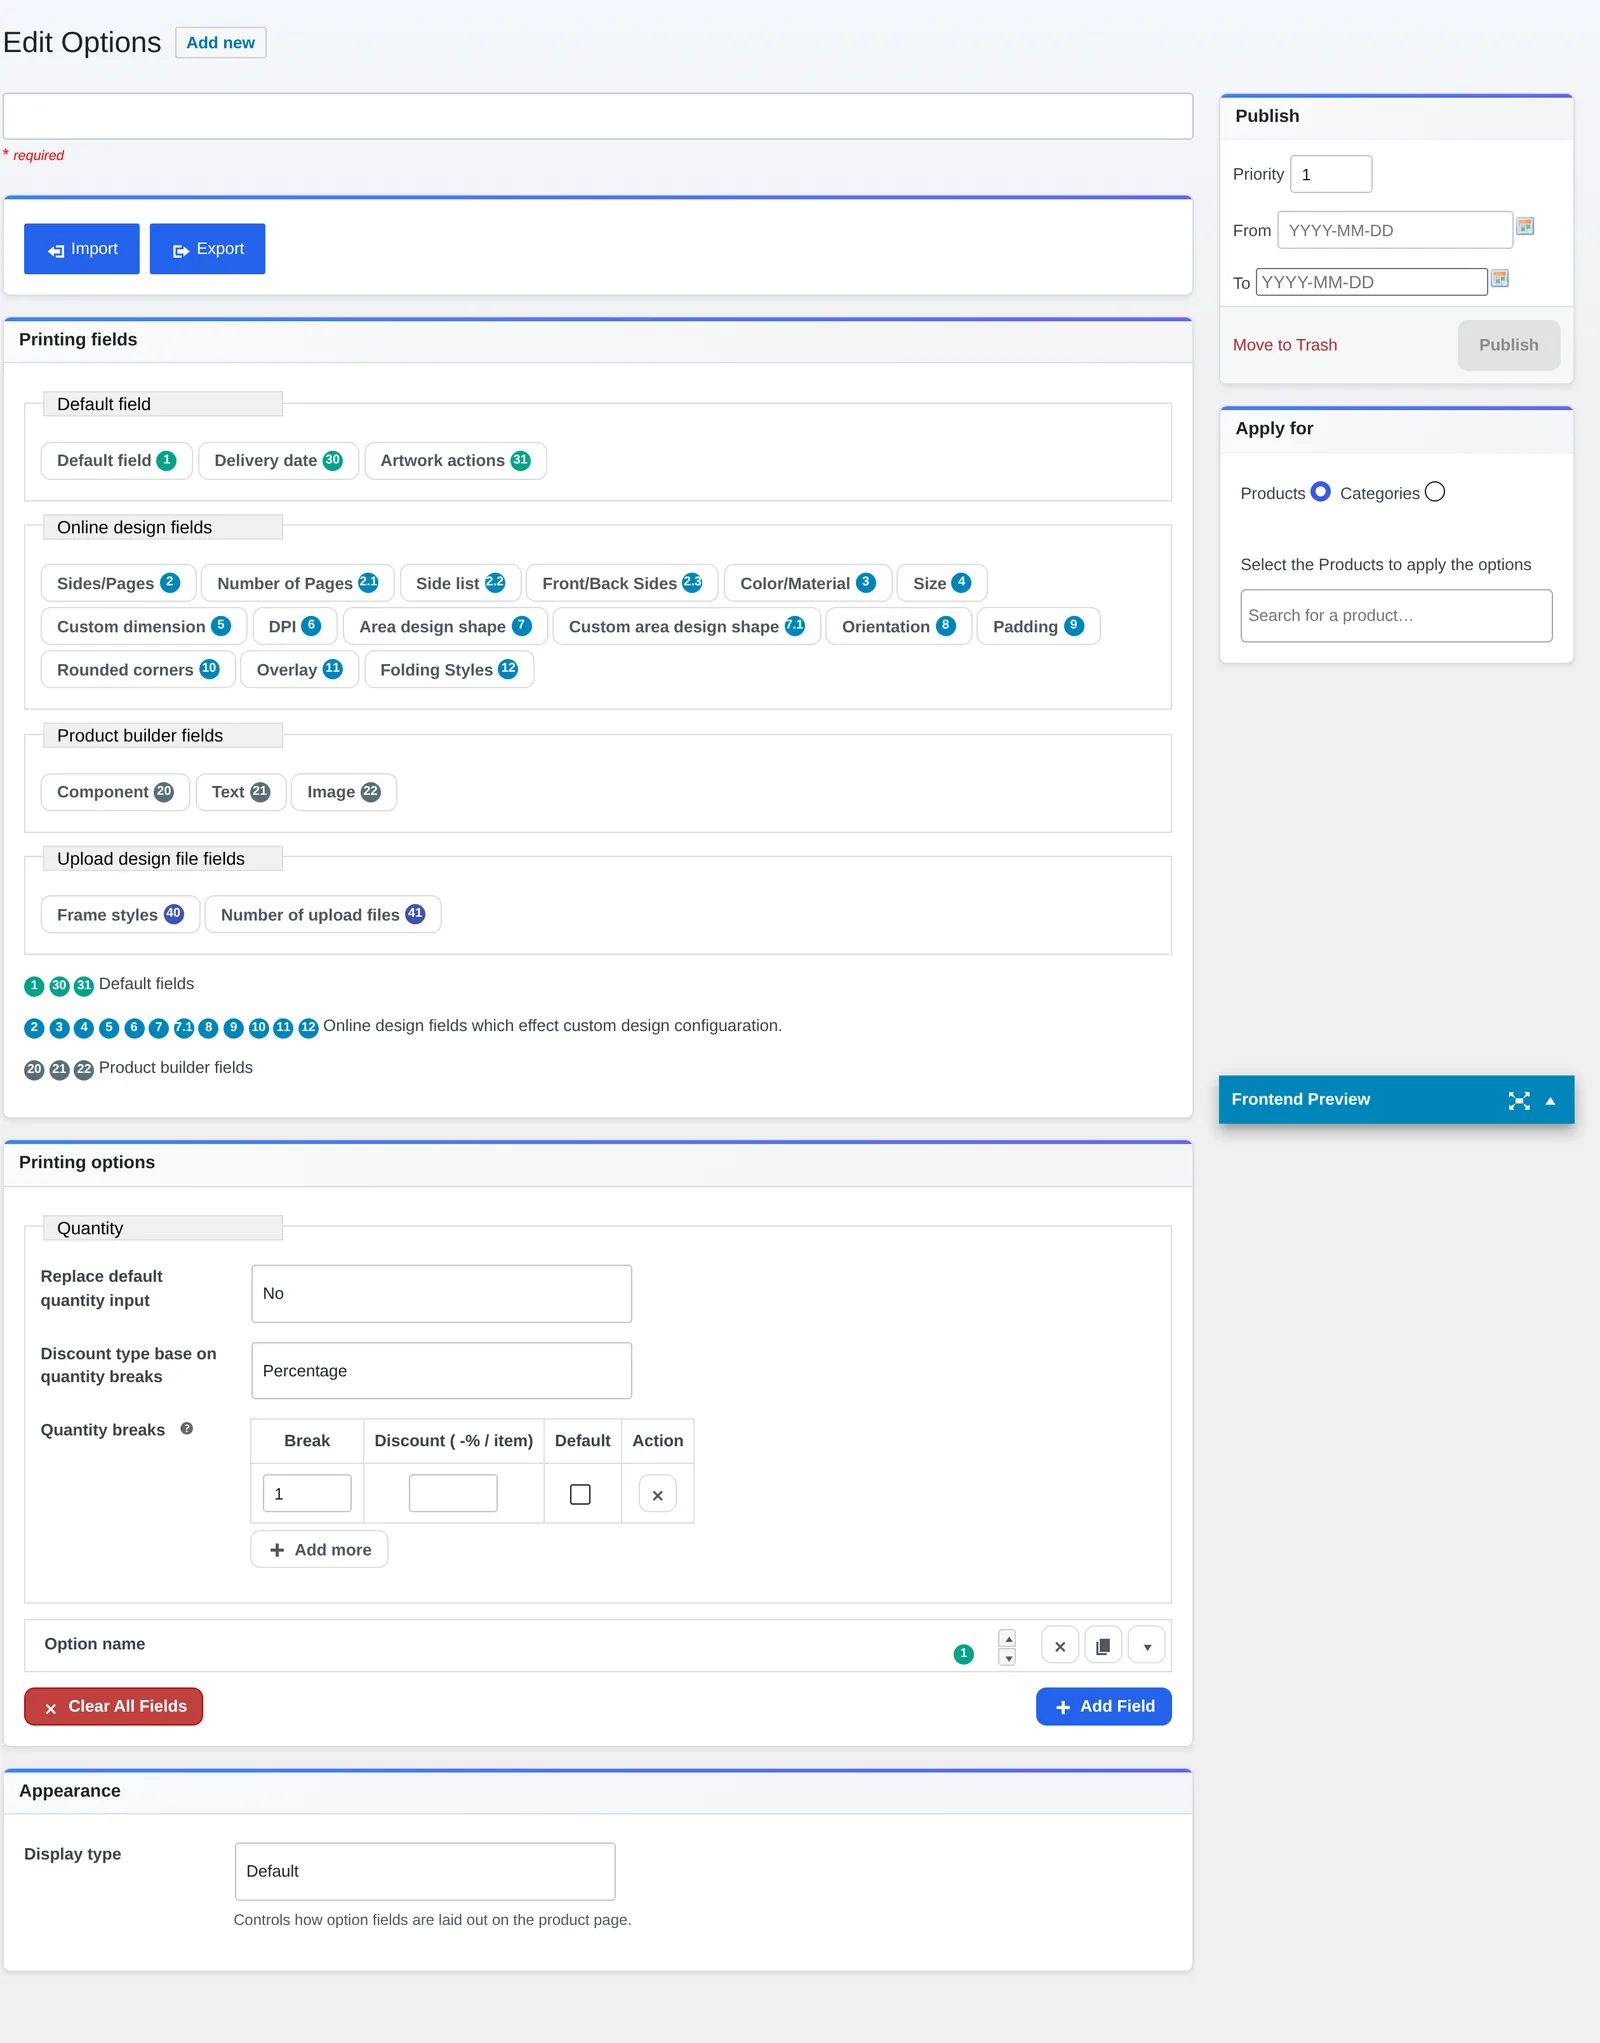
Upload limits
Configurable per product in Settings > Upload design (Cmsmart's demo store caps it at 100 MB)
Negotiating host-level upload_max_filesize/post_max_size increases on locked-down shared hosting
PDF/image extensions
Uses PHP Imagick/GD and Ghostscript when present
Installing or compiling these on a restrictive host, or moving to a VPS that allows them
Health monitoring
Per-site Overview alert when a dependency is missing
A central dashboard across a multi-store or multi-vendor install
What's the business value of getting system requirements right the first time?
Matching your server to NBDesigner's requirements before launch turns Cmsmart Product Designer from a support liability into a reliable sales channel — fewer abandoned designs, fewer reprints from bad color output, and a support team that spends its time on customers instead of PHP configuration.
Benefit
How it shows up in your business
KPI to track
Fewer abandoned designs
The editor loads and saves on the first try instead of timing out mid-session
Design-started vs. design-completed rate
Fewer reprints
Print-ready PDFs carry the correct bleed and color profile instead of a fallback render
Reprint rate / cost per reprint
Less support time
Staff aren't opening host tickets to chase "blank page" or "upload failed" reports
Support hours per order
Faster go-live
Requirements are checked once, during setup, not discovered after launch day
Days from install to first live order
Rough-cut worksheet: (support hours per month spent on designer/PDF issues) × (blended hourly cost) + (reprint rate × cost per reprint × monthly order volume) = your current cost of an unverified server. Run the same numbers after setup to see what a correctly provisioned stack is worth to your store.
A correctly configured install means every one of these orders reaches production with a usable design file — no manual rework.
How do you set up and configure your server for NBDesigner?
Setting up Cmsmart Product Designer (NBDesigner) correctly means checking your PHP, WordPress and WooCommerce versions against the plugin's floor, confirming a short list of php.ini values, and testing one full order before you consider the store launch-ready.
Check your current WordPress, WooCommerce and PHP versions from Tools > Site Health or your host's control panel.
Compare them against NBDesigner's own floor — WordPress 5.6+, WooCommerce 8.0+, PHP 8.0+ (plugin readme) — and note that PHP's currently supported branches start at 8.2, so PHP 8.0 and 8.1 no longer receive security fixes; treat the plugin's floor as a minimum to clear, not a target.
Ask your host (or check phpinfo) to confirm fix_pathinfo = 1, allow_url_fopen = on, and that the server supports JSON — NBDesigner's own system-check notes call these out directly.
Raise upload_max_filesize and post_max_size to at least match what you configure in Settings > Upload design (Cmsmart's demo store uses 100 MB per file).
Confirm PHP Imagick (or GD) is enabled if you want customers to download JPG proofs — NBDesigner's Settings screen flags this requirement next to the option.
Confirm Ghostscript and ImageMagick are reachable on the server, or enable Cmsmart Cloud rendering instead, so print-ready PDF generation doesn't fail at the order stage.
Activate the plugin and check the Plugins screen shows no "Requires: WooCommerce" warning.
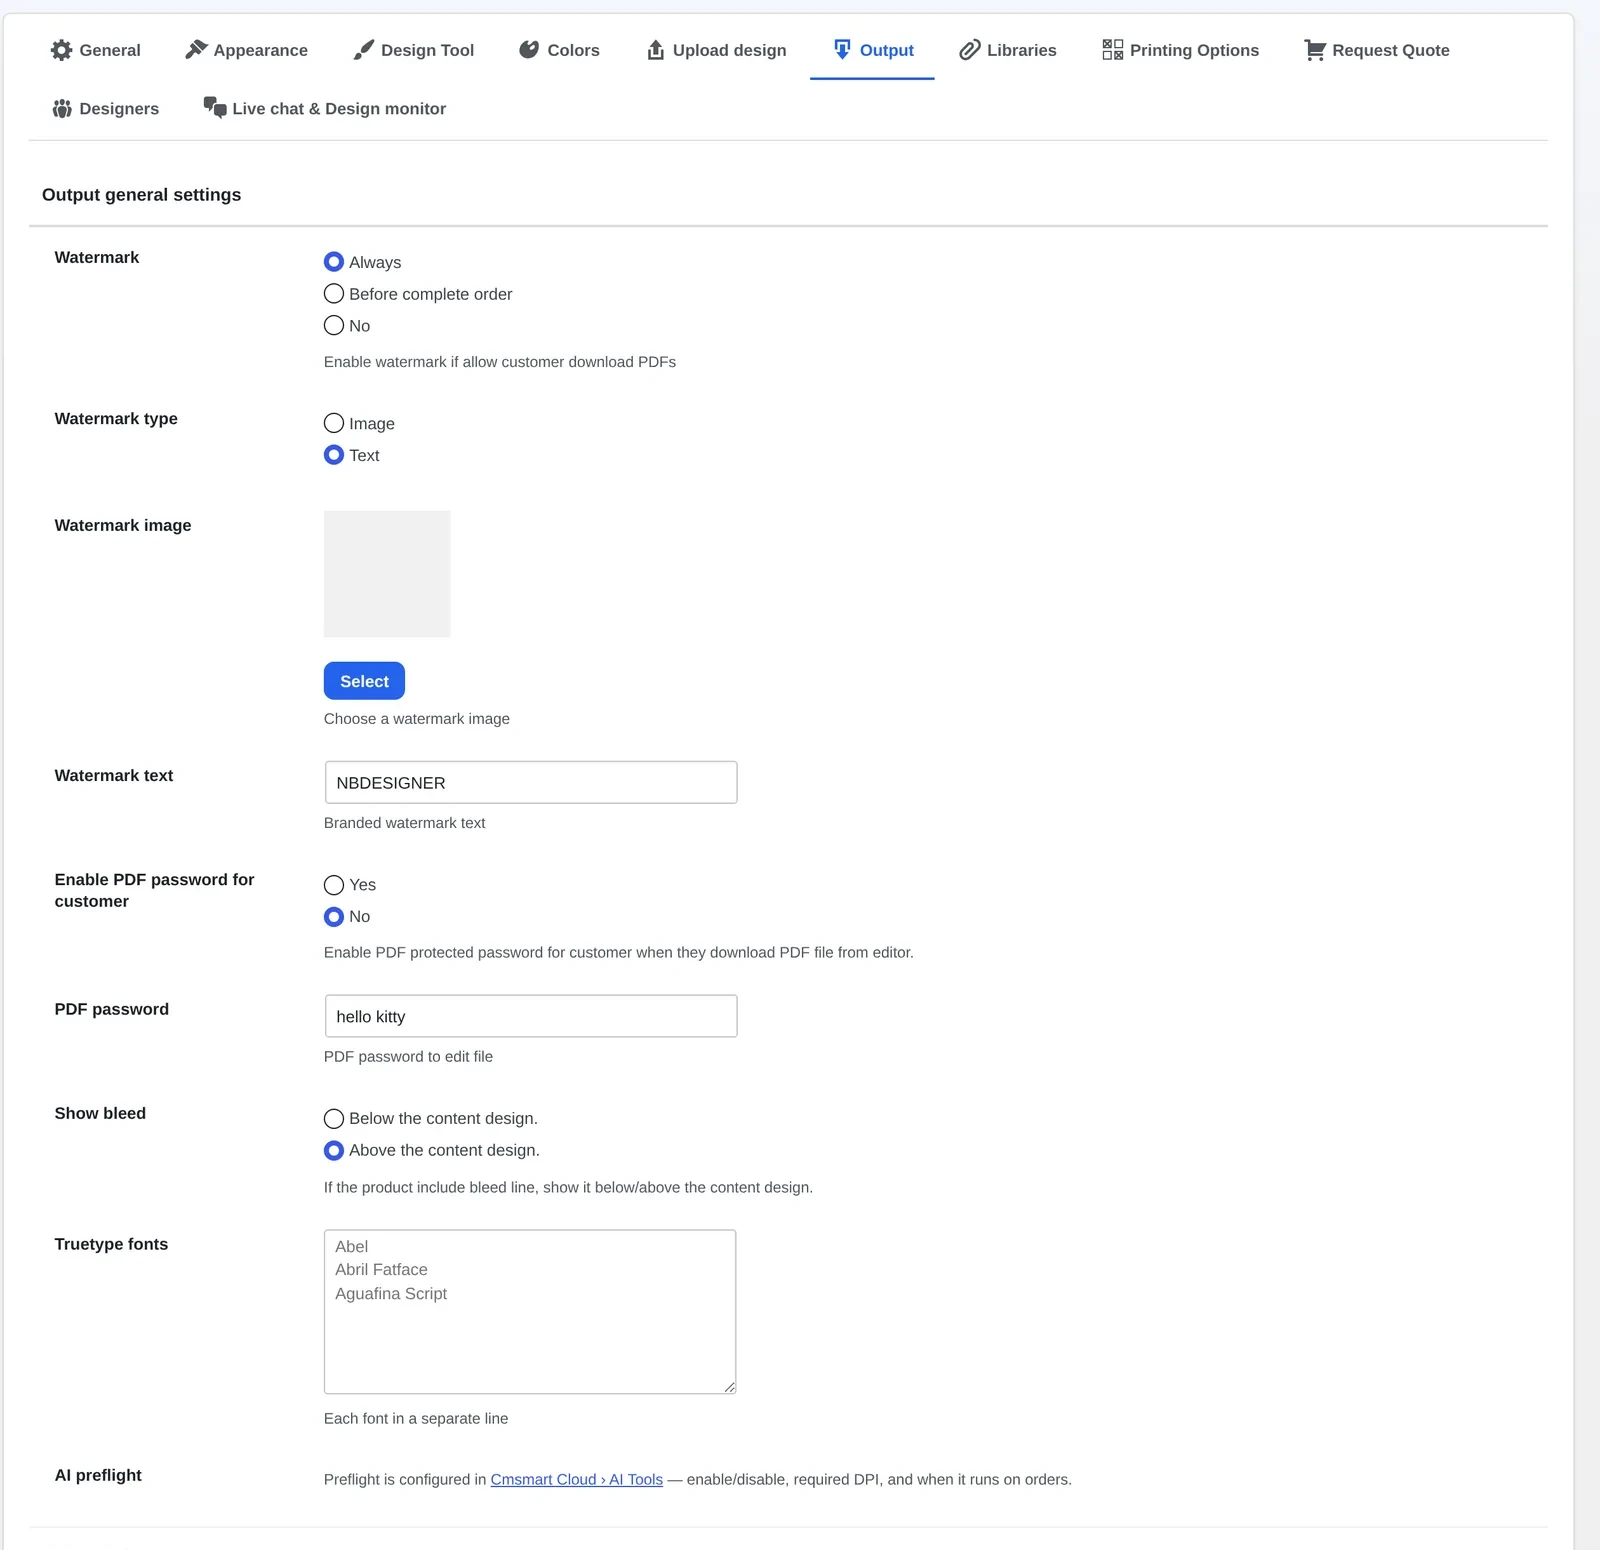
Open Settings > Output to set your watermark, bleed and embedded-font preferences before your first real order reaches production.
Run one full test order — design, add to cart, checkout, then Create PDF from the order screen — before you call the store launch-ready.
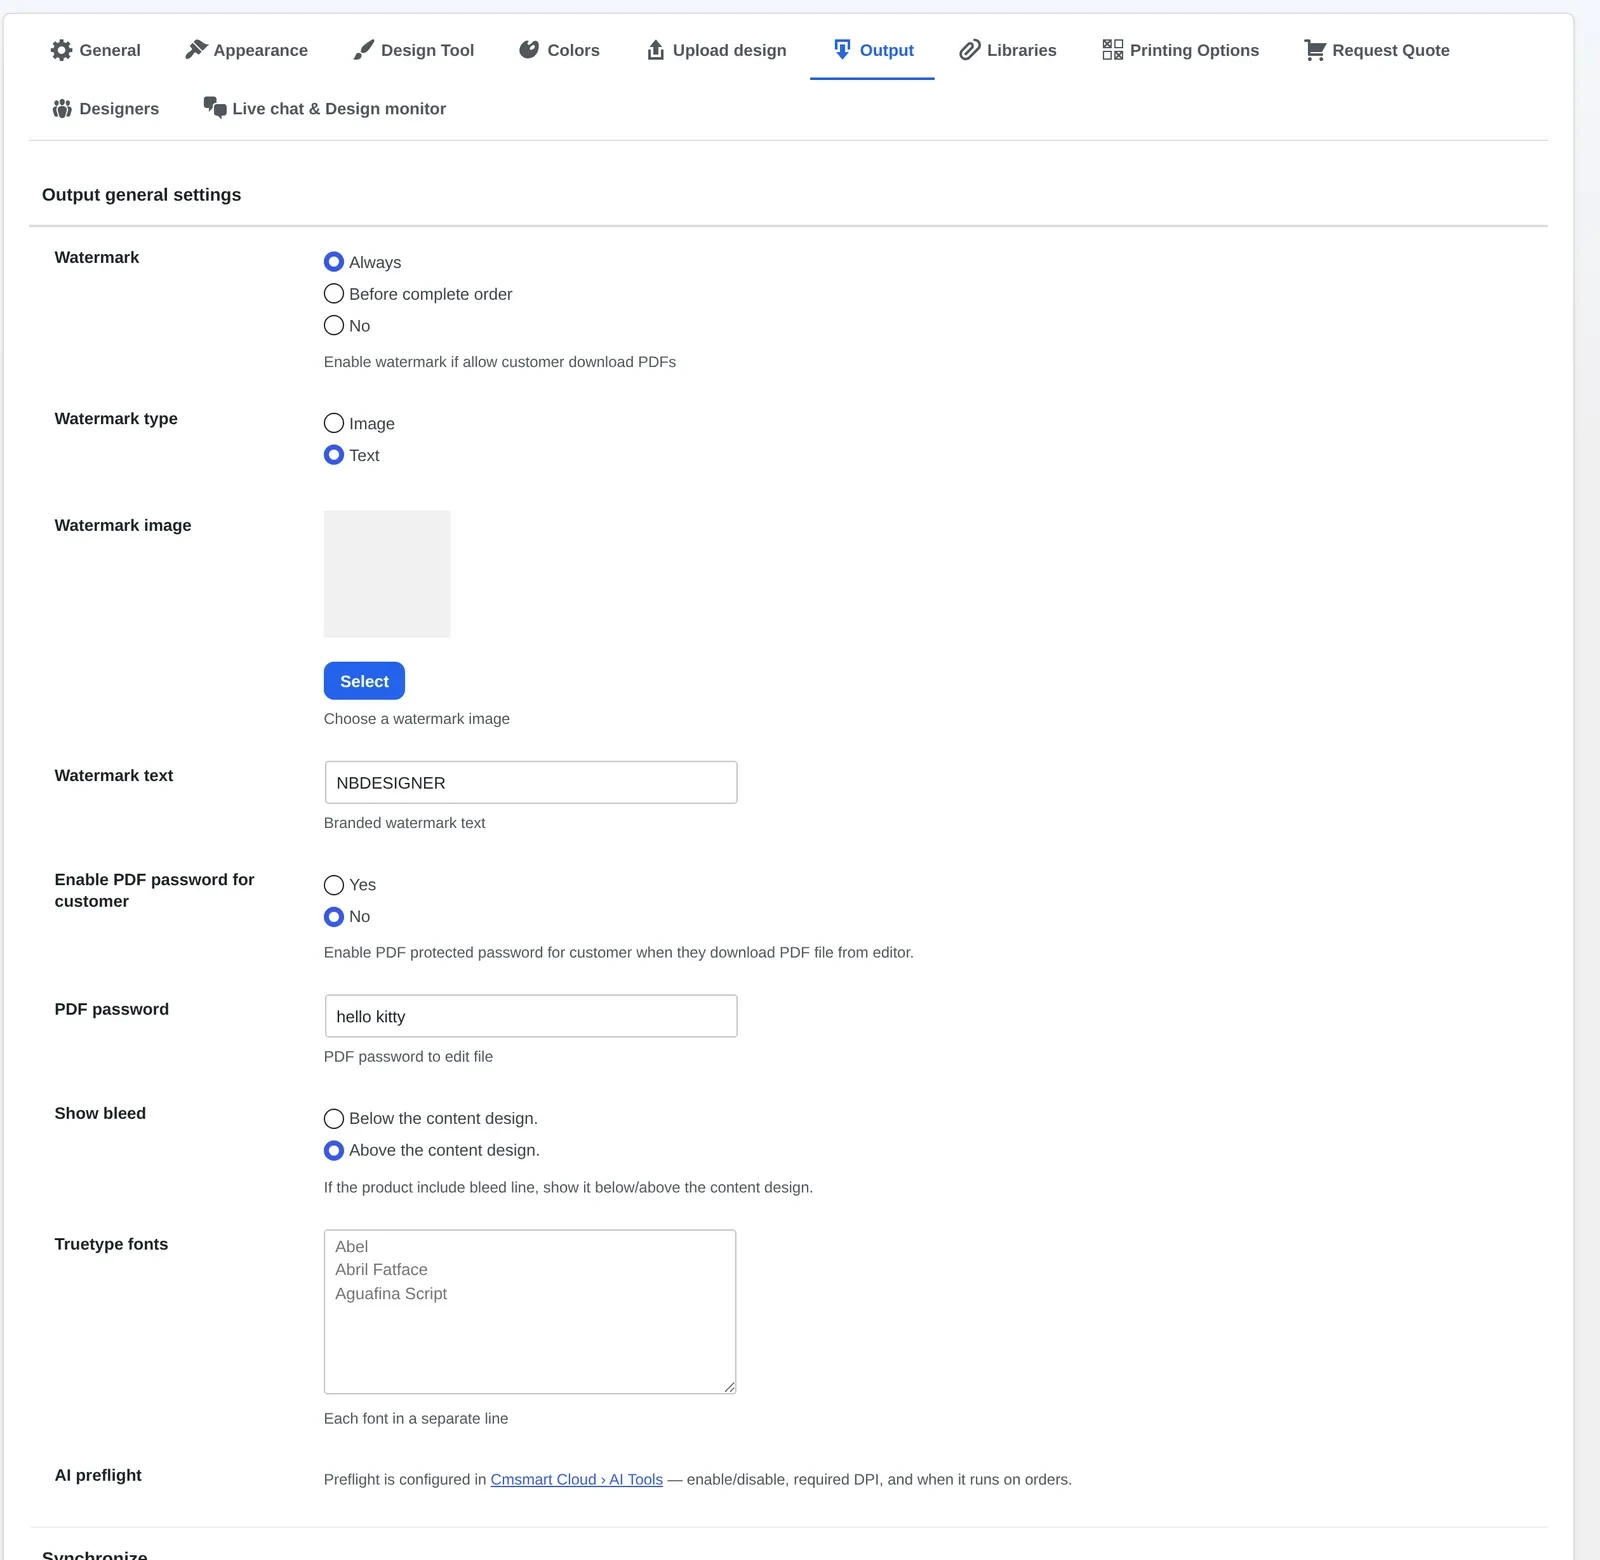
Settings > Output is where bleed, embedded fonts and AI preflight are configured once your server requirements are confirmed.
Going further: when do you need custom development instead of a settings tweak?
Most system-requirement issues are a configuration fix, but a few need more than a settings screen — Cmsmart builds the hosting, monitoring or integration work around NBDesigner as custom development when a store's infrastructure genuinely can't be reconfigured from wp-admin.
Locked-down shared hosting. When a host won't raise upload_max_filesize or enable Imagick, Cmsmart builds a managed hosting or VPS migration so the designer runs on infrastructure you control.
Multi-store or multi-vendor health monitoring. NBDesigner's Overview alert covers one site; running the designer across several stores calls for a custom dashboard that rolls those health checks up in one place.
Staged PHP upgrades. For stores with heavy customization, Cmsmart builds a staging pipeline so a PHP version bump is tested against your specific design templates and print options before it reaches production.
ERP/MIS or print-API connections. Server-to-server integrations often need PHP extensions or authentication a generic host doesn't provide out of the box — Cmsmart builds (custom development) the connector and the server configuration it needs together.
Every custom engagement follows the same delivery model: discovery, solution design, sprints, QA, launch, and ongoing support — see Cmsmart's product designer customization service or how we run a project on Ecommerce Projects.
Why work with Cmsmart on your product designer infrastructure?
Cmsmart has built and supported Cmsmart Product Designer (NBDesigner) installs since 2012 as a Netbase JSC division, with 6,300+ client projects delivered and a 4.2-star Trustpilot rating — so the requirements check above comes from setups we've actually run, not a generic checklist.
Cmsmart is a Netbase JSC division, in business since 2012, with 6,300+ client projects and 1,800+ live stores running today across 80+ countries. Reviewers who've run NBDesigner for years back this up directly:
"We have had the NB Designer plugin installed for three years and have experienced absolutely no problems during that time. It is wonderful to see their commitment to continuous development... The designer works exceptionally well across all devices." — Web Developer, Trustpilot
What's the minimum WordPress, WooCommerce and PHP version for NBDesigner?
NBDesigner's published floor is WordPress 5.6+, WooCommerce 8.0+ and PHP 8.0+ (plugin readme). Because PHP 8.0 and earlier no longer receive security updates and current WordPress.org requirements (2026) and WooCommerce server requirements both recommend PHP 8.3+, treat the plugin's floor as the minimum to clear, not the version to run in production.
Why does my designer show a blank product page even though I technically meet the minimum?
This is almost always a low PHP configuration limit — memory or execution time — rather than a broken install. Raising memory_limit and checking fix_pathinfo, allow_url_fopen and JSON support (per NBDesigner's own system-check guidance) resolves most cases.
Do I need Ghostscript or ImageMagick installed?
Yes, if you want print-ready PDF rendering and JPG design downloads to work locally. NBDesigner's Settings screen flags the Imagick requirement directly next to the JPG download option, and the Overview screen raises a system-health alert when ImageMagick, GD or Ghostscript aren't reachable. Cmsmart Cloud rendering is the alternative when your host won't install them.
Can Cmsmart check or fix my server configuration for me?
Yes — this is a standard part of NBDesigner setup engagements. When a host's shared-hosting plan can't be reconfigured, Cmsmart builds the hosting migration or VPS setup as custom development; see web-to-print solutions for the broader setup service.
Does upgrading PHP break my existing designs or orders?
Not when the upgrade is tested first. Cmsmart's 2.14.1 release was verified on WordPress 7.1 with WooCommerce 11.0.1, PHP 8.3.31 and HPOS enabled, with existing orders round-tripping their design data intact — the same staged-testing approach is what we recommend before any store raises its PHP version.
How do I confirm my store is compatible with WooCommerce's High-Performance Order Storage (HPOS)?
Check the Customer Design approval box loads on the HPOS order screen (woocommerce_page_wc-orders) and that a test order's design data survives checkout — both are part of the verified test run behind the 2.14.1 release and the setup checklist above.
Applies to Cmsmart Product Designer (NBDesigner) 2.17.0 · Updated October 2026. Requirements are read from the plugin README and header; every screen below is from a live 2.17.0 install.
In short
The outcome: your WooCommerce store lets a customer design their own product and pay, and the order arrives at your end with the artwork already attached.
How it works: install the NBDesigner plugin, connect a license in the setup wizard, tick Enable Design on a product, and the storefront gets a design button; orders then flow into Cmsmart > Orders with a print-ready PDF.
What it takes: WordPress 5.6+, PHP 8.0+, WooCommerce 8.0.0+ and MySQL 5.7, plus about one working session for your first product. Cmsmart can do the whole setup for you.
Installing the NBDesigner plugin on a WooCommerce store changes what "order received" means for a personalized product. A buyer designs their own invitation, business card or t-shirt on the product page, approves the preview and checks out, and your team opens the order to find a finished design file attached, not an email thread. This guide covers what the plugin needs, how to install and activate it end to end, and what the first order looks like once it is live.
Without it, most shops still run personalization by hand: a customer emails a logo, someone mocks up a proof in an image editor, the file goes back and forth for approval, and the order sits in a queue while a staff member rebuilds what the customer could have built themselves. This guide, and the plugin it covers, exist to close that gap.
What does a manual proofing process cost your print business?
Every personalized order that goes through email costs staff minutes: reading the request, building a mock-up, waiting for approval, and re-keying the final file into production. Cmsmart Product Designer (NBDesigner) moves that work onto the WooCommerce product page, so the customer designs and approves their own artwork and your team starts from a file they already confirmed.
You are not alone in carrying this cost on WooCommerce: the platform itself says it powers 4M+ online stores, representing 31% of the top one million ecommerce sites (Store Leads data, as published by WooCommerce; accessed 2026-10-05) — most of them still without any way for a shopper to design before they buy.
Manual proofs. A human has to open the file, check it against the product's safe zone, and send a preview back before the order can move.
Slow quoting on custom work. Pricing a one-off design by hand adds a reply cycle most buyers won't wait for.
Reprints from bad files. Art without bleed or the wrong color mode (RGB instead of CMYK) looks fine on screen and wrong off the press.
Abandoned carts. A buyer who can't see what they're ordering before paying often leaves instead of emailing a file and waiting — checkout abandonment already runs high across ecommerce in general (70.22% on average, compiled from 50 studies, Baymard Institute, 2025), and a design step a buyer can't preview only adds friction.
Staff time spent on repeat work instead of production, purchasing or sales.
A simple way to size this: personalized orders per month × minutes a staff member spends per proof × hourly labor cost. Put your own numbers in; the point is to know what the status quo already costs before you compare it to a one-time setup.
What would a self-service design-and-order flow look like?
Picture a buyer opening your store at 10pm, designing a door hanger with their own logo, approving the preview and paying before bed. Cmsmart Product Designer captures that design with the order as it's placed, so your morning queue already holds a production-ready file instead of an email you still have to answer.
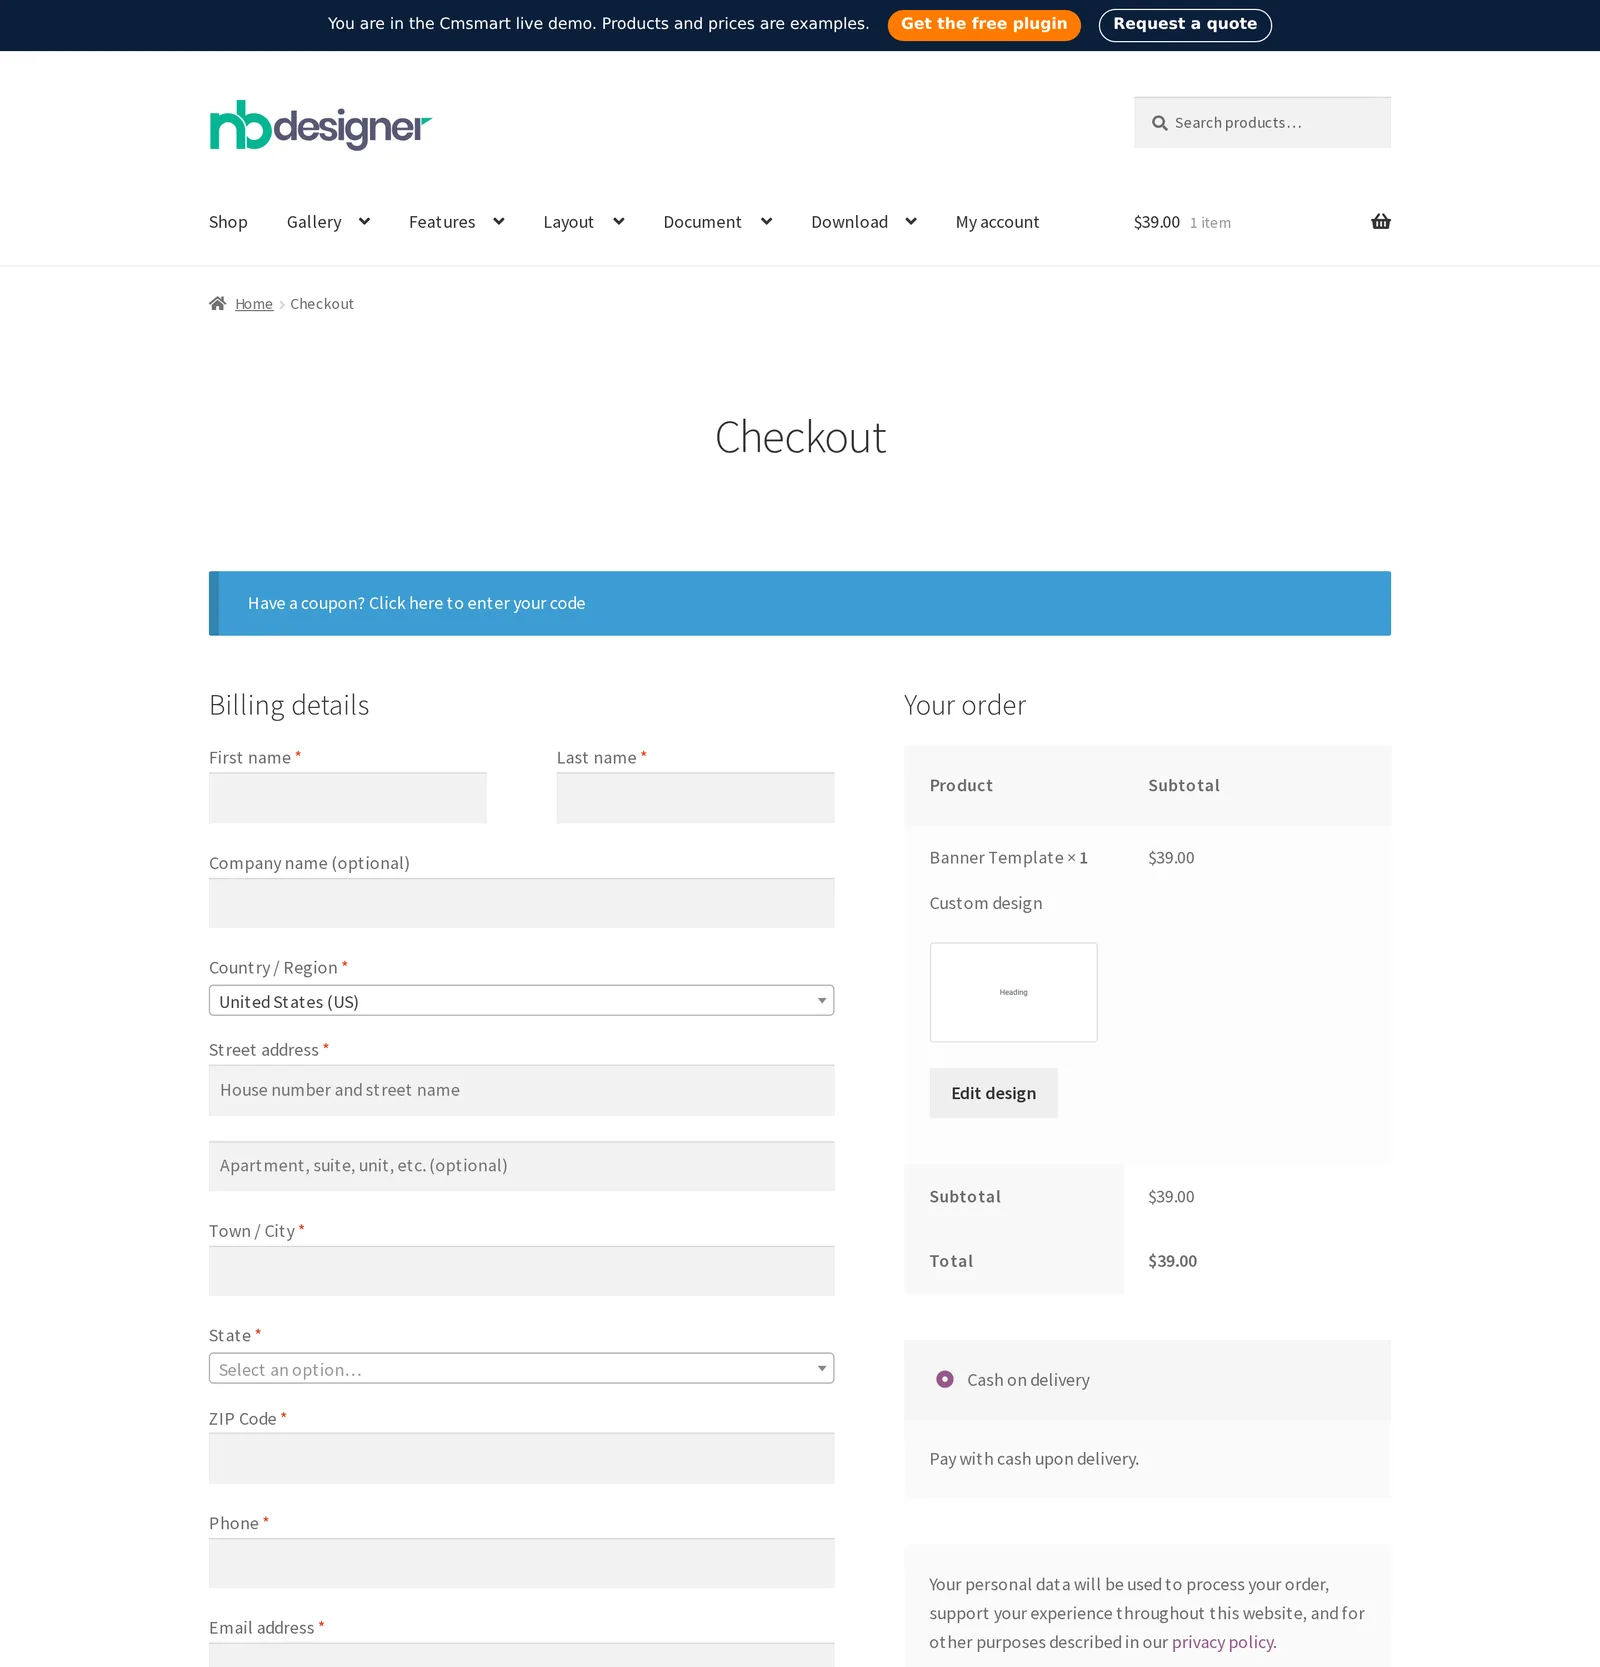
Example scenario. A small print shop sells door hangers and business cards online. Today, a buyer clicks Start and upload design on the product page, picks a template, swaps in their own wording, and watches the price update as they resize the design area. They add it to the cart, see their exact artwork in the order review at checkout, and pay. By the time the shop opens, the order is sitting in Cmsmart > Orders with the design attached — no inbox, no back-and-forth, no guessing what the customer meant.
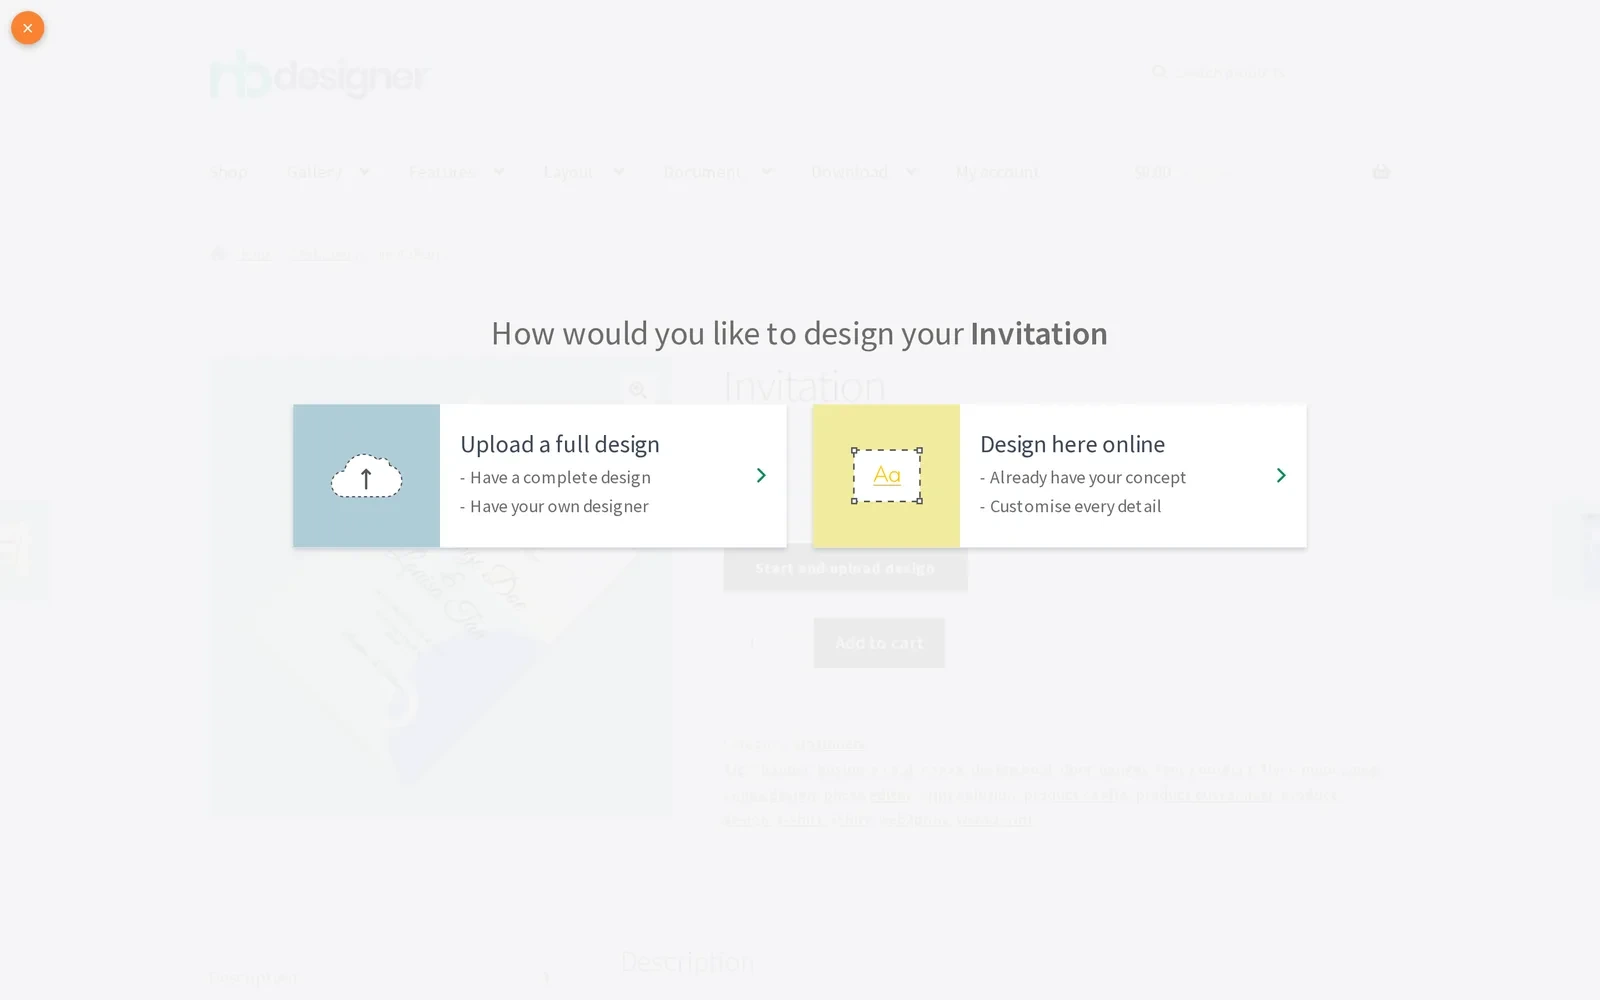
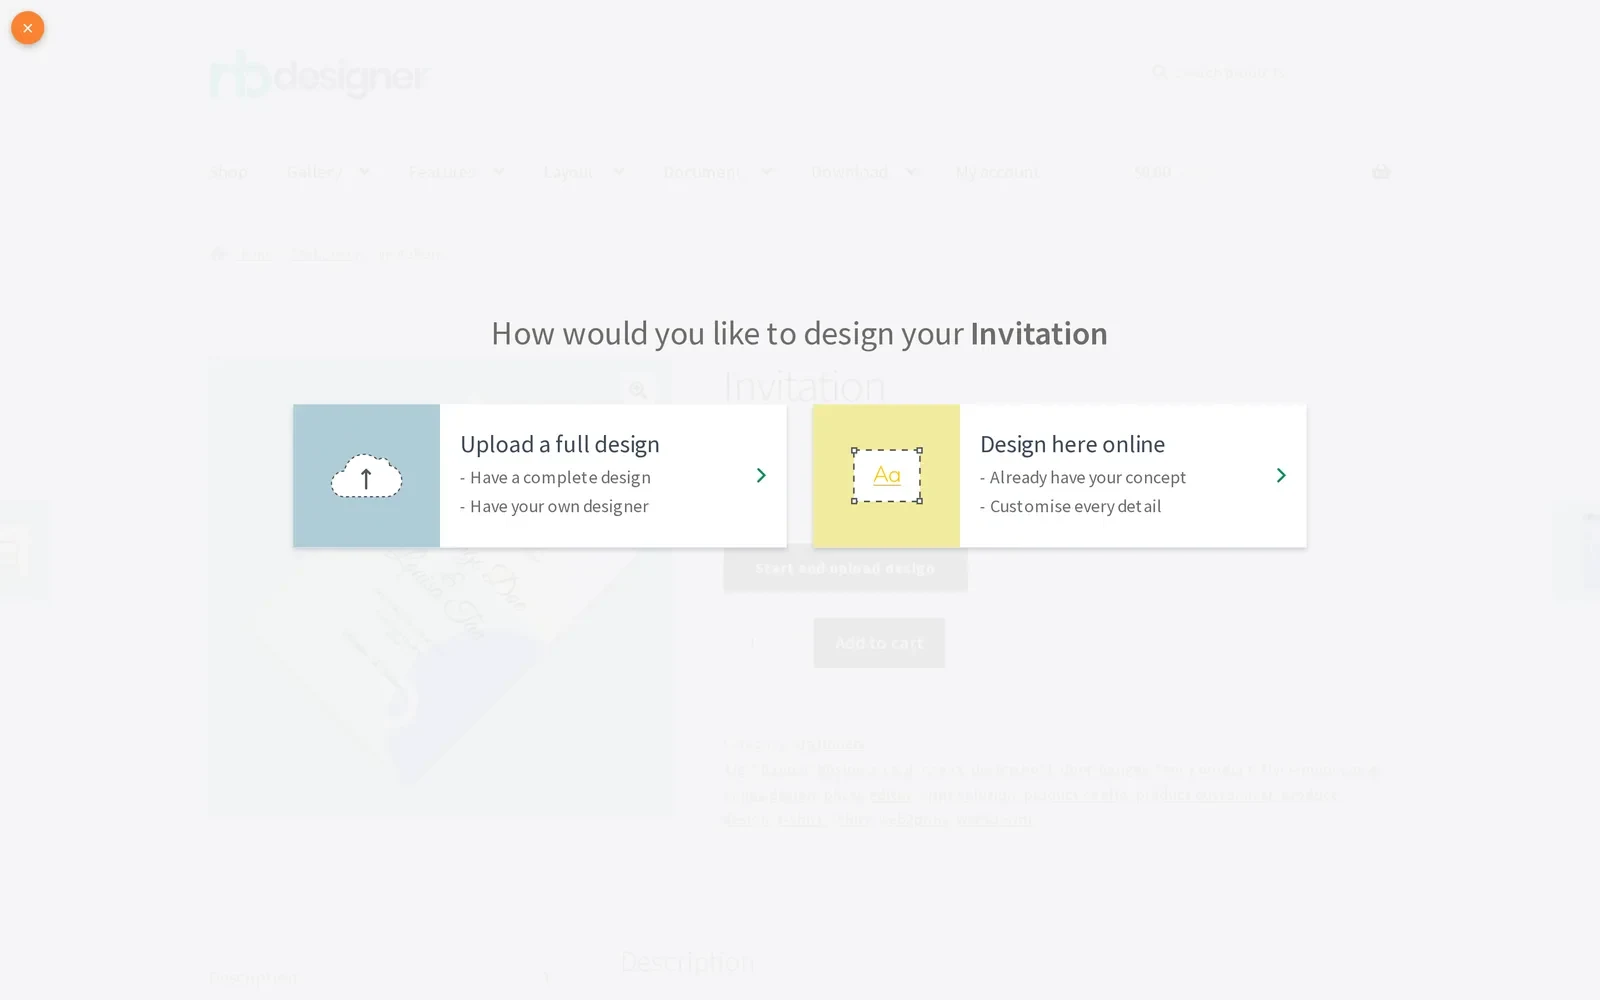
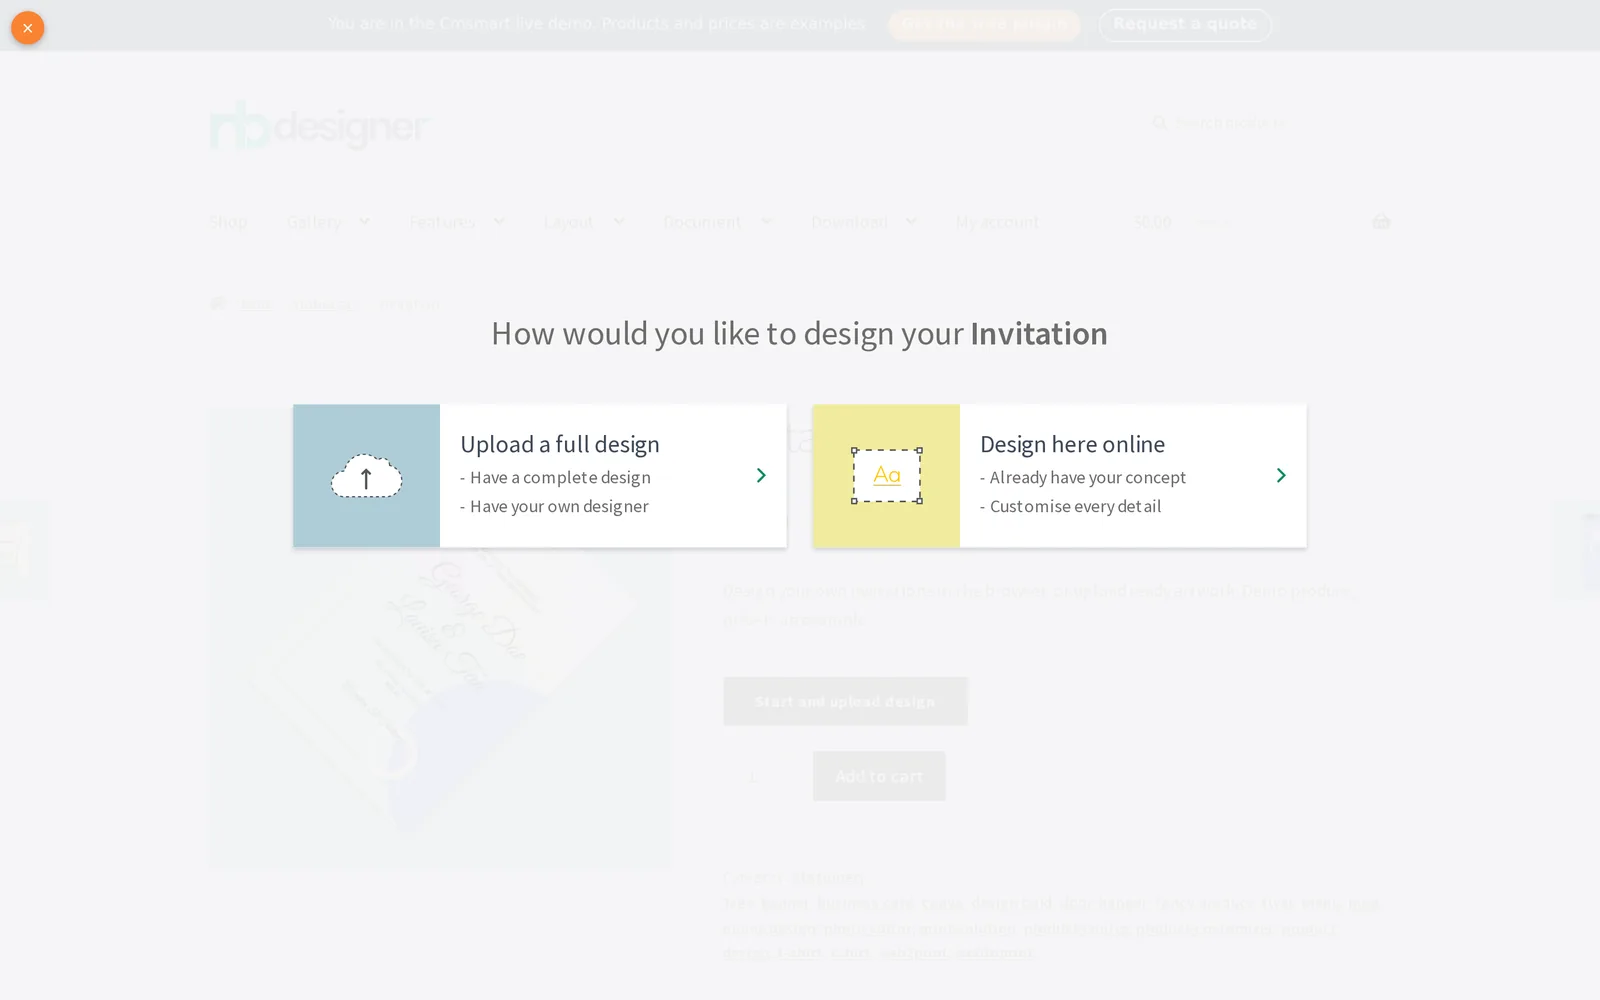
The first click of that scenario: a buyer picks "Upload a full design" or "Design here online" before the editor ever opens.
How does Cmsmart Product Designer connect design, order and production?
Cmsmart Product Designer wires four things together on a standard WooCommerce product: a storefront design tool, your pricing and print options, order capture, and a print-ready PDF for your production team. What exists in the plugin today and what Cmsmart builds as a custom layer on top are two different things, and this guide marks each one.
Storefront designer. A "how would you like to design" chooser (upload a finished file, or design online with templates, text, cliparts and photos) opens from the product page. In the plugin today.
Pricing and print options. Printing Options and a price matrix calculate the line price from the choices a buyer makes. In the plugin today.
Order capture. The design is saved to the cart line item and carried through to checkout and the order record, with no separate upload step for the buyer. In the plugin today.
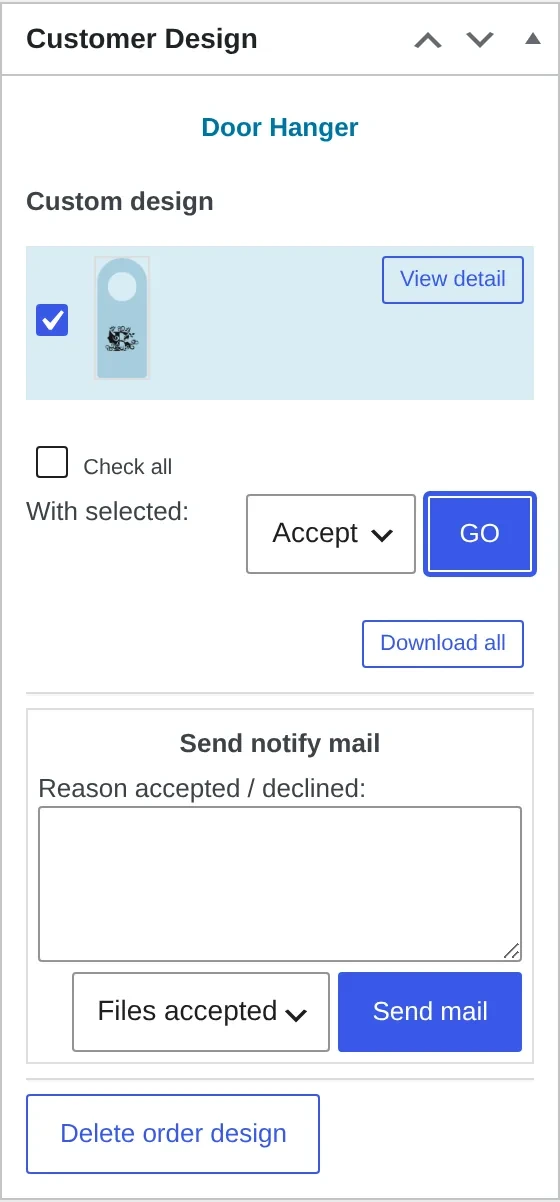
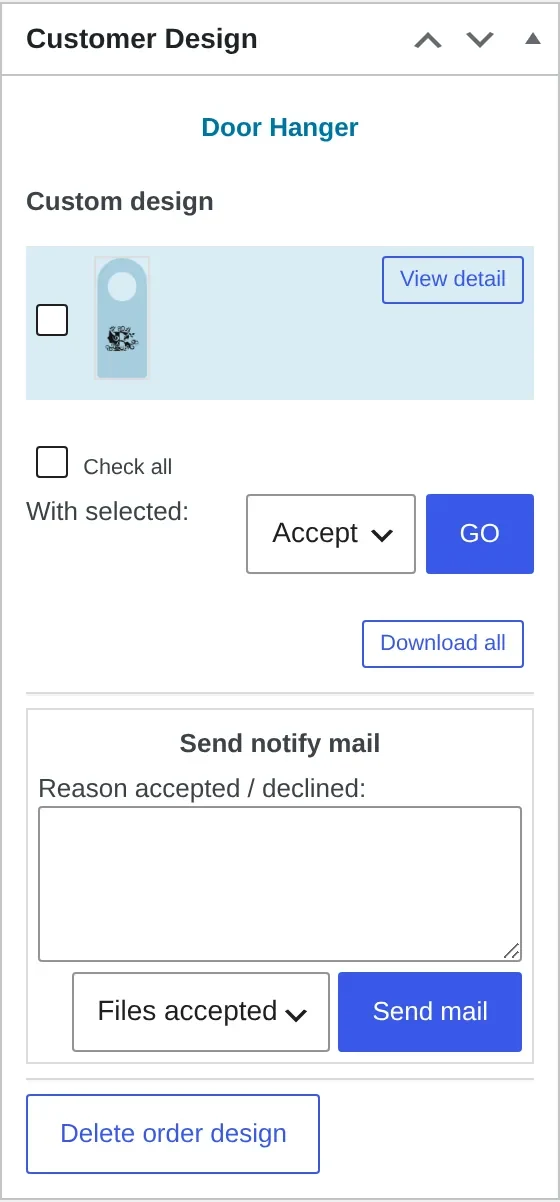
Approval and production output. Your team approves or declines the artwork from the order screen, then Create PDF produces the print-ready PDF that matches the order. Once a design is approved, Cmsmart locks it on the server (the approved-artwork lock, 2.17), so a customer or a stray tab can't quietly change the file production already saw. In the plugin today.
Your pricing rules, your MIS, your brand. Custom price formulas, ERP/MIS sync and brand-specific editor tools are not shipped features — Cmsmart builds them as a project on top of the plugin.
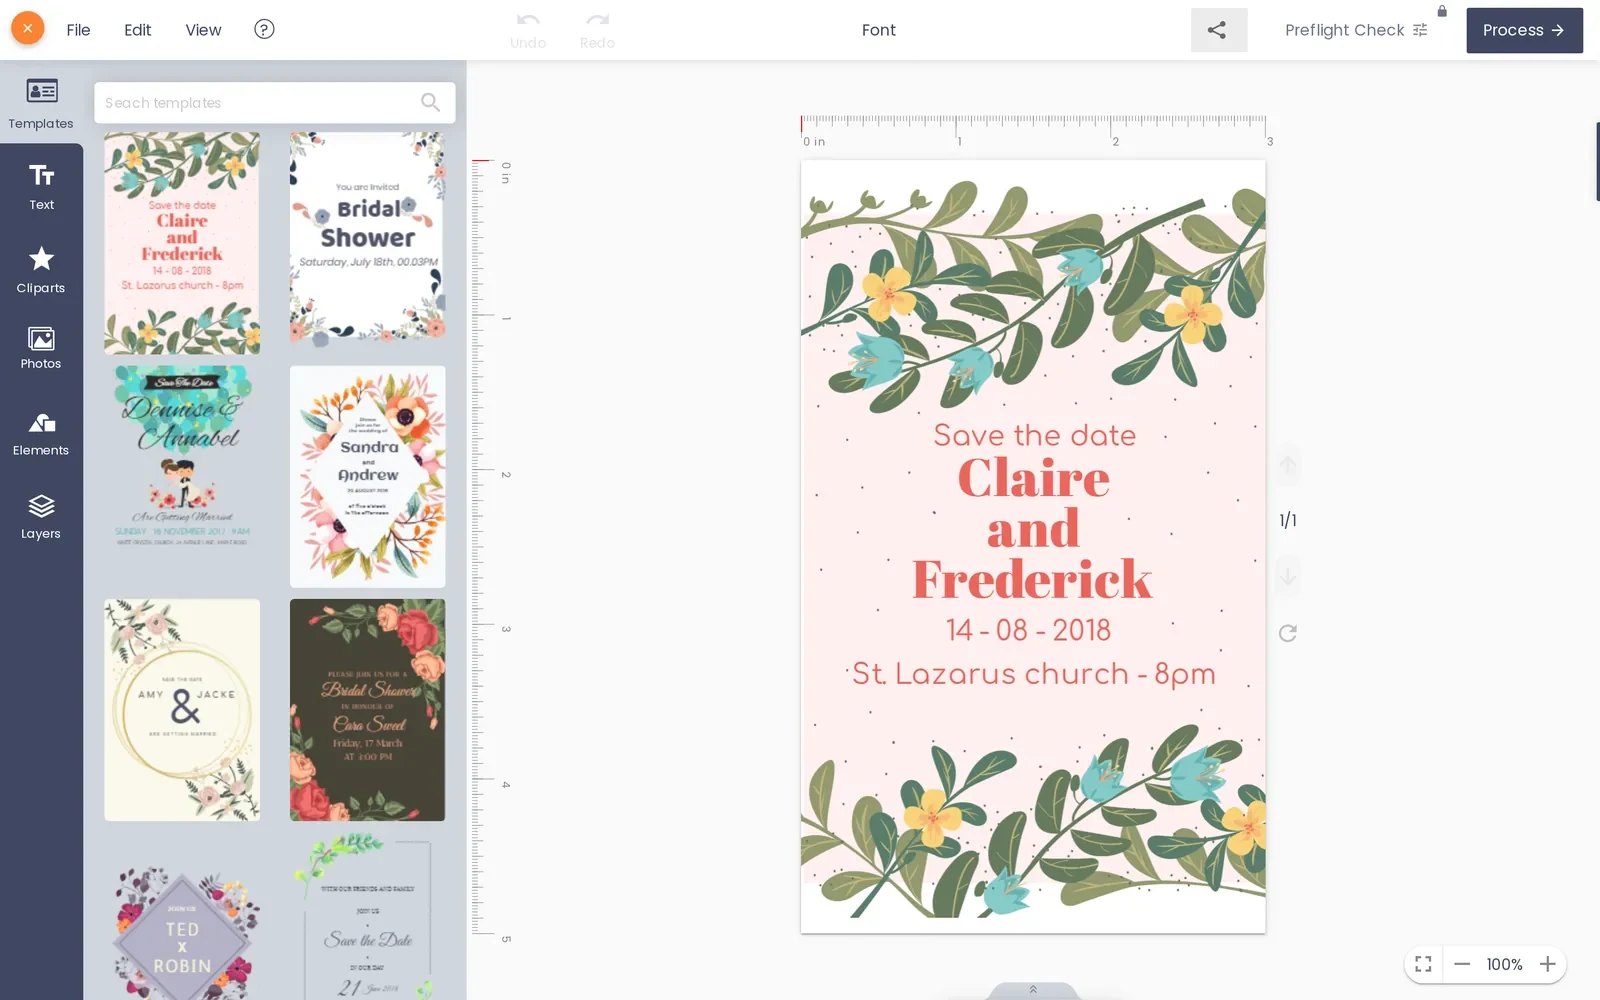
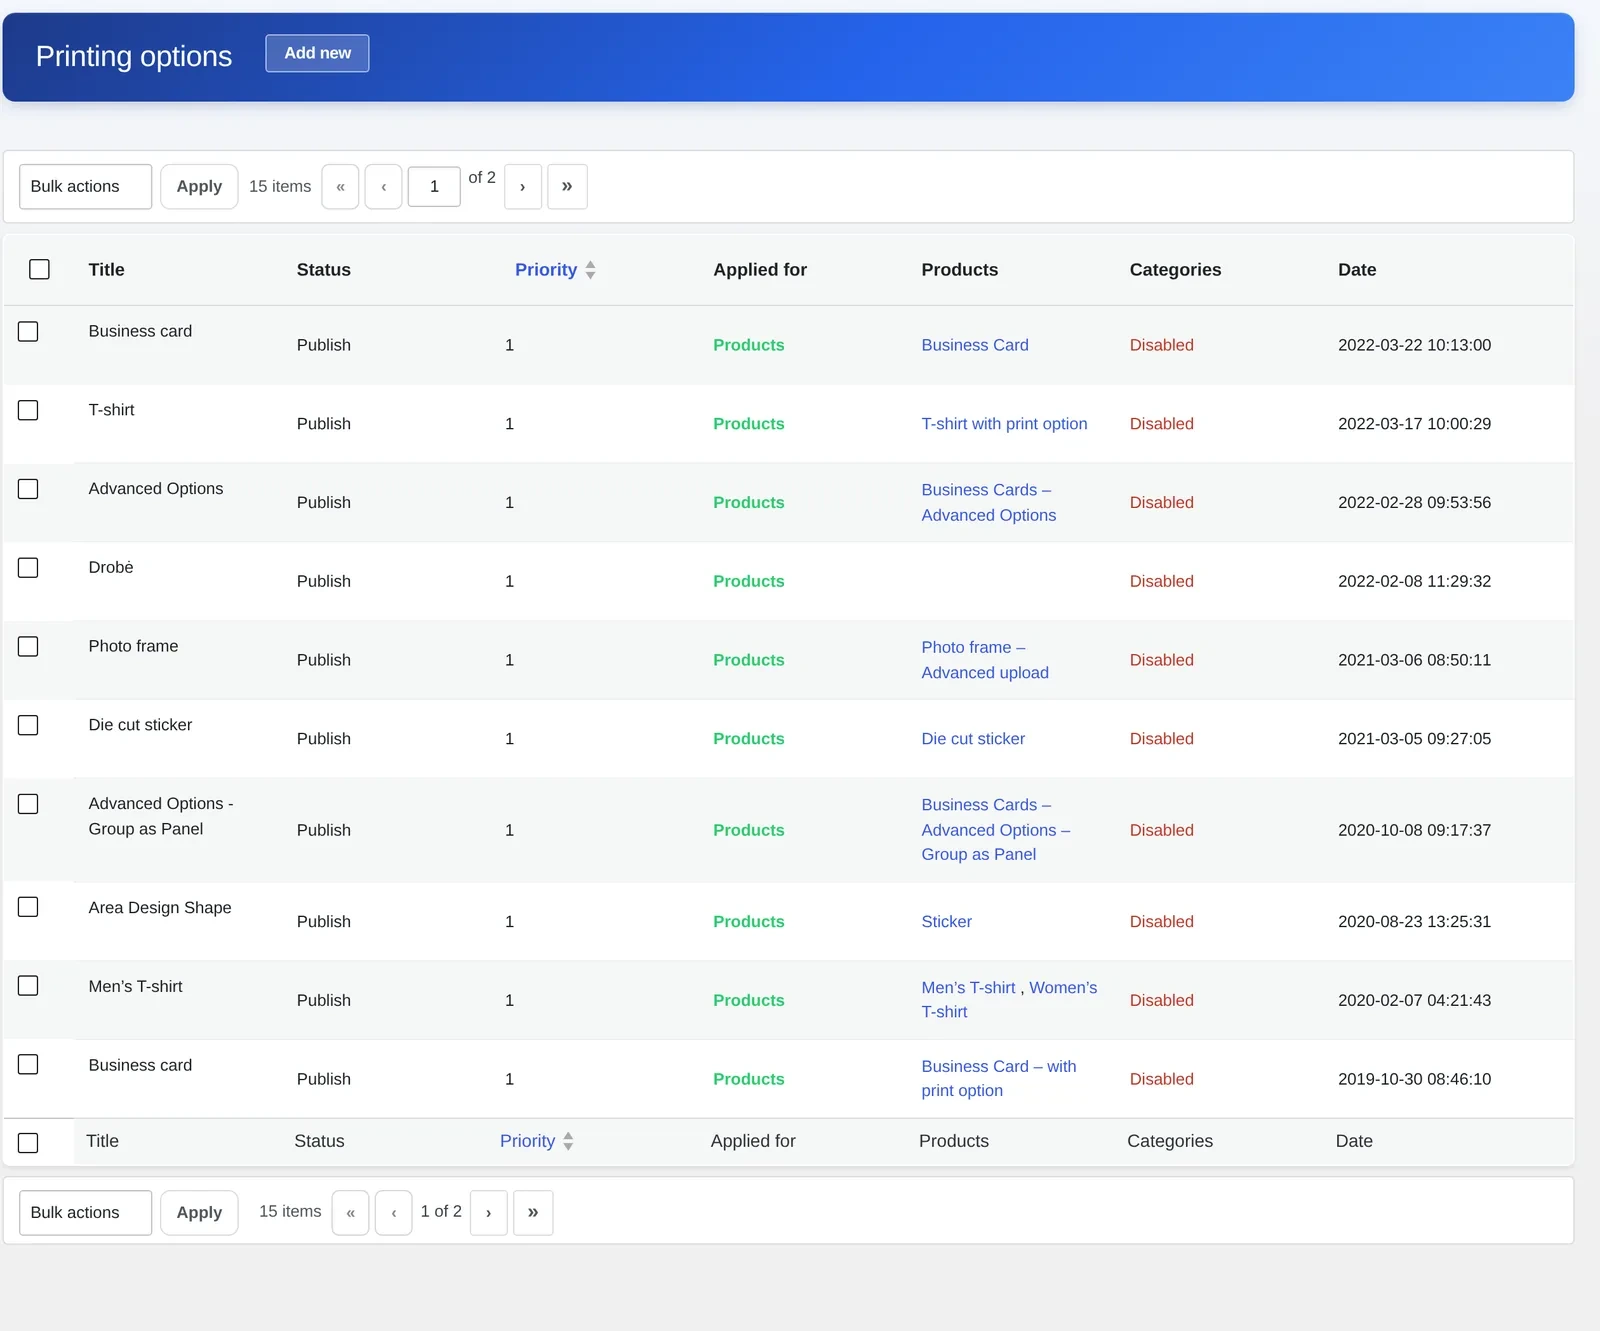
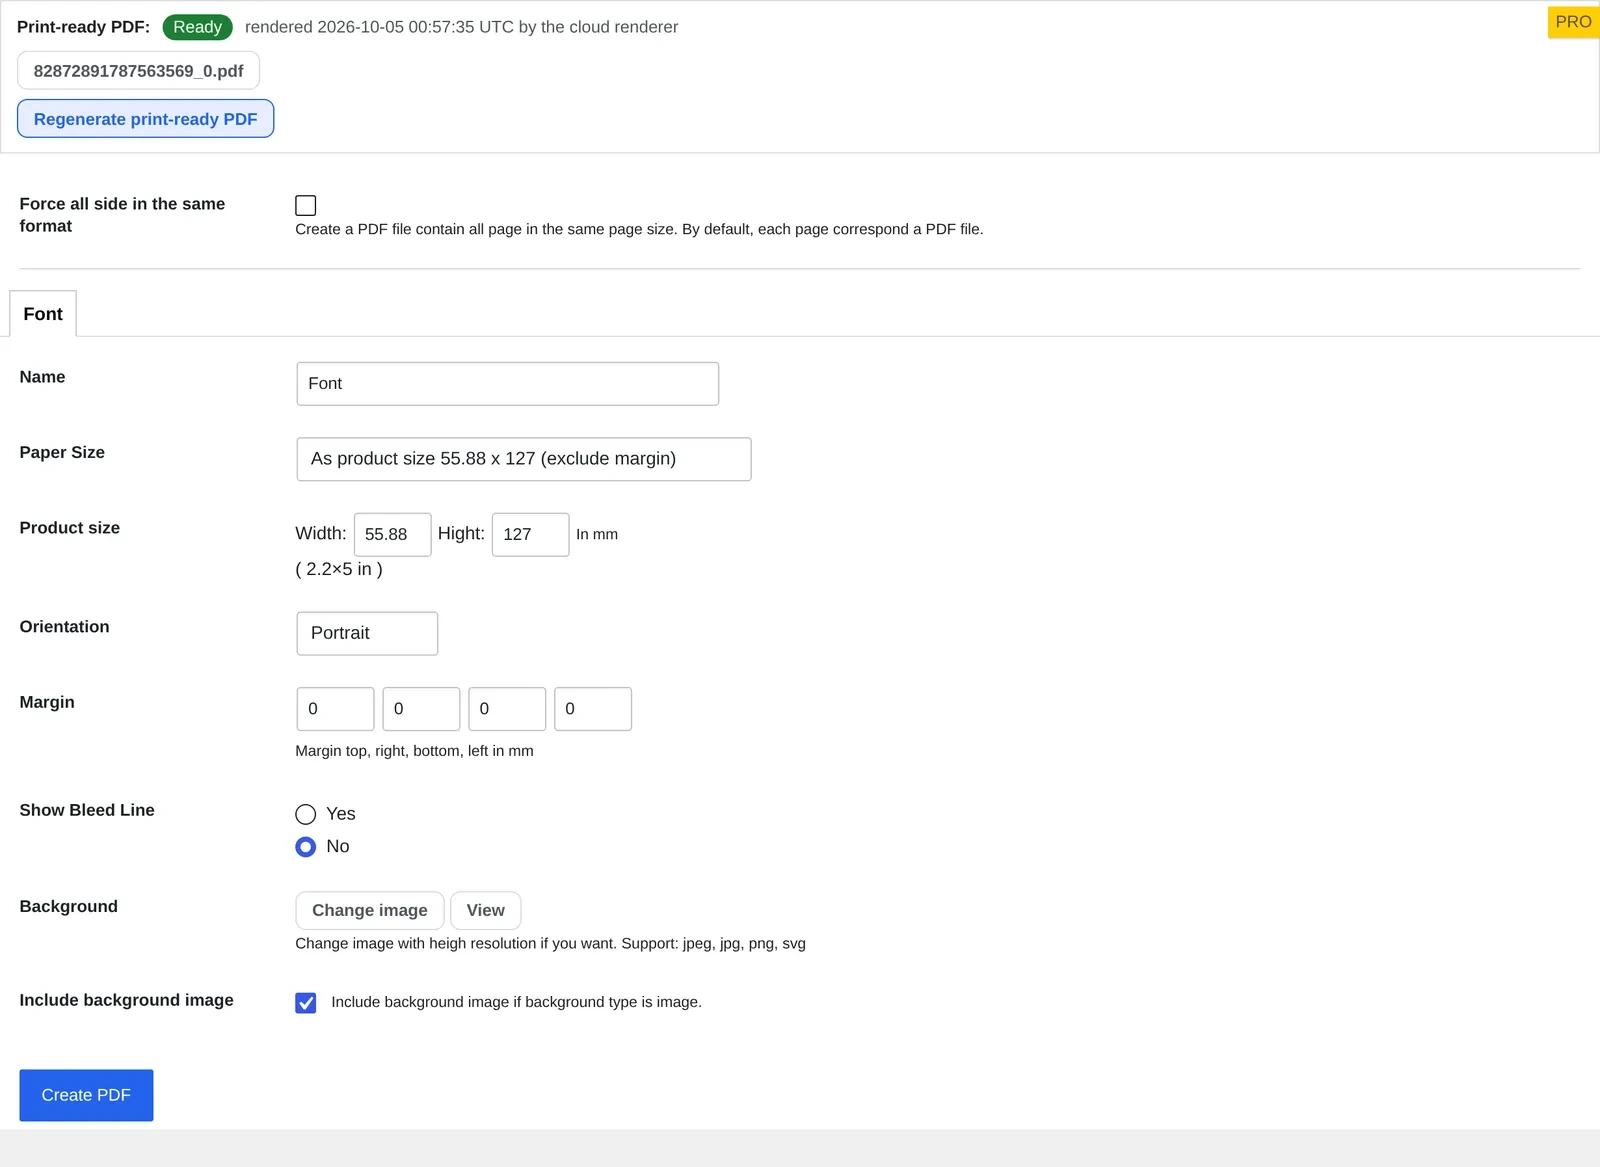
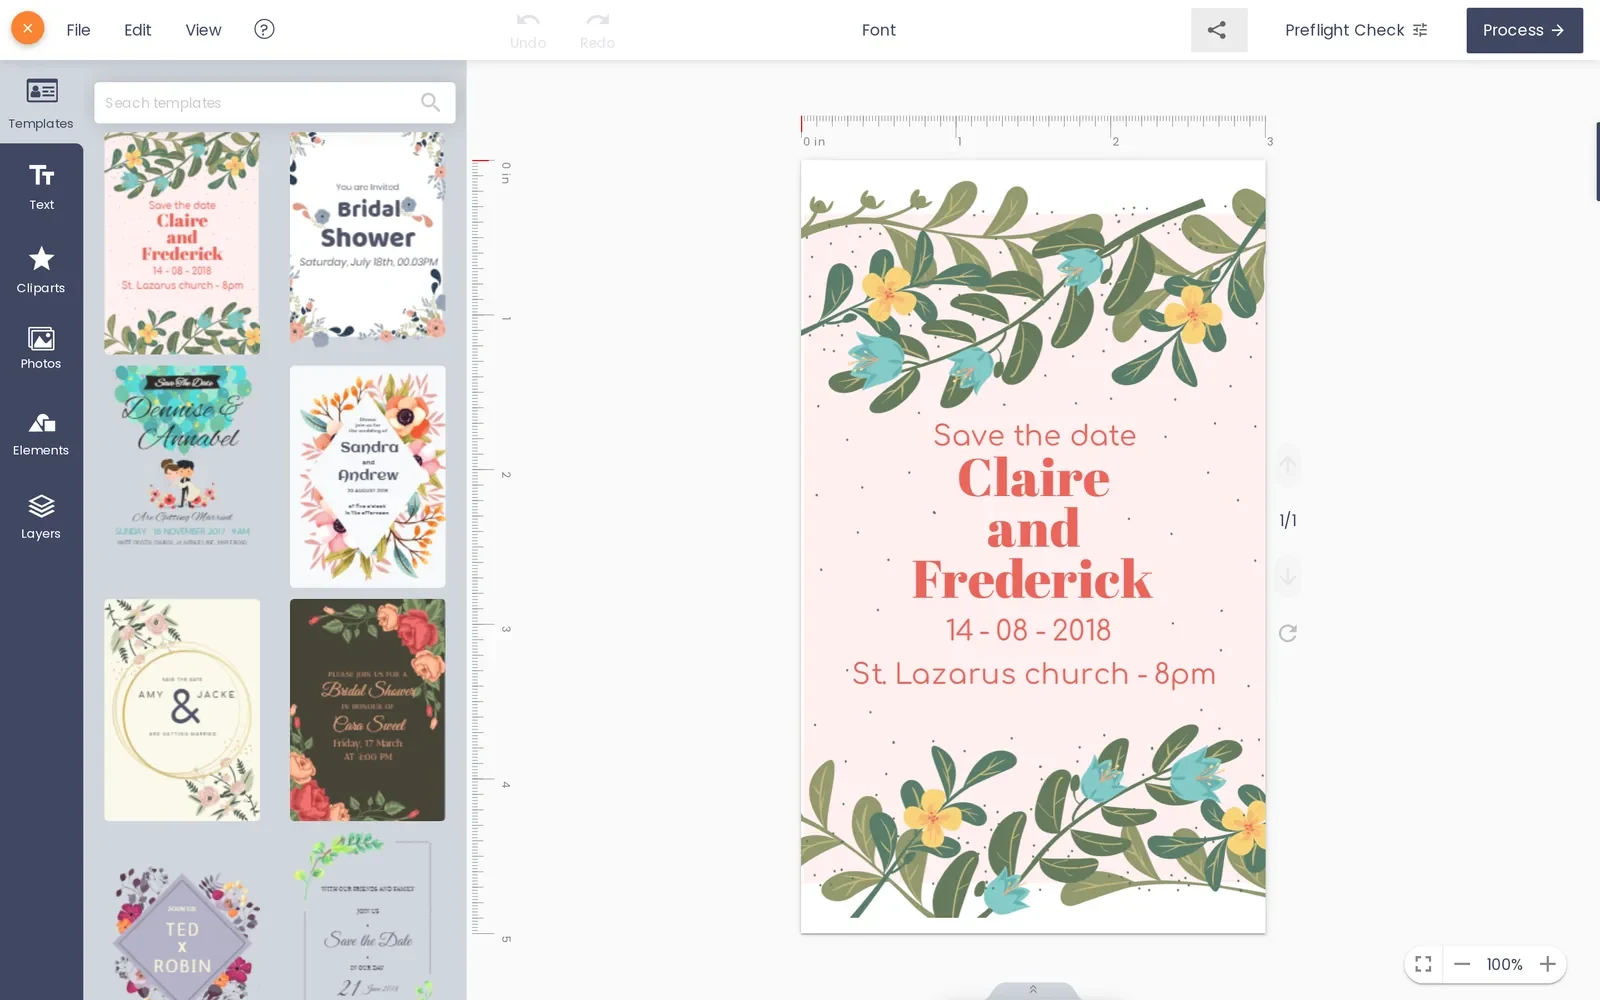
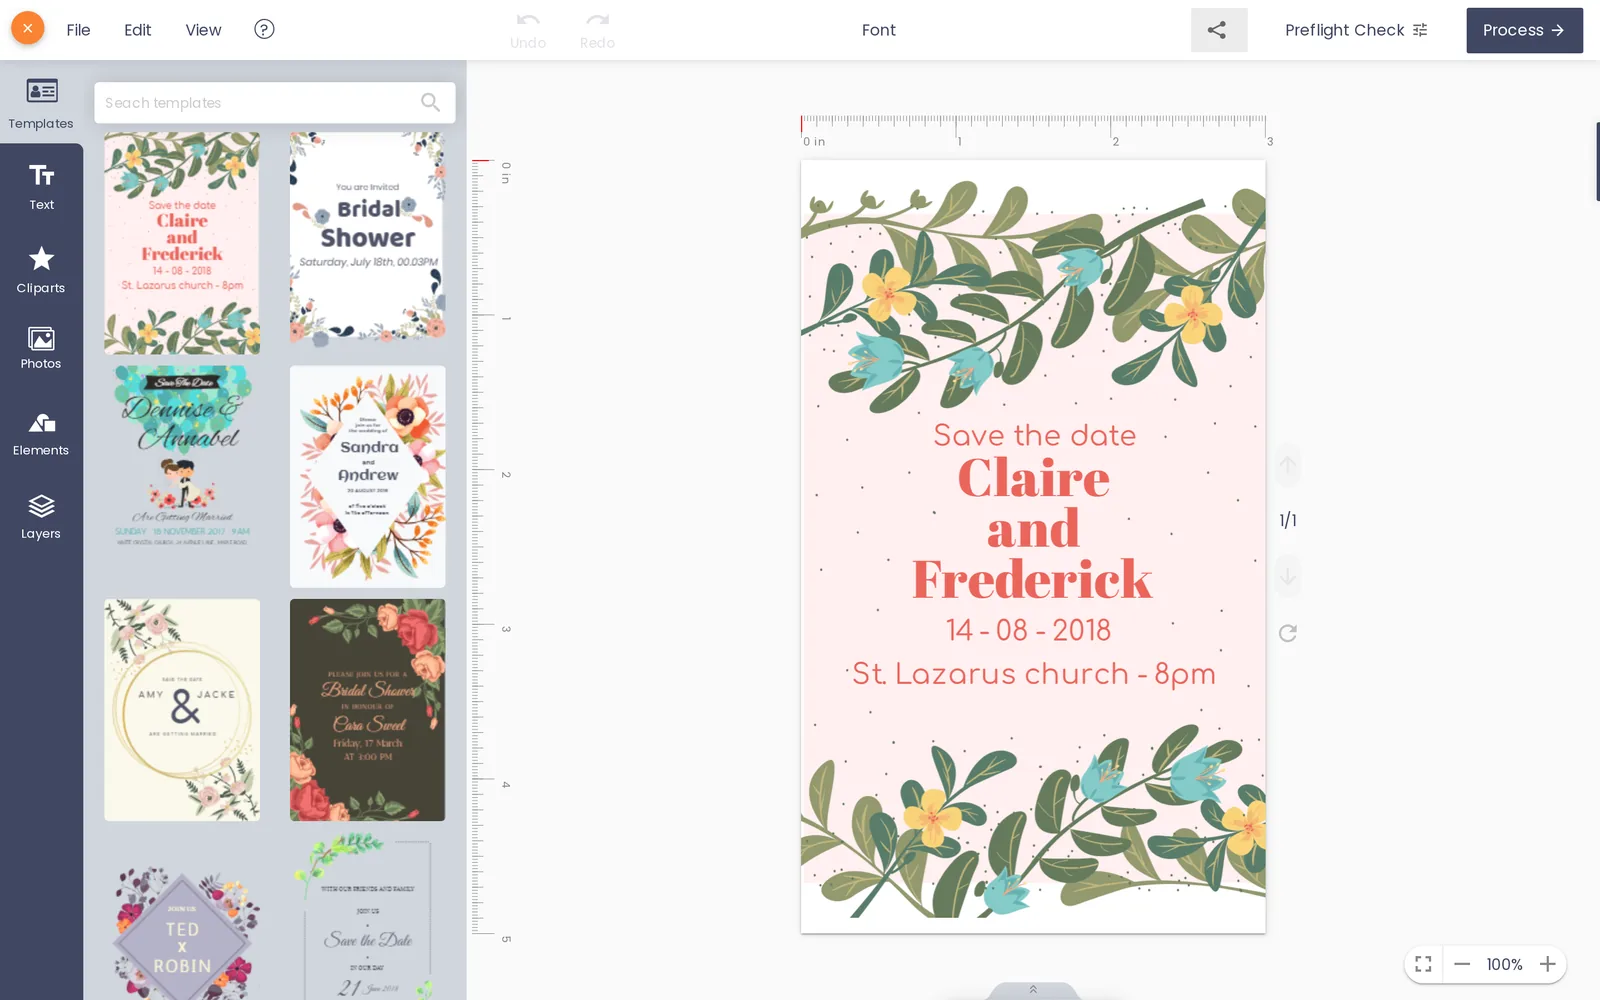
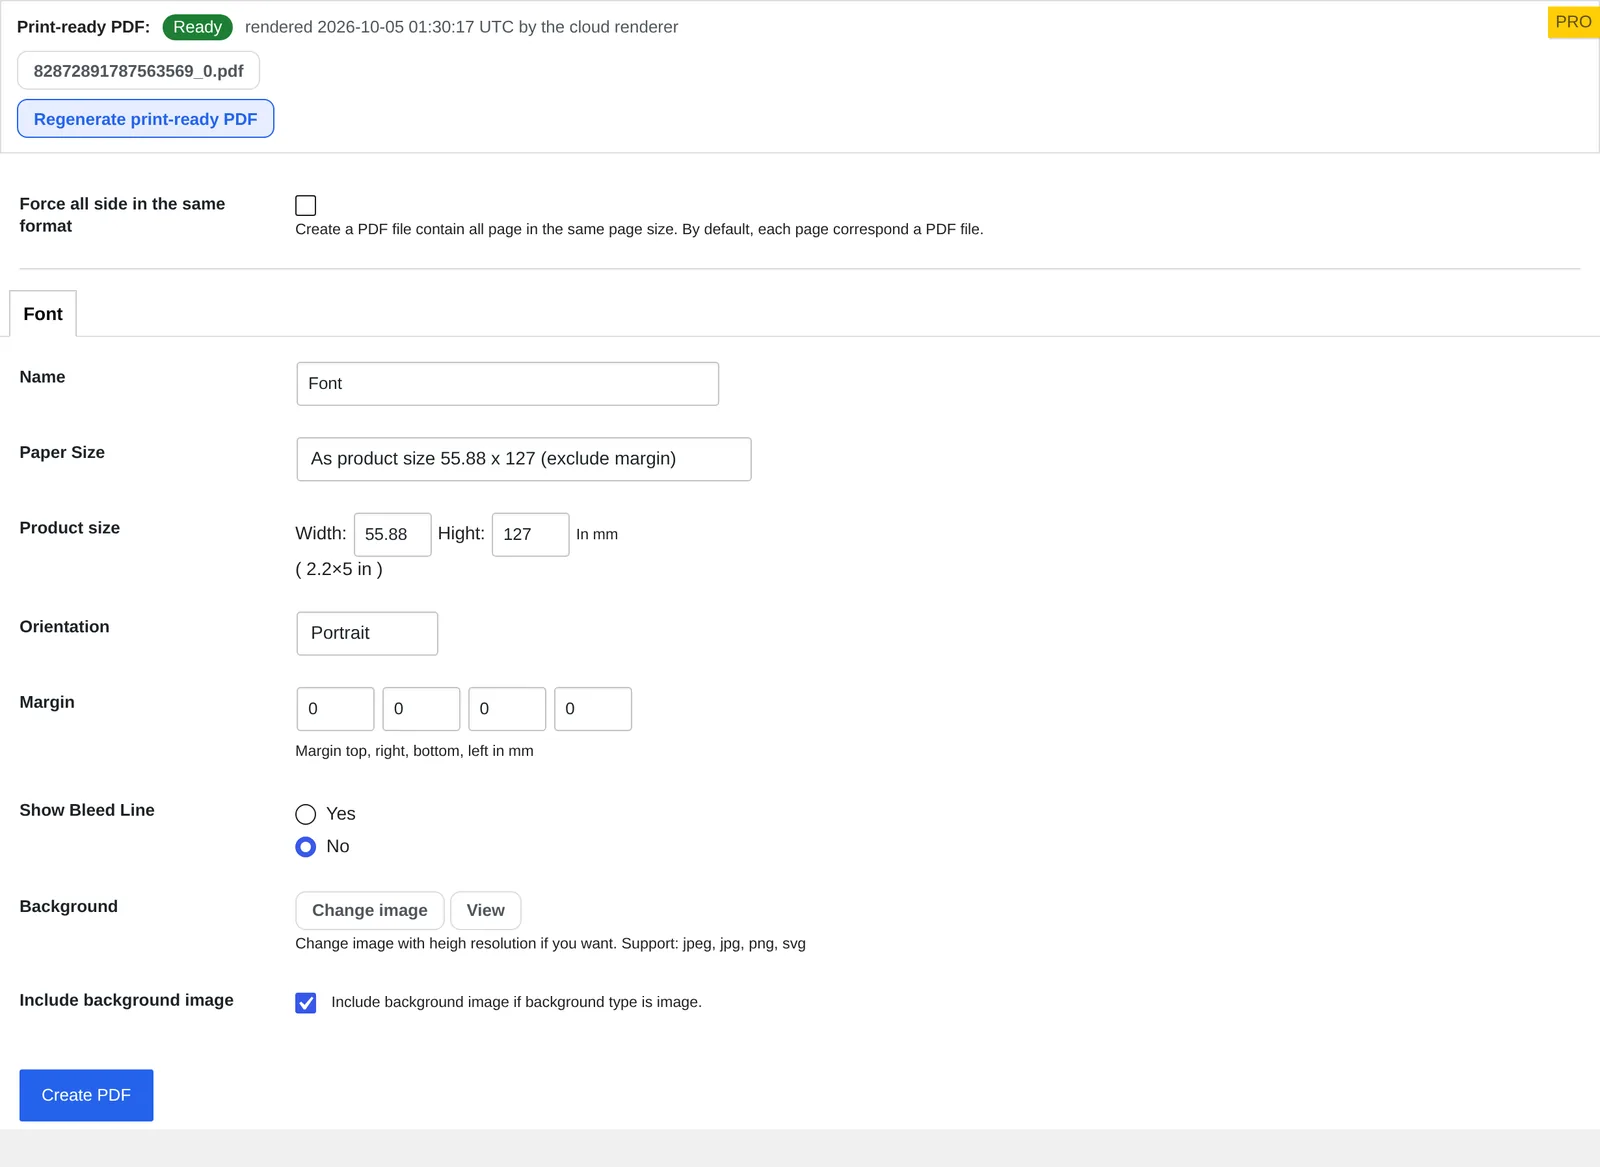
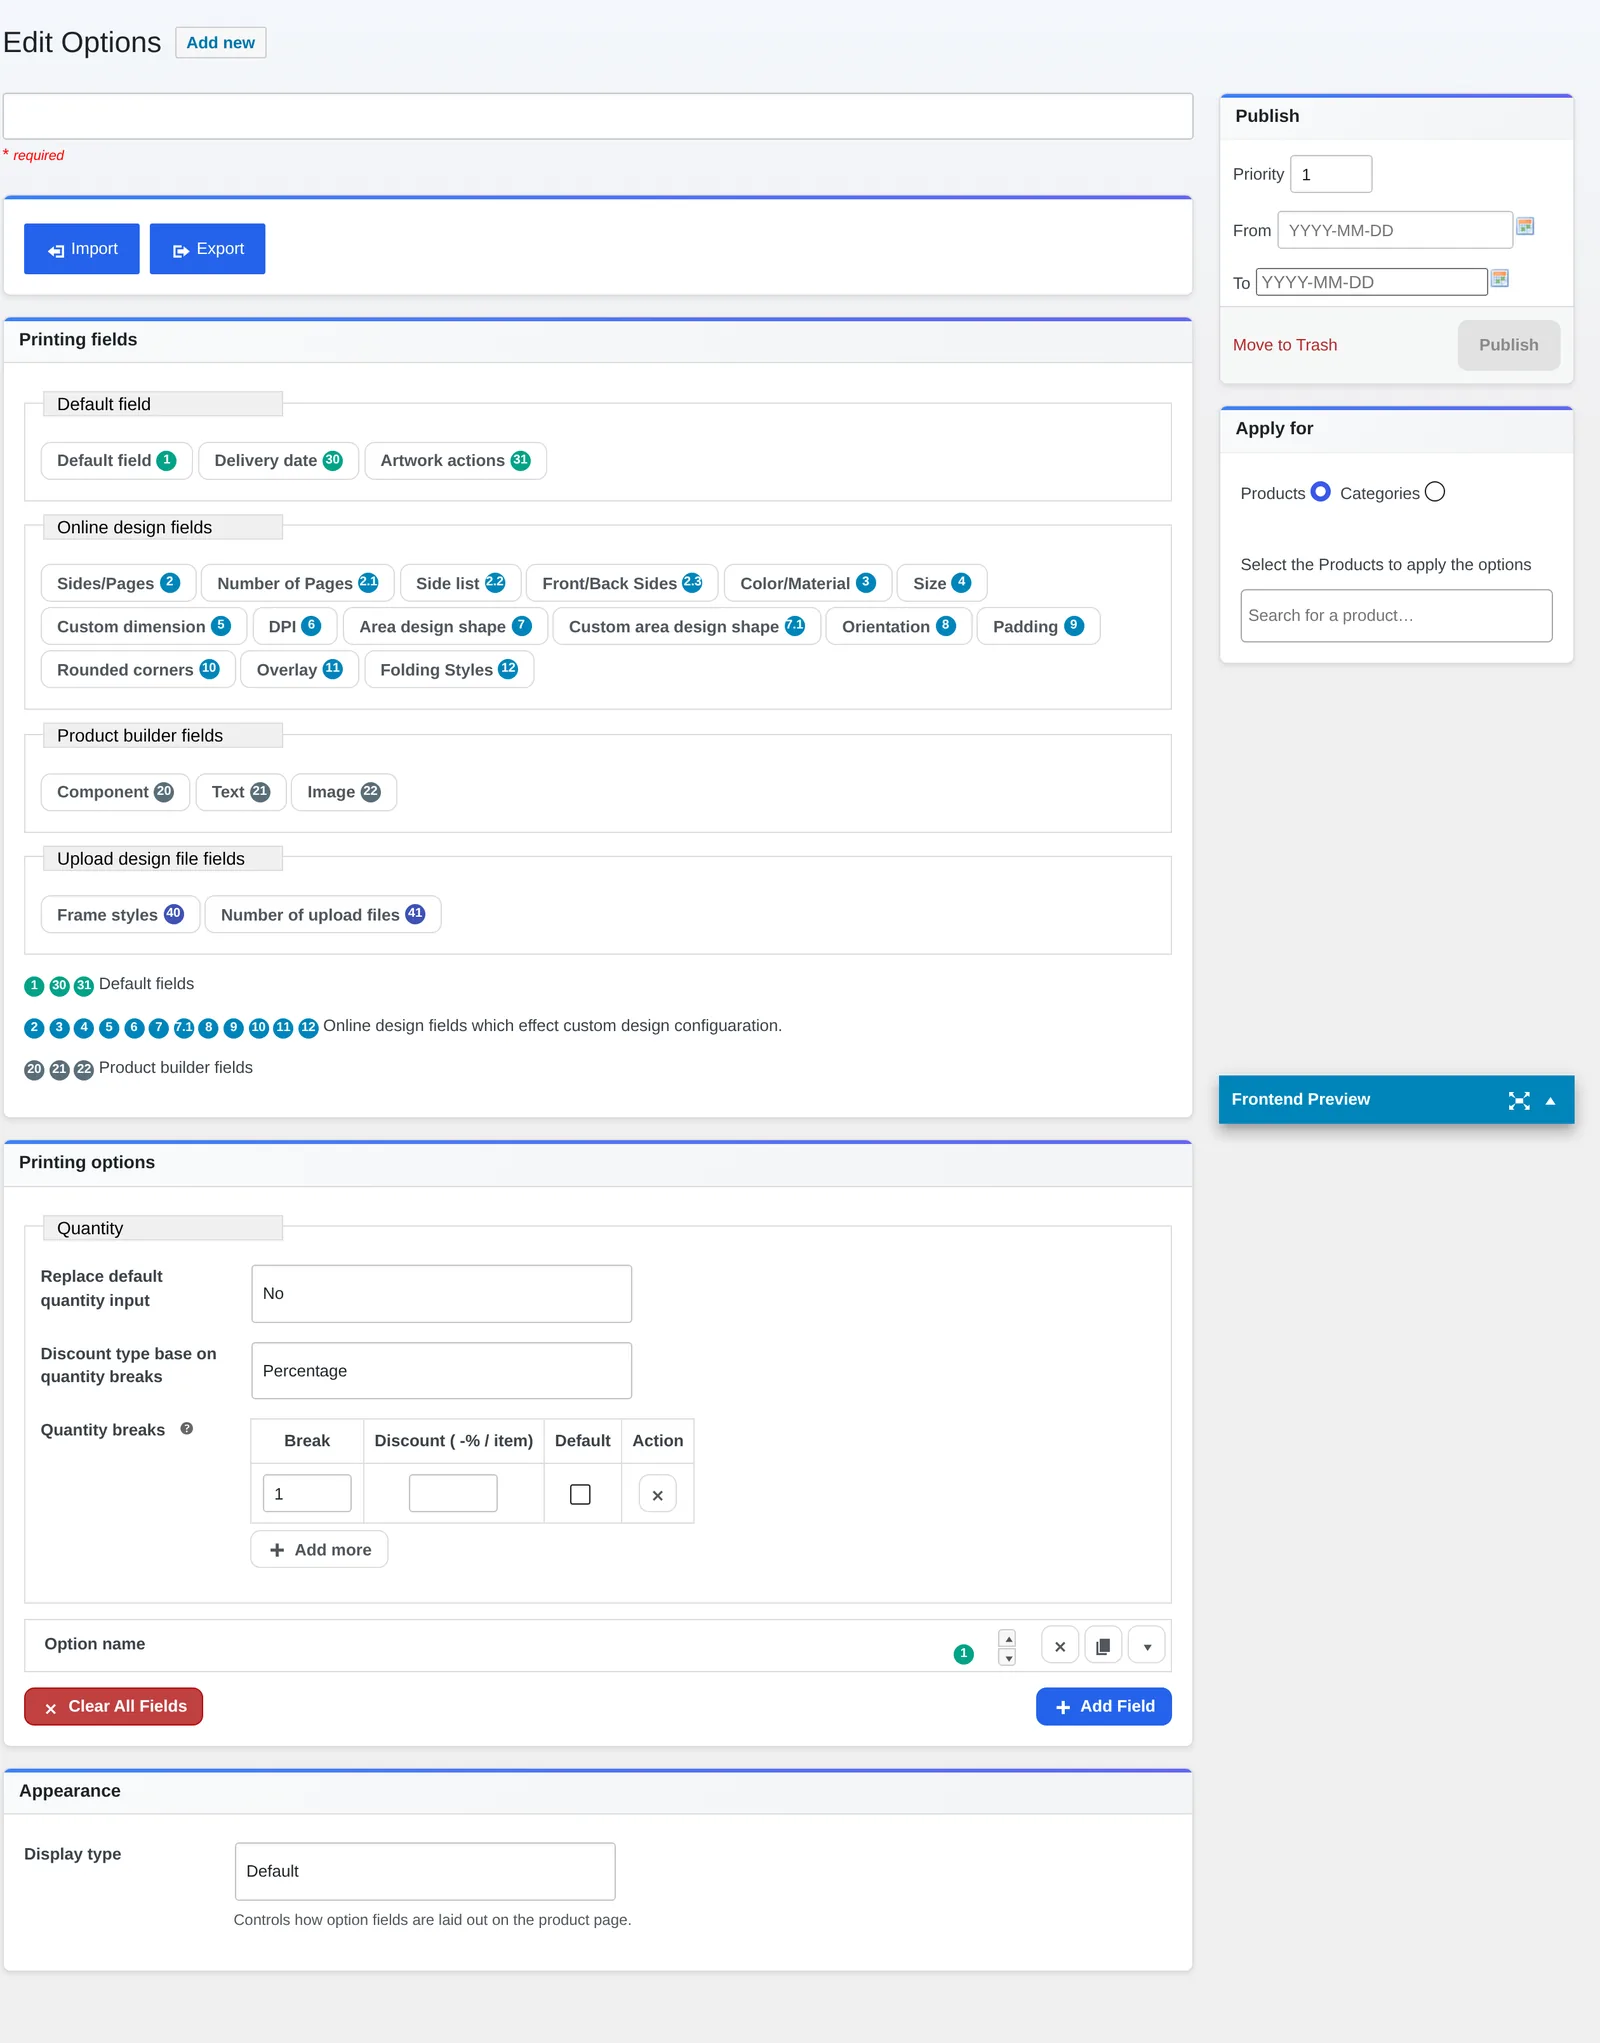
The storefront designer: a buyer customizes a template, then clicks Process to send it back to the product page.On the order: Create PDF reports the print-ready PDF that matches the order as Ready, rendered by Cmsmart Cloud.Printing Options: each option set (and its price matrix) is reusable across every product you assign it to.Approving from the order screen: tick the design, choose Accept, click GO — the approved-artwork lock takes it from there.
Plugin out of the box (2.17.0)
Custom build by Cmsmart
Store
Your existing WooCommerce theme
Print-shop store installed and configured from a preset, products and pages ready
Editor
Modern layout, templates, text, cliparts, photos, layers
Brand-specific tools, templates and product rules for your catalogue
Pricing
Printing options and price matrix
Pricing engine for your own formulas, MOQ and B2B price lists
Production
Print-ready PDF, file sync to FTP/SFTP/Dropbox/S3/Google Cloud
Sync with your MIS, ERP or production queue
What's the business value of NBDesigner once it's running?
Installing Cmsmart Product Designer turns a WooCommerce product into a self-service design-and-order flow: fewer manual proofs, a shorter path from visit to paid order, and production input that arrives as a file instead of an inbox. Track it with ordinary store metrics, not a new dashboard.
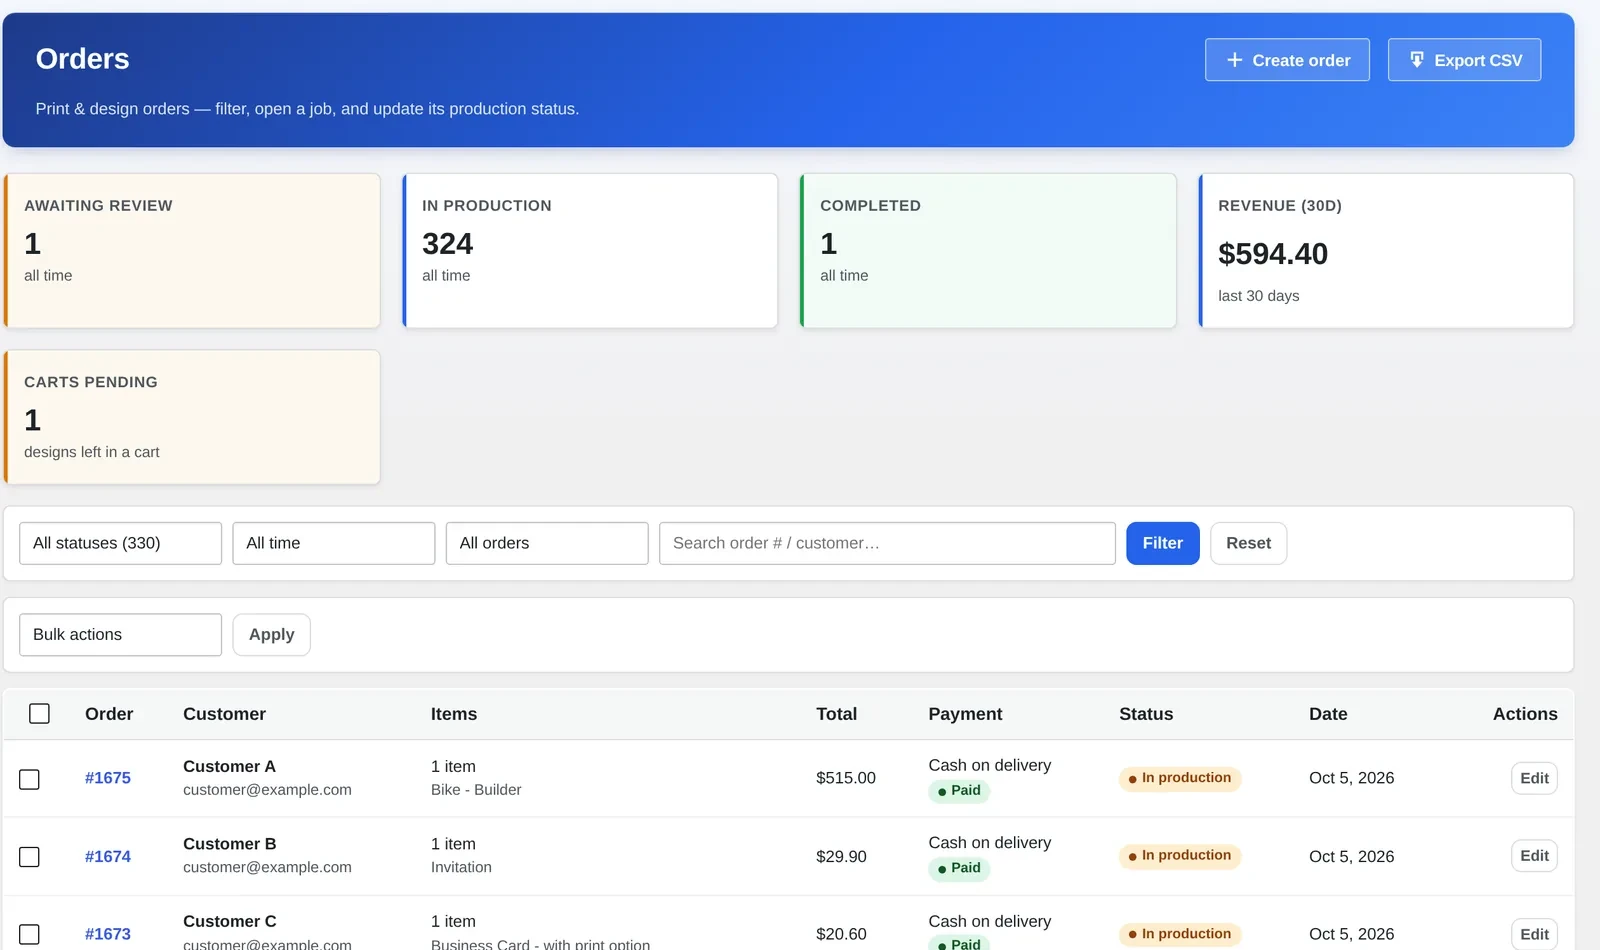
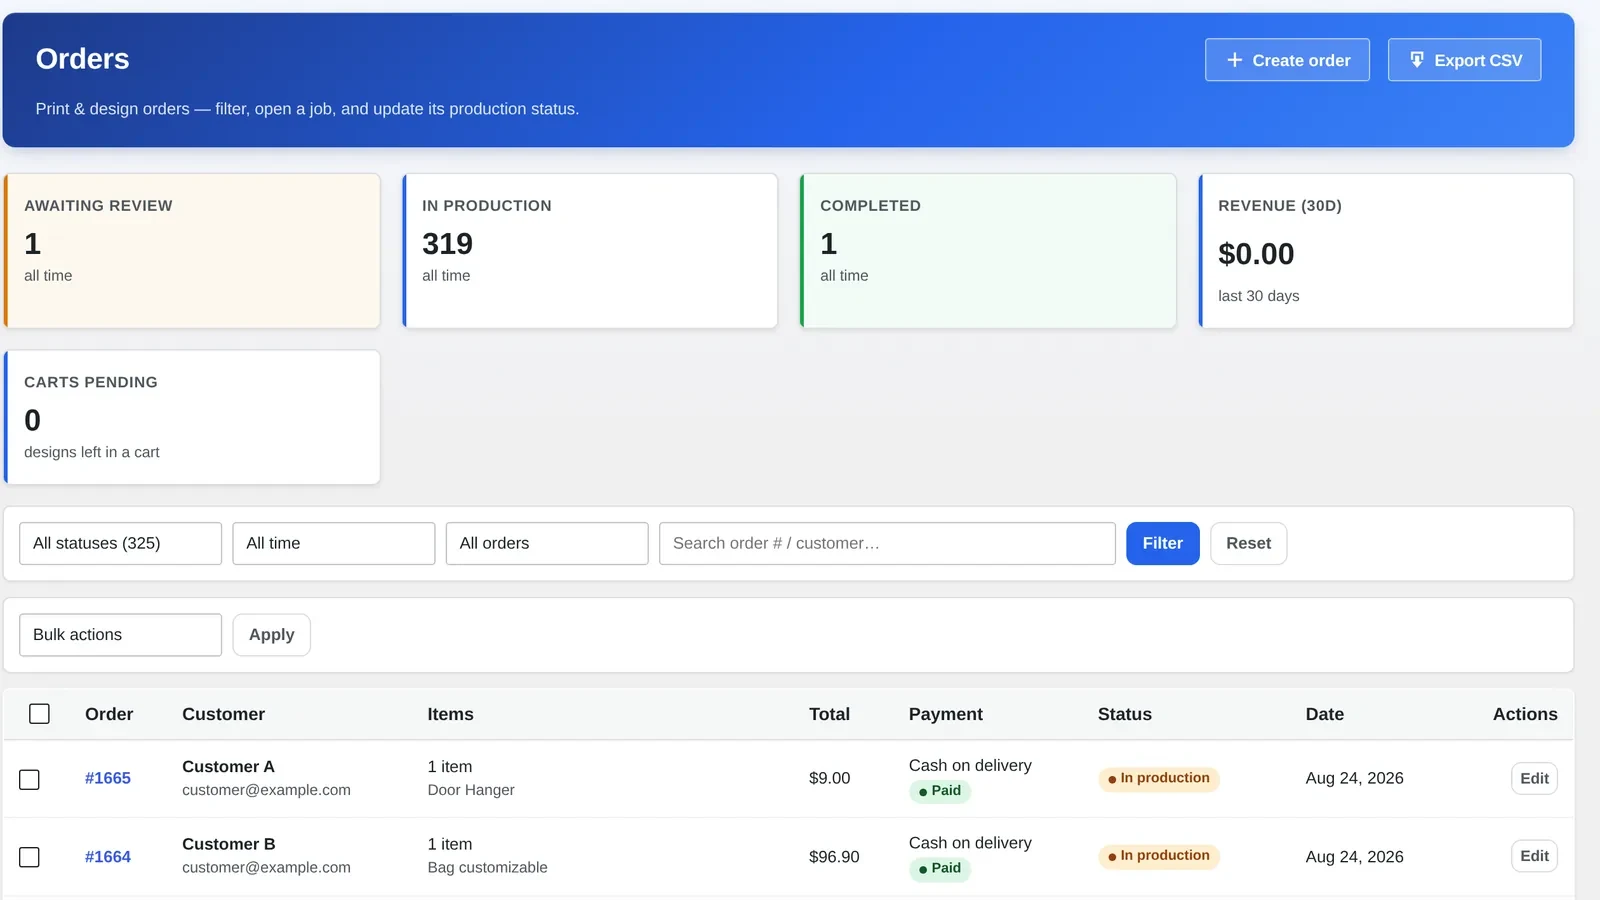
Cmsmart > Orders: every design order with its production status, no inbox required.The same design button on a phone: a personalized product stays orderable outside office hours.The print-ready PDF that matches the order, rendered and timestamped by Cmsmart Cloud — the file your production team actually opens.
Benefit
How it shows up in your business
KPI to track
Fewer manual proofs
Customers design and preview themselves instead of emailing files
Proof emails per order; staff minutes per order
Faster orders
Design, price and checkout happen in one visit
Time from first visit to paid order
Cleaner production input
Artwork and a print-ready PDF are stored with the order, not in an inbox
Orders held for missing or wrong files
A product you can sell 24/7
Personalized products are orderable outside office hours
Share of personalized orders placed outside working hours
ROI worksheet (use your own numbers):
Hours saved per month = personalized orders/month × minutes saved per order ÷ 60
Labor value saved = hours saved × your fully-loaded hourly rate
Compare the total against the one-time setup and the plugin's license cost.
How do I install and configure the NBDesigner plugin on WooCommerce?
Upload the plugin .zip under Plugins > Add New, activate it, and follow the Cmsmart setup wizard: connect a license (or start the free 30-day trial), pick your dimension unit, keep the default NBDesigner pages, then tick Enable Design on a product. The steps below use a live 2.17.0 install.
Requirement
Minimum
WordPress
5.6
PHP
8.0
WooCommerce
8.0.0
MySQL
5.7
Plugin dependency
WooCommerce must be active
Back up your site first, as with any plugin install. If you are running a release older than 2.15.0, update now: 2.16.1 closes an image-import route that let an unauthenticated visitor upload an executable file, and tightens the script-blocking rules in the upload folders. Nginx servers ignore .htaccess, so add the equivalent rule on Nginx yourself.
Upload. WordPress admin > Plugins > Add New > Upload Plugin, choose the plugin .zip, click Install Now.
Activate. Click Activate Plugin. A new Cmsmart menu appears, and a fresh install opens the setup wizard.
Connect a license. Enter your store email and click Activate my license: it finds an existing Cmsmart license for your store or starts a 30-day trial automatically, with no key to paste. A manual key-paste field remains if you already have one.
General setup. Pick the dimension unit (cm, in, mm, ft or px) used to calculate the design area, and the font subset for your language.
NBD Pages. Keep Create default NBDesigner pages ticked, then finish on the Cmsmart overview.
After activation: the plugin row confirms the version and the WooCommerce requirement.Video: how to activate your license key (Cmsmart on YouTube).
If you skip the wizard, activate later under Cmsmart > License. The same area also opens Cmsmart Cloud, one admin page with Overview, AI Tools, Storage and Billing tabs for the plugin's AI preflight tools, managed design storage and token balance — none of that is required to take your first order. Once orders are flowing, tune the back-end options with the NBDesigner settings guide.
Enable the designer on a first product:
Go to Products and edit a product.
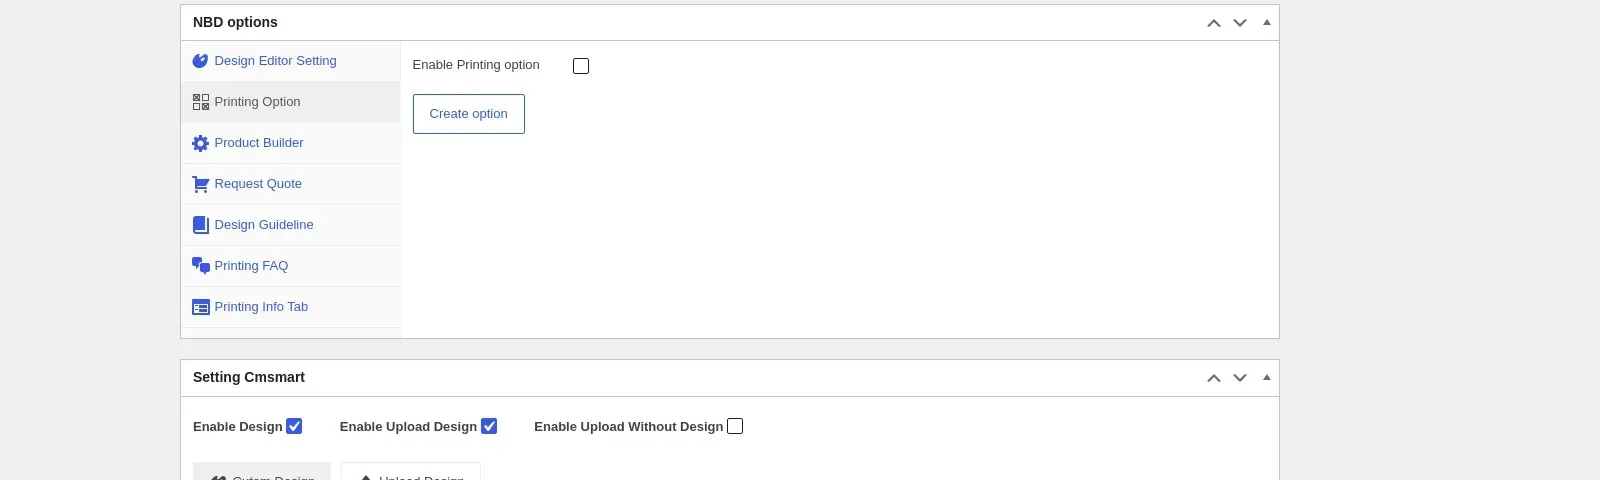
In the Setting Cmsmart box, tick Enable Design. Optionally tick Enable Upload Design and Enable Upload Without Design.
Set the Product area and Design area (width, height, top, left), and choose the Modern editor layout (Classic is deprecated).
Update the product and open it on the storefront: a design button now opens the editor for your customers.
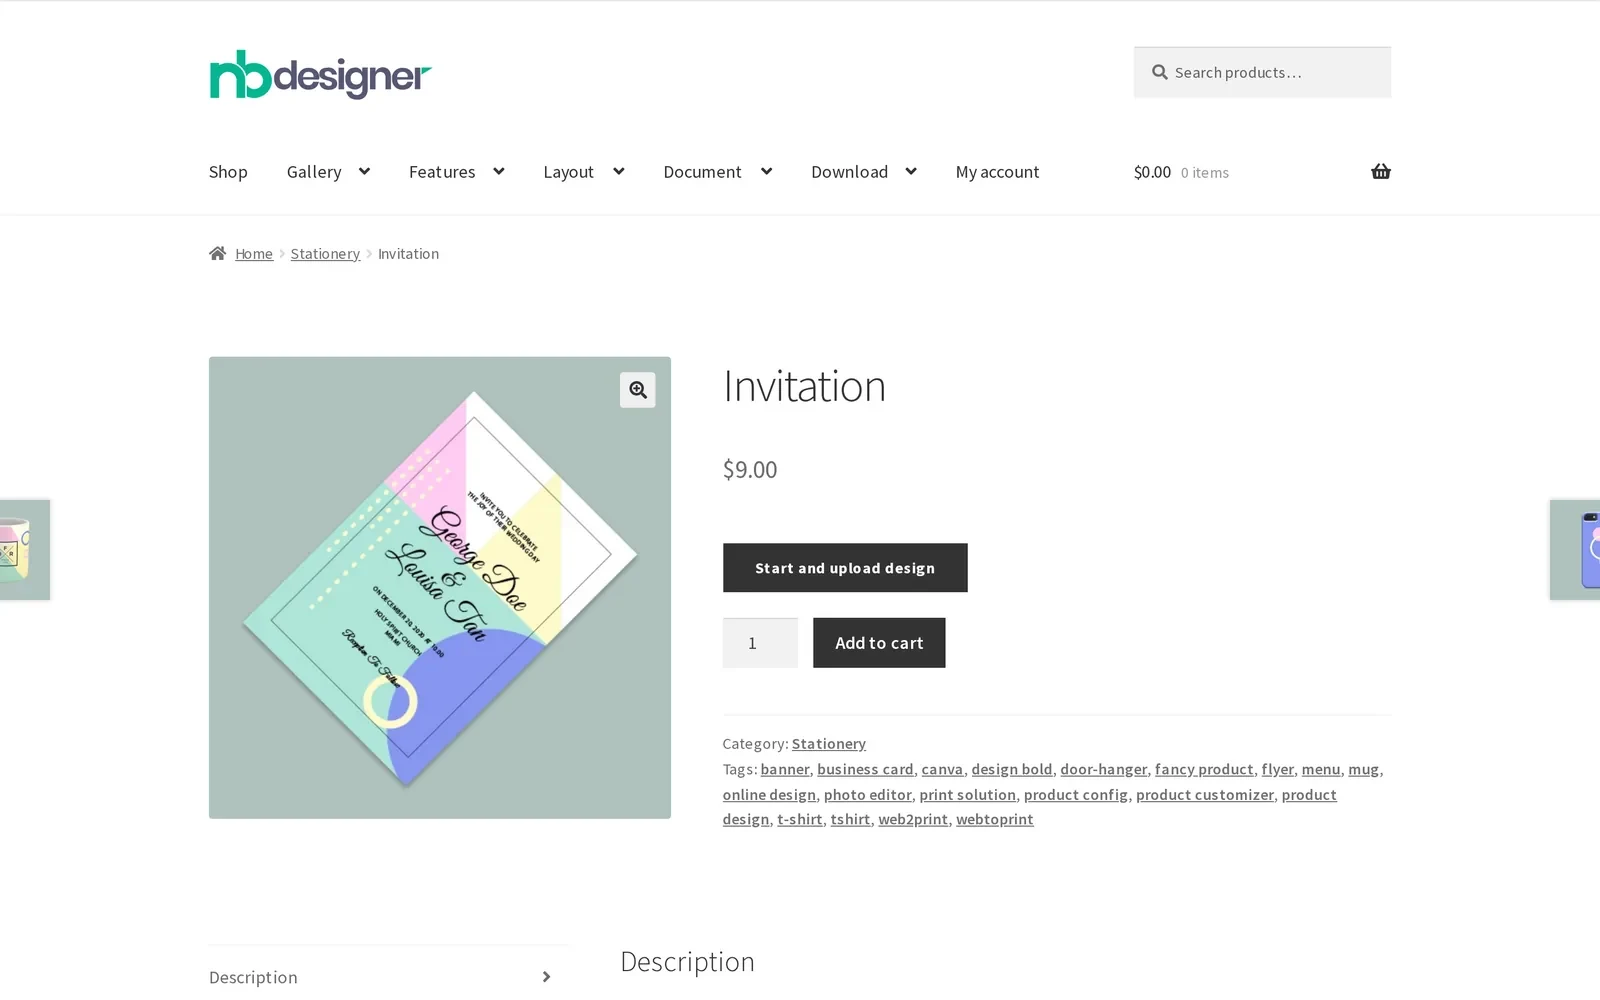
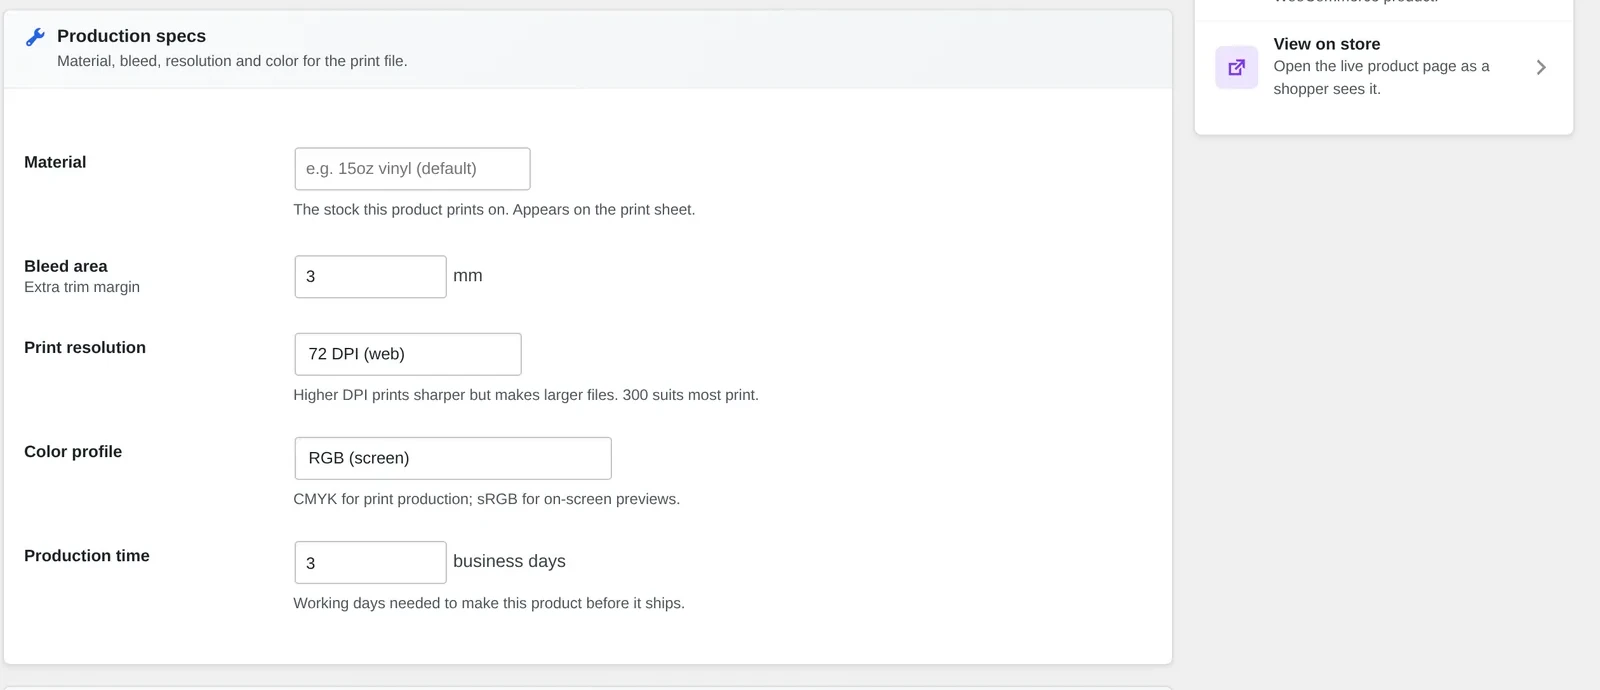
The NBD options and Setting Cmsmart boxes at the bottom of a WooCommerce product edit screen.What a buyer sees once design is enabled: a start-design button beside Add to cart.The fields behind that insight: bleed, print resolution and color profile are set per product, not guessed from the photo.
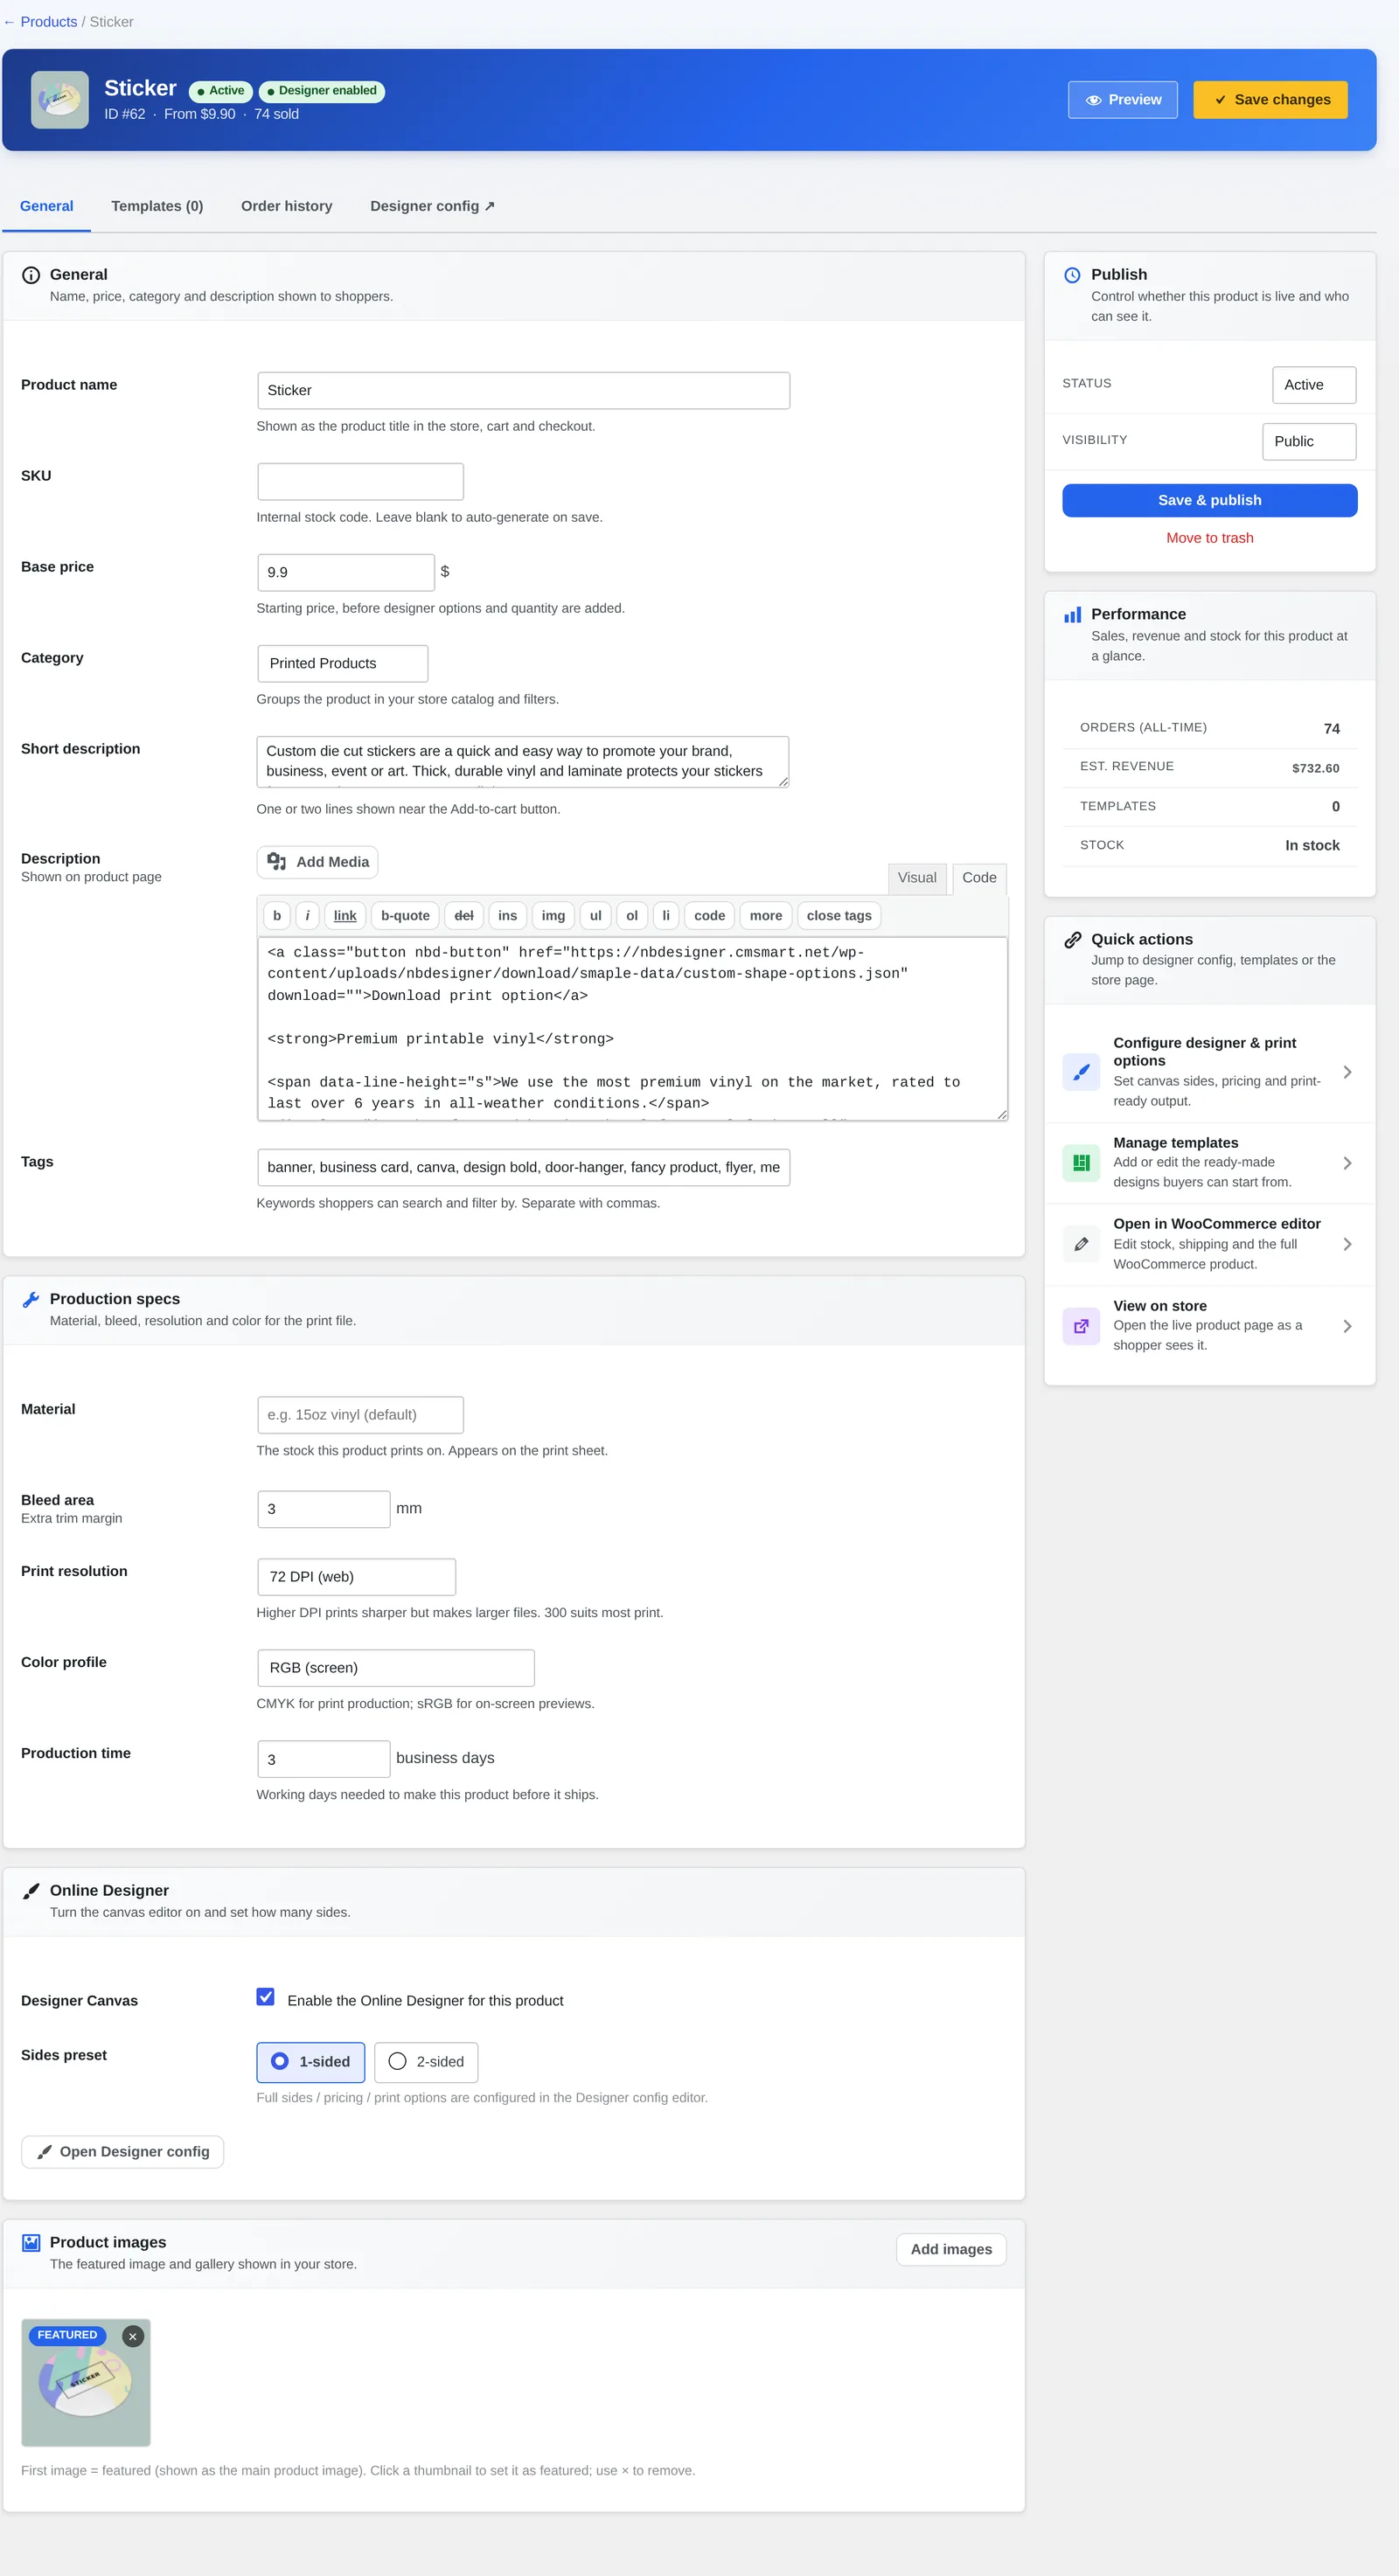
Cmsmart insight: set the design area to the real printable area of the product, with bleed and safe zone, before you launch — not a rectangle copied from the product photo. It looks fine on screen and produces files your printer has to fix by hand. Check it once per product, with your printer's template open beside you, before the first real order.
If something does not work:
Warning about max_input_vars on the Printing Options screen: raise that PHP setting so large option groups save.
Warning about max_file_uploads in the product box: raise it so multi-side designs save.
JPG export needs the PHP Imagick extension; CMYK/ICC conversion needs Imagemagick with lcms2.
Status stuck on Expired or LITE after renewing: use Re-sync licence on the License page — the plugin caches license state for up to 6 hours, and this forces a fresh check.
What can Cmsmart build beyond the plugin?
The plugin covers design, pricing and order capture. Cmsmart, a custom development partner since 2012, builds what your business needs on top of it: a ready print-shop store, branded editor tools, your own pricing rules, and production integrations, delivered as a project with discovery, design, sprints, QA, launch and support.
Done-for-you install and preset. Business reason: launch without learning the admin yourself. We install, configure and load a print-shop preset (store setup service).
Editor customization. Business reason: a design experience that fits your products and brand, not a generic toolset. We build custom tools, templates and layouts.
Production integration. Business reason: no re-keying between store and print floor. We connect orders and design files to your MIS, ERP or production queue.
Cmsmart has built ecommerce and web-to-print stores since 2012 as a division of Netbase JSC, with 6,300+ client projects and 500+ custom development projects behind it. Beyond the published figures, real installs on live stores are where the plugin and the setup advice in this guide actually come from.
Cmsmart has built ecommerce and web-to-print stores since 2012 as a division of Netbase JSC: 6,300+ client projects and 500+ custom development projects (WorkSuite project records, Sep 2026), rated 4.2 on Trustpilot (404 reviews). See real work on our projects page.
“We have had the NB Designer plugin installed for three years and have experienced absolutely no problems during that time,” writes a verified Trustpilot reviewer (Web Developer, GB, 2026 review).
Frequently asked questions
Does NBDesigner work without WooCommerce?
No. WooCommerce is a declared required plugin, and the designer attaches to WooCommerce products.
Does it support HPOS order storage?
Yes. Order queries handle both WooCommerce's High-Performance Order Storage and the legacy post store, and the Customer Design box loads on the WooCommerce Orders screen (fixed in 2.17.0).
Where do I find my license key?
In the email sent when you start the trial or buy, and in your Cmsmart Dashboard under Downloads & license key. Most new installs never need to paste one: Activate my license starts the trial automatically.
Which editor layout should I choose?
Modern. The plugin marks it recommended and has stopped adding features to Classic.
Can Cmsmart install and configure it for me?
Yes. Cmsmart offers store setup and preset installation as a service; request a quote with your store URL and the products you want to personalize.
Can it connect to our MIS or ERP?
Not out of the box. Cmsmart builds that connection as a custom project once your order and file flow is running.
Launch personalized products without the setup work
Tell us your products and your print workflow. We install, configure and customize Cmsmart Product Designer so your first designed orders arrive ready for production.
Applies to Cmsmart Product Designer (NBDesigner) 2.17.0 · Updated October 2026. This guide shows how to install and configure NBDesigner on WooCommerce, step by step, with screenshots from the live nbdesigner.cmsmart.net demo, currently running the 2.18.0-dev build that follows the 2.17.0 release covered here, so your own wp-admin menu matches exactly.
In short
Outcome: install, license and configure Cmsmart Product Designer (NBDesigner) correctly the first time so every order arrives as a print-ready file, not a screen-resolution preview someone has to fix by hand.
How it works: activate the plugin and license, set General, Upload design, Output and Printing Options once in wp-admin, then switch the Online Designer on per product with its own bleed, DPI and color profile.
What it takes: an active WooCommerce store, PHP 8.0+ with Imagick for JPG/CMYK export, and roughly two to three hours for a confident first pass through the settings.
A WooCommerce store that lets customers design their own t-shirts, business cards or signage only turns every finished design into a usable print file if you install and configure NBDesigner on WooCommerce correctly before the first order ships, and most of the support tickets we see trace back to a setting nobody ever changed from its default.
What does it cost your team when the product designer is never tuned?
Cmsmart Product Designer (NBDesigner) turns a WooCommerce product page into a self-serve design studio, but a default install leaves watermark, DPI and bleed settings unset. Orders then arrive as low-resolution previews instead of print-ready files, and someone on your team has to open, fix and re-export every one by hand before it can go to press.
In the stores we audit, the same five problems show up whenever setup was skipped or rushed:
Low-DPI or RGB files that bounce back from the press because Default output resolution was left at a screen-friendly value instead of a print one.
Missing bleed and safe zone, so the trimmed print cuts into text or artwork the customer approved.
Staff re-exporting artwork order by order because Output › Auto export design to PDF was never turned on.
Quotes that don't match the price matrix a customer actually selected, because Printing Options were copied from a demo instead of configured per product.
Rejected uploads when a customer's file type isn't in the allowed list, which reads as a broken store rather than a setting.
None of that needs a market statistic to prove — it shows up as a formula your own team already lives with: reprint minutes per order × orders per week × your staff's hourly cost. Multiply those three numbers with your own figures and you'll see why a careful setup pass pays for itself in the first week.
What does a well-tuned design-to-print workflow look like?
Once Cmsmart Product Designer is configured, the plugin carries a design from the product page to a print-ready PDF without anyone touching it in between. The buyer sees accurate bleed and pricing while they design; your team opens Orders the next morning to files that already match your press specs.
Example scenario. A buyer opens your sticker product page at 9 p.m., clicks "Design here online," drags in their logo, and the live preview already shows the bleed line your team set in Output settings. They check out; by the time your shop opens, Cmsmart > Orders already shows a print-ready PDF rendered at 300 DPI in CMYK with the bleed baked in, because Output settings and the product's production specs were configured once, in advance. Nobody exported anything overnight.
What a correctly configured product page looks like to the buyer: a single "Start and upload design" entry point into the designer.
That gap between "installed" and "actually running itself" is almost always a settings gap, not a feature gap — which is why this guide walks the settings in the order that matters. If you'd rather have this configured for you, talk to an ecommerce expert about your setup.
How does Cmsmart Product Designer turn a plugin into that workflow?
Cmsmart Product Designer (NBDesigner) is built from six configurable layers: the storefront entry point, the design canvas, upload rules, the output engine, the pricing engine and per-product production specs. Configuring each layer once is what turns a generic plugin install into a store-specific, print-ready workflow.
Storefront entry point — the product-page button and the "Upload a full design / Design here online" chooser buyers see first.
Design canvas — the Modern editor layout, measurement units and default DPI set in General settings.
Upload rules — allowed/disallowed file types, size limits and minimum DPI for customer-supplied artwork.
Output engine — watermarking, bleed display, CMYK/ICC export and automatic print-ready PDF rendering.
Pricing engine — Printing Options: the price-matrix rules attached to each product or category.
Per-product production specs — bleed, resolution and color profile set on the individual product, which can override the store-wide default.
Cmsmart insight: in our support queue, most "the print file looks wrong" tickets trace back to one setting: Default output resolution – DPI left at 150 (a screen-friendly default) instead of 300 for production stock. Check that one field before you check anything else.
Step
Manual / email-based workflow
Cmsmart Product Designer, configured
Proofing
Customer emails a file; staff reply with a mockup for approval
Buyer sees their design and price live on the product page before checkout
File prep
Staff open each design in an editor to set bleed, DPI and CMYK
Output settings and per-product specs apply automatically to every order
Pricing
Staff quote manually from a price sheet
Printing Options price matrix calculates the total as options change
Uploads
Any file type arrives; staff convert what they can use
Upload design settings reject the wrong formats before checkout
Records
Approvals live in email threads
Customer Design approval and the order timeline live in wp-admin
What's the business value of doing this correctly the first time?
A correctly configured Cmsmart Product Designer turns personalization from a support burden into a sales advantage: fewer reprints, faster turnaround and quotes that match what the customer actually ordered. The value shows up in hours saved per week and in orders that don't need a second look before they print.
Benefit
How it shows up in your business
KPI to track
Fewer reprints
Bleed, DPI and color profile are correct before the file reaches the press
Reprint rate (%) per month
Faster turnaround
Auto export skips the manual file-prep step on every order
ROI worksheet (use your own numbers):
Hours saved per week = (orders per week) × (minutes your team currently spends re-checking or re-exporting each design) ÷ 60.
Reprint cost avoided per month = (orders per month) × (your current reprint rate) × (your average cost per reprint).
Compare both to the one-time cost of a careful setup pass, or of having Cmsmart configure it for you.
How do you install and configure NBDesigner on WooCommerce?
Set up Cmsmart Product Designer in this order: install and license the plugin, then configure General, Upload design, Output and Printing Options once store-wide, then enable and fine-tune the Online Designer on each product. Doing it in this order means every product you turn on inherits settings that are already correct.
Confirm prerequisites. WooCommerce must be active and up to date; PHP 8.0+ with the Imagick extension is required for JPG/CMYK export, which Settings > Output will flag if it's missing.
Install and activate the plugin. Upload the Cmsmart Product Designer (NBDesigner) package under Plugins, then activate it; the Plugins row shows the active version and a direct link to Settings.
Activate your license. Open Cmsmart > License and enter the key from your Cmsmart account; the plugin caches that status locally, so re-sync after any upgrade, renewal or domain change instead of assuming it updated on its own.
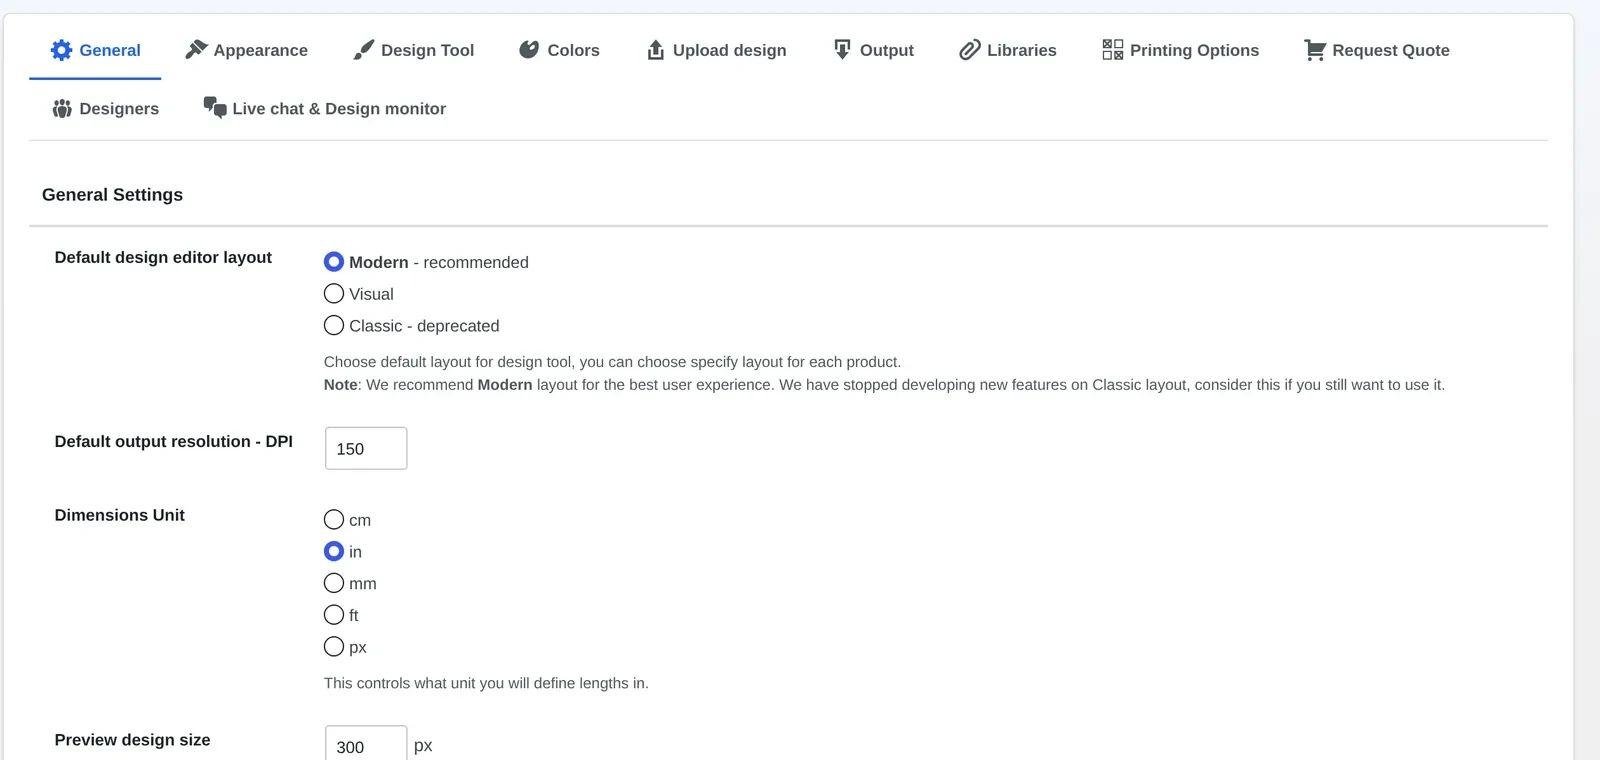
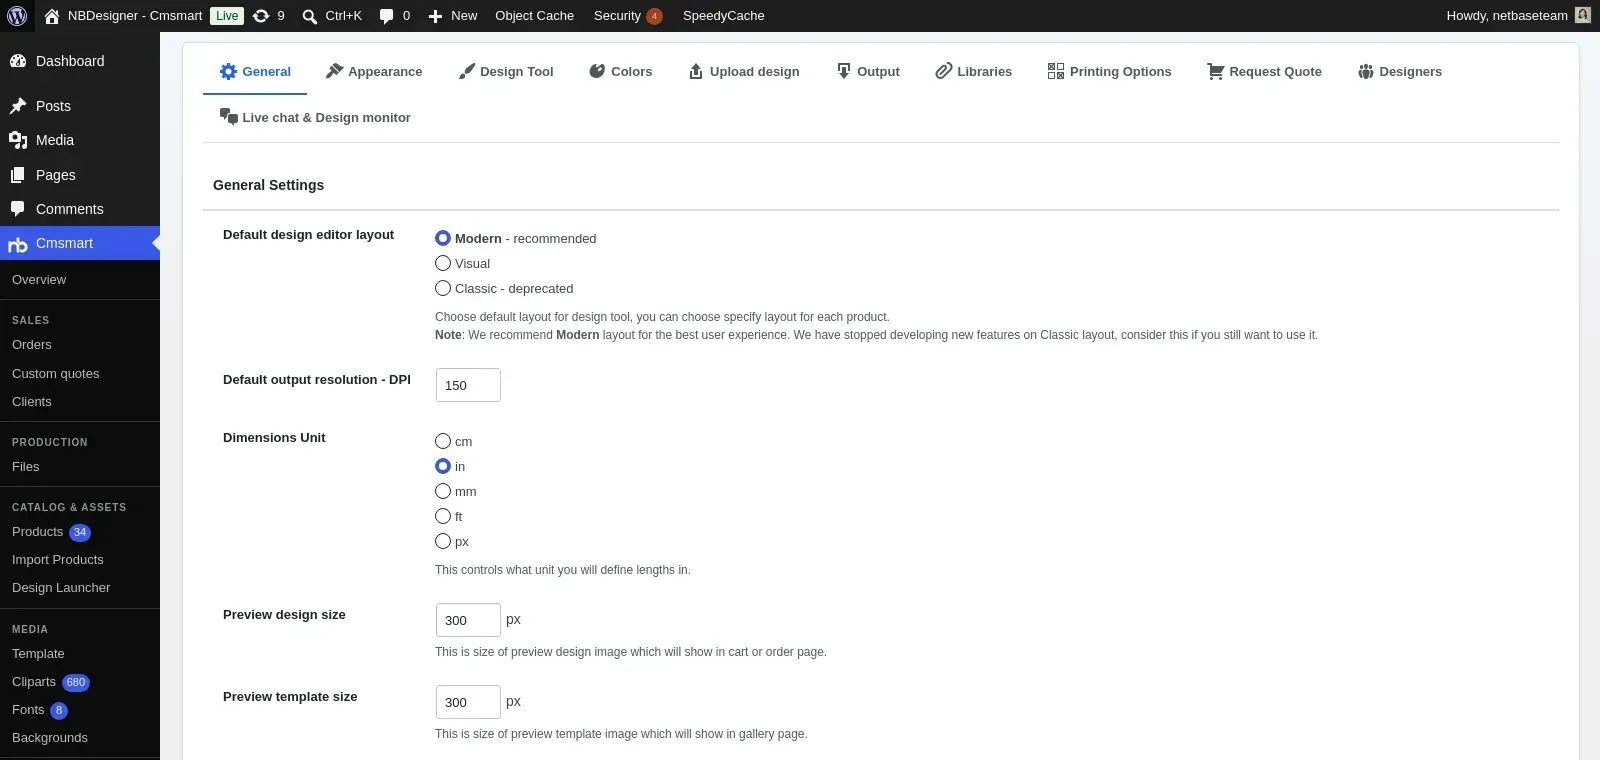
Set General settings. Choose the Modern editor layout, your default output DPI (300 for print, not the 150 screen default), measurement units and preview sizes.
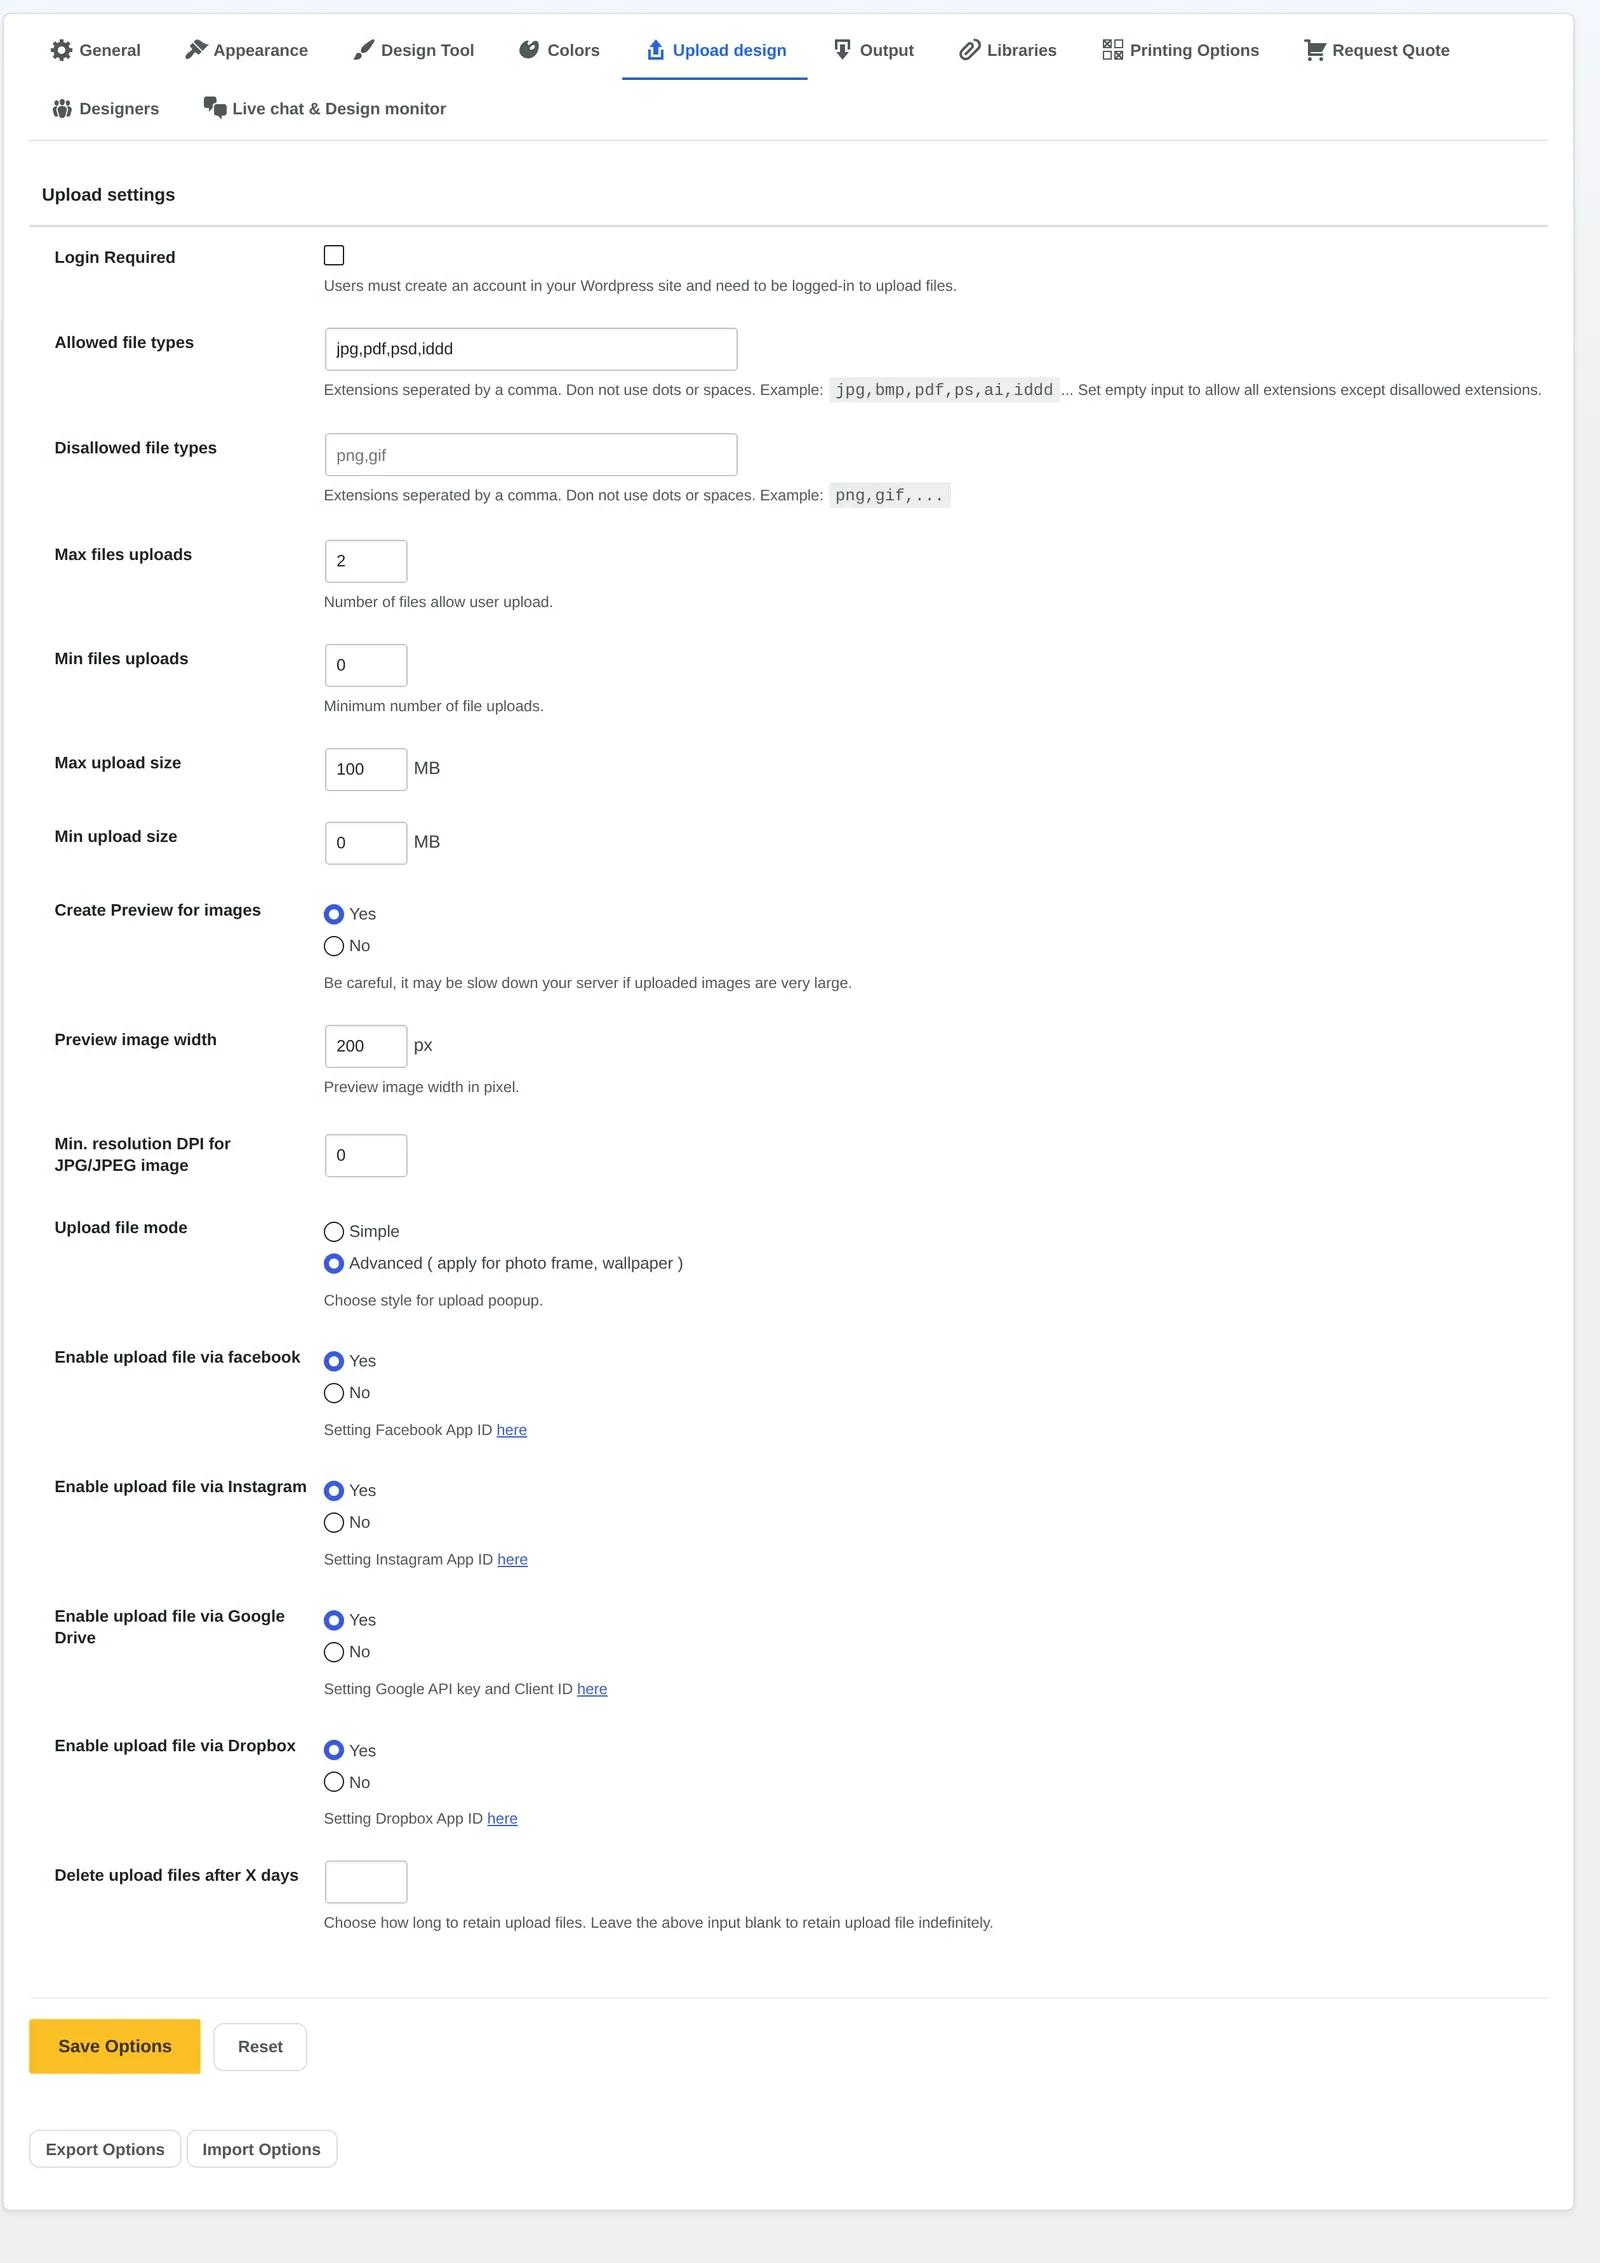
Configure Upload design settings. Set allowed and disallowed file types, minimum/maximum file size and a minimum DPI for customer-supplied artwork, so bad uploads are rejected before checkout, not after.
Configure Output settings. Turn on watermarking for proofs, set the bleed line position, confirm CMYK/ICC export, and turn on automatic export so a print-ready PDF renders as soon as an order reaches your chosen status.
Build your Printing Options price matrix. Create or edit the option sets (size, material, sides, quantity breaks) and apply them to the right products or categories so every quote on the storefront is accurate.
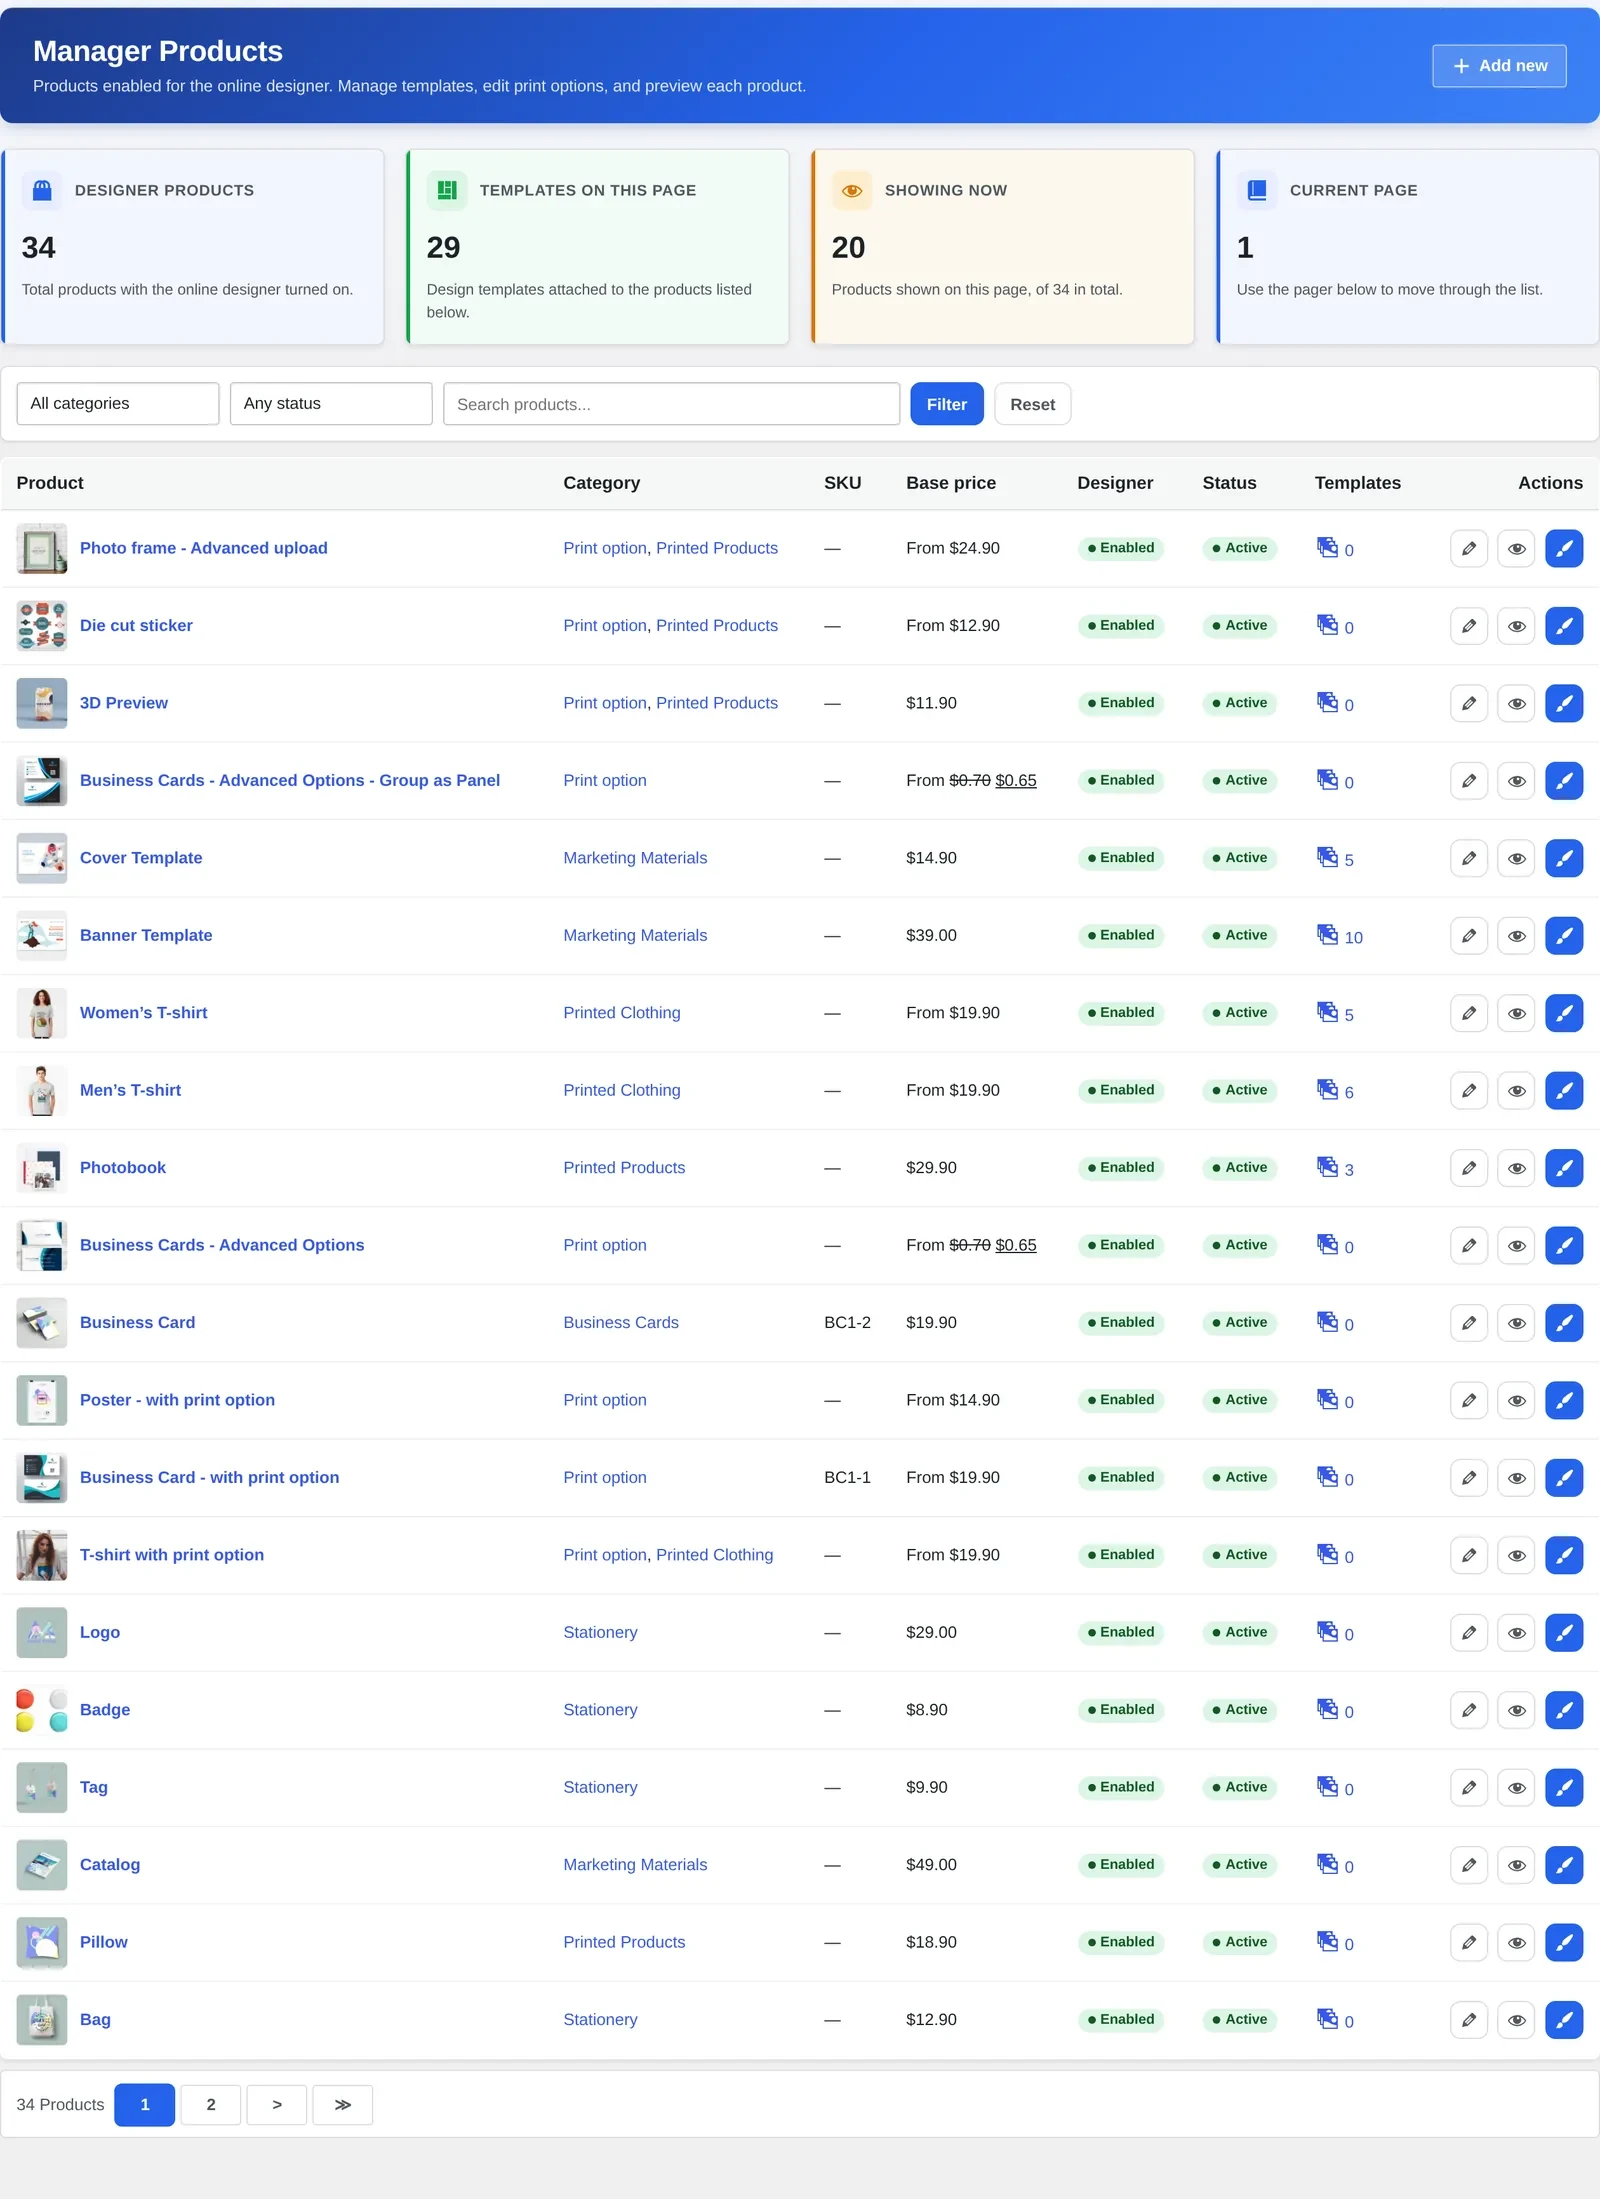
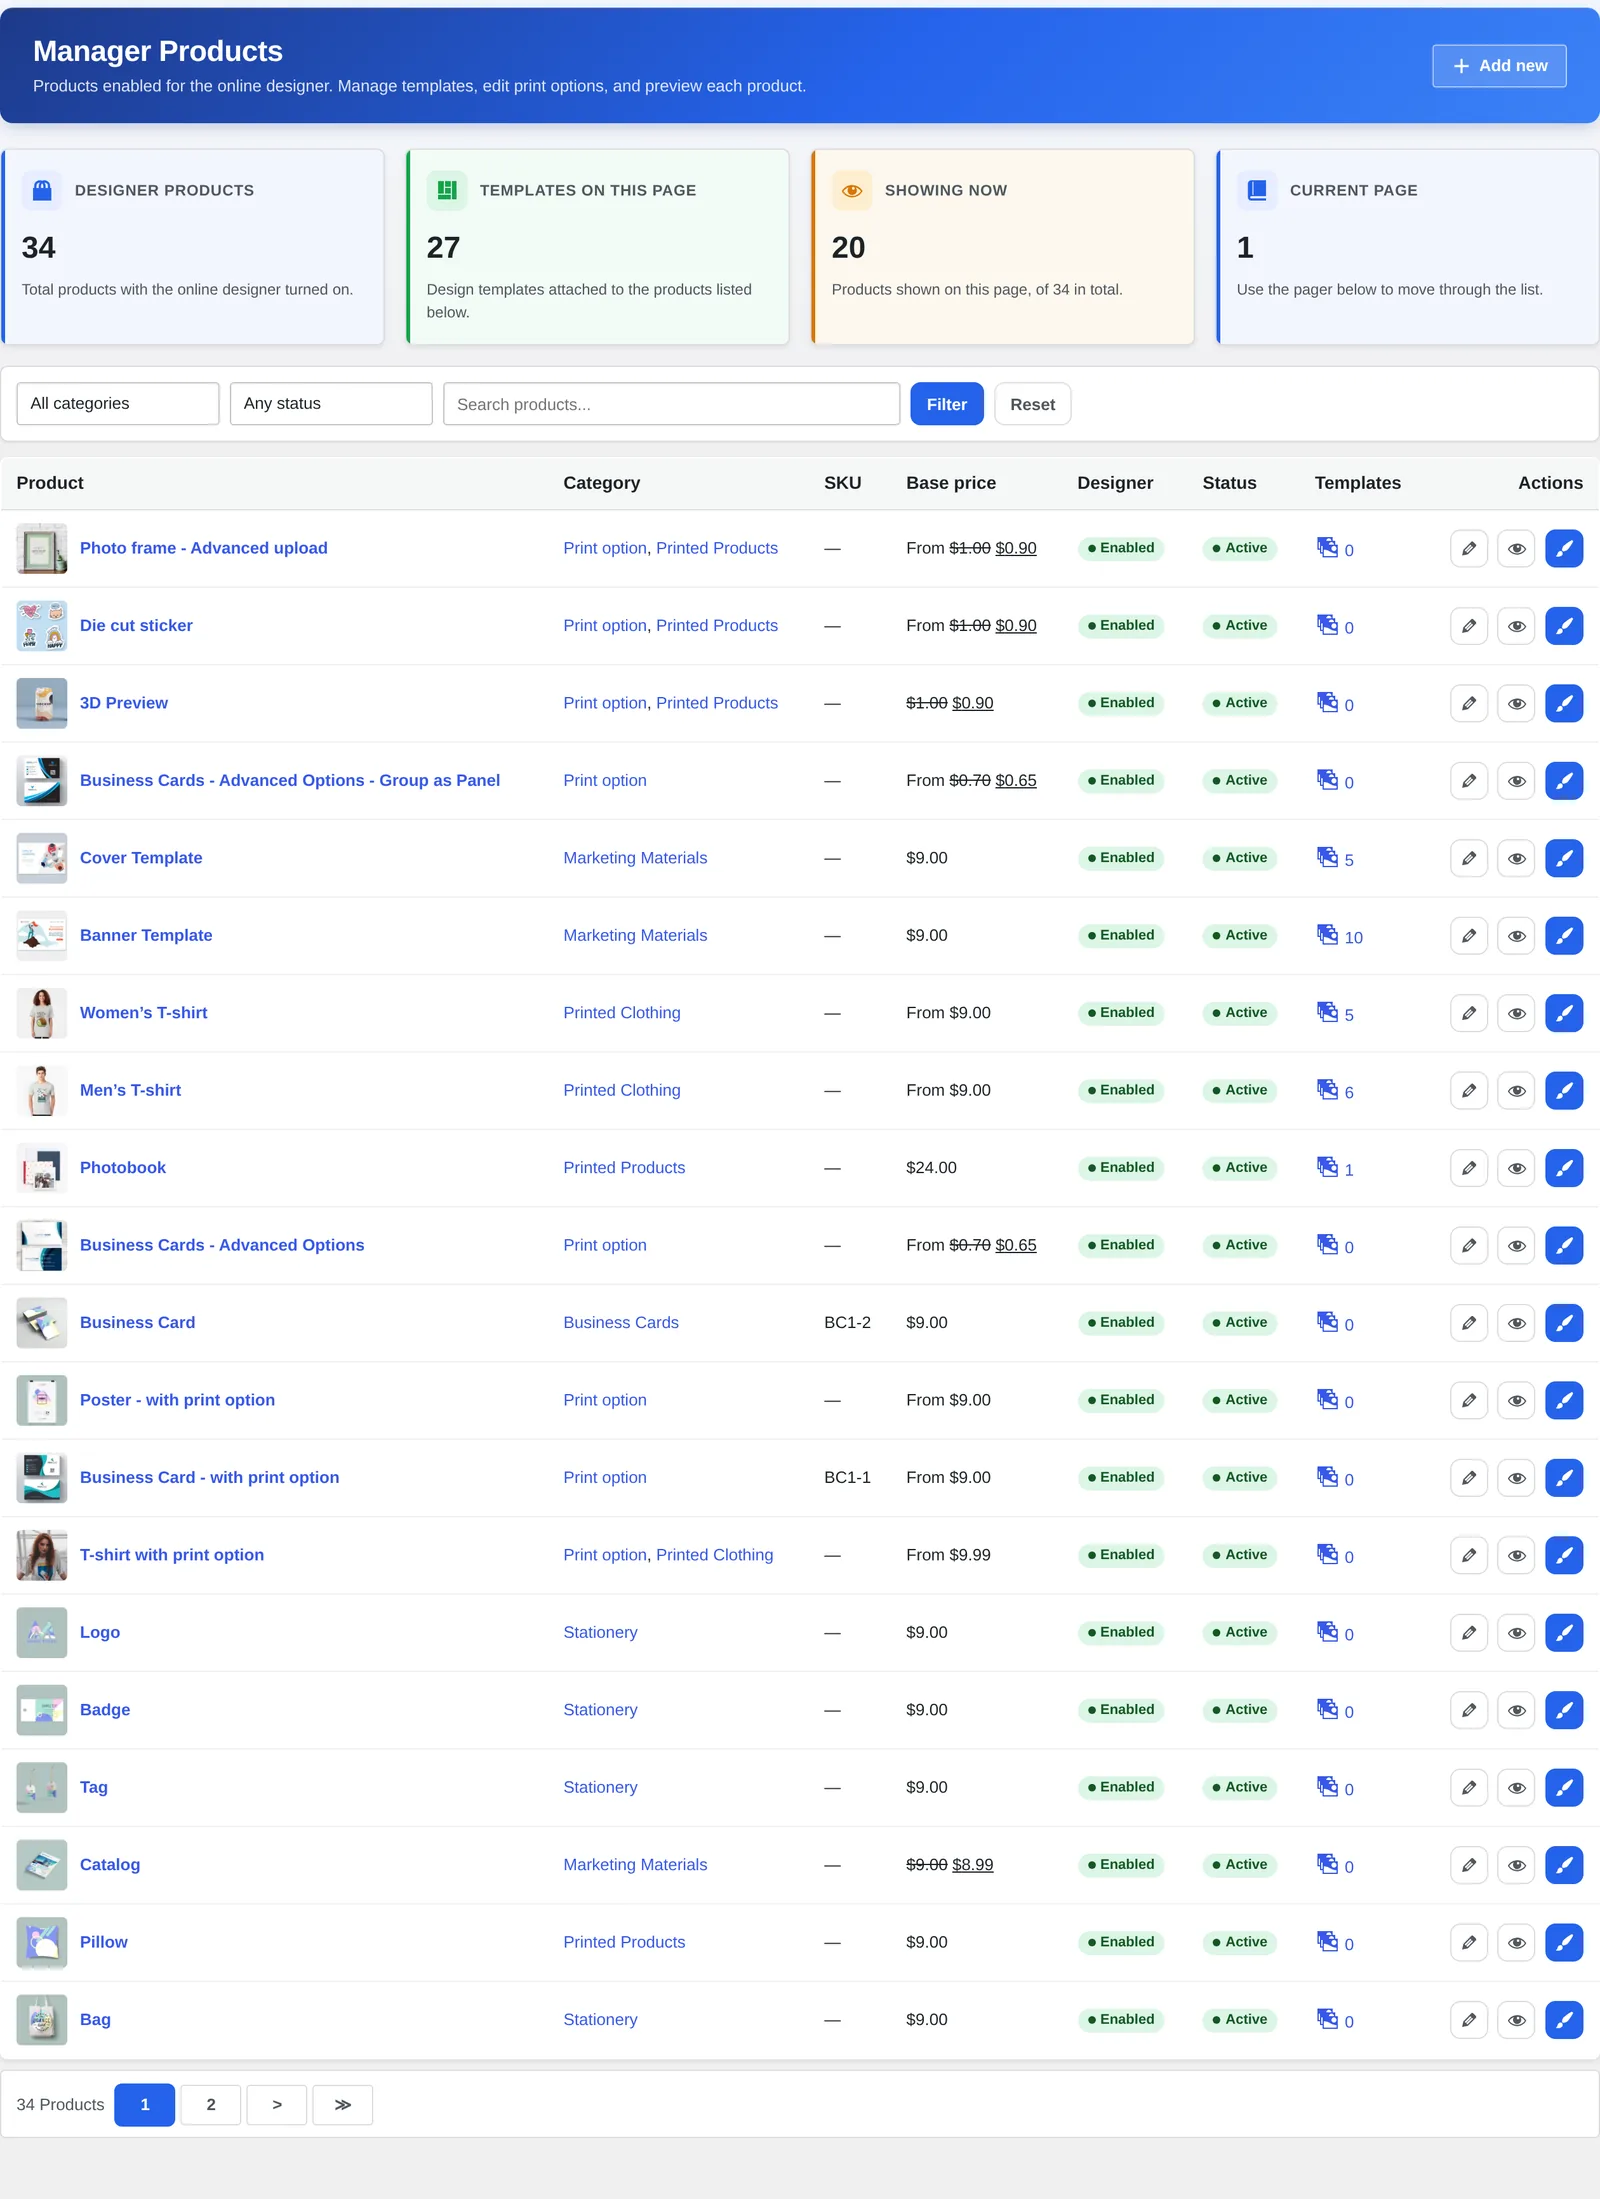
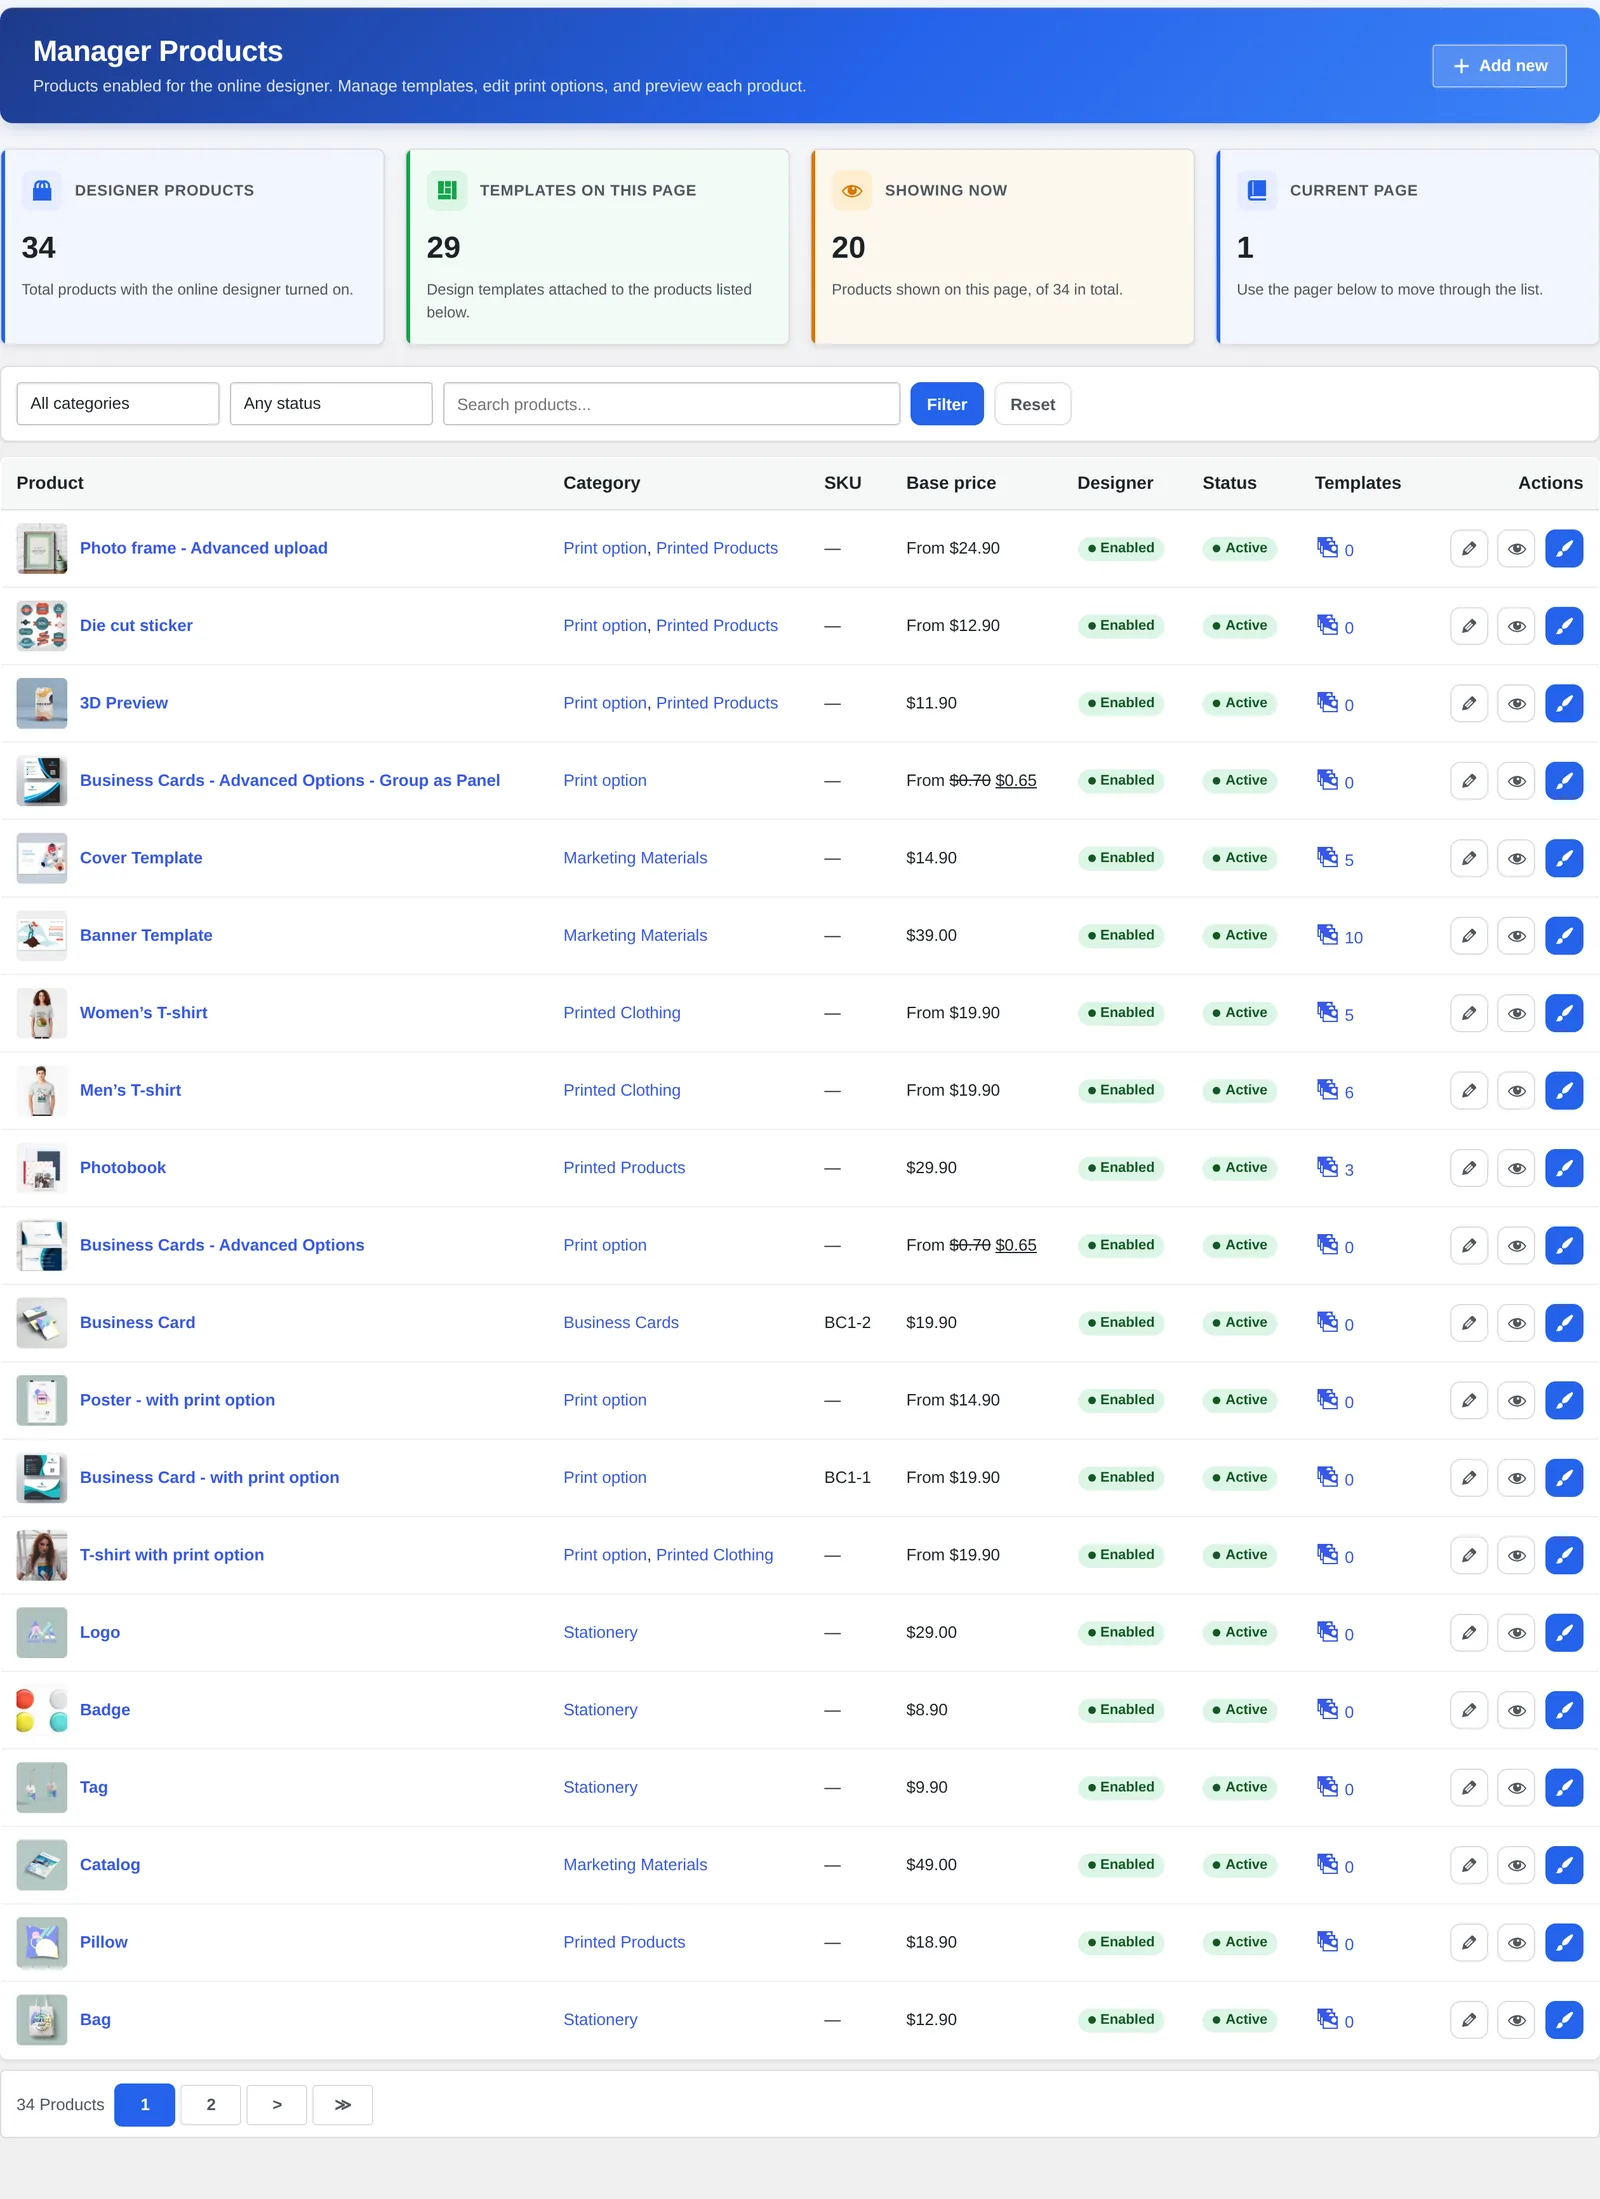
Enable the Online Designer per product. In Product manager, turn the designer on for each SKU you want customers to customize; this is also where you see how many of your products already have it enabled.
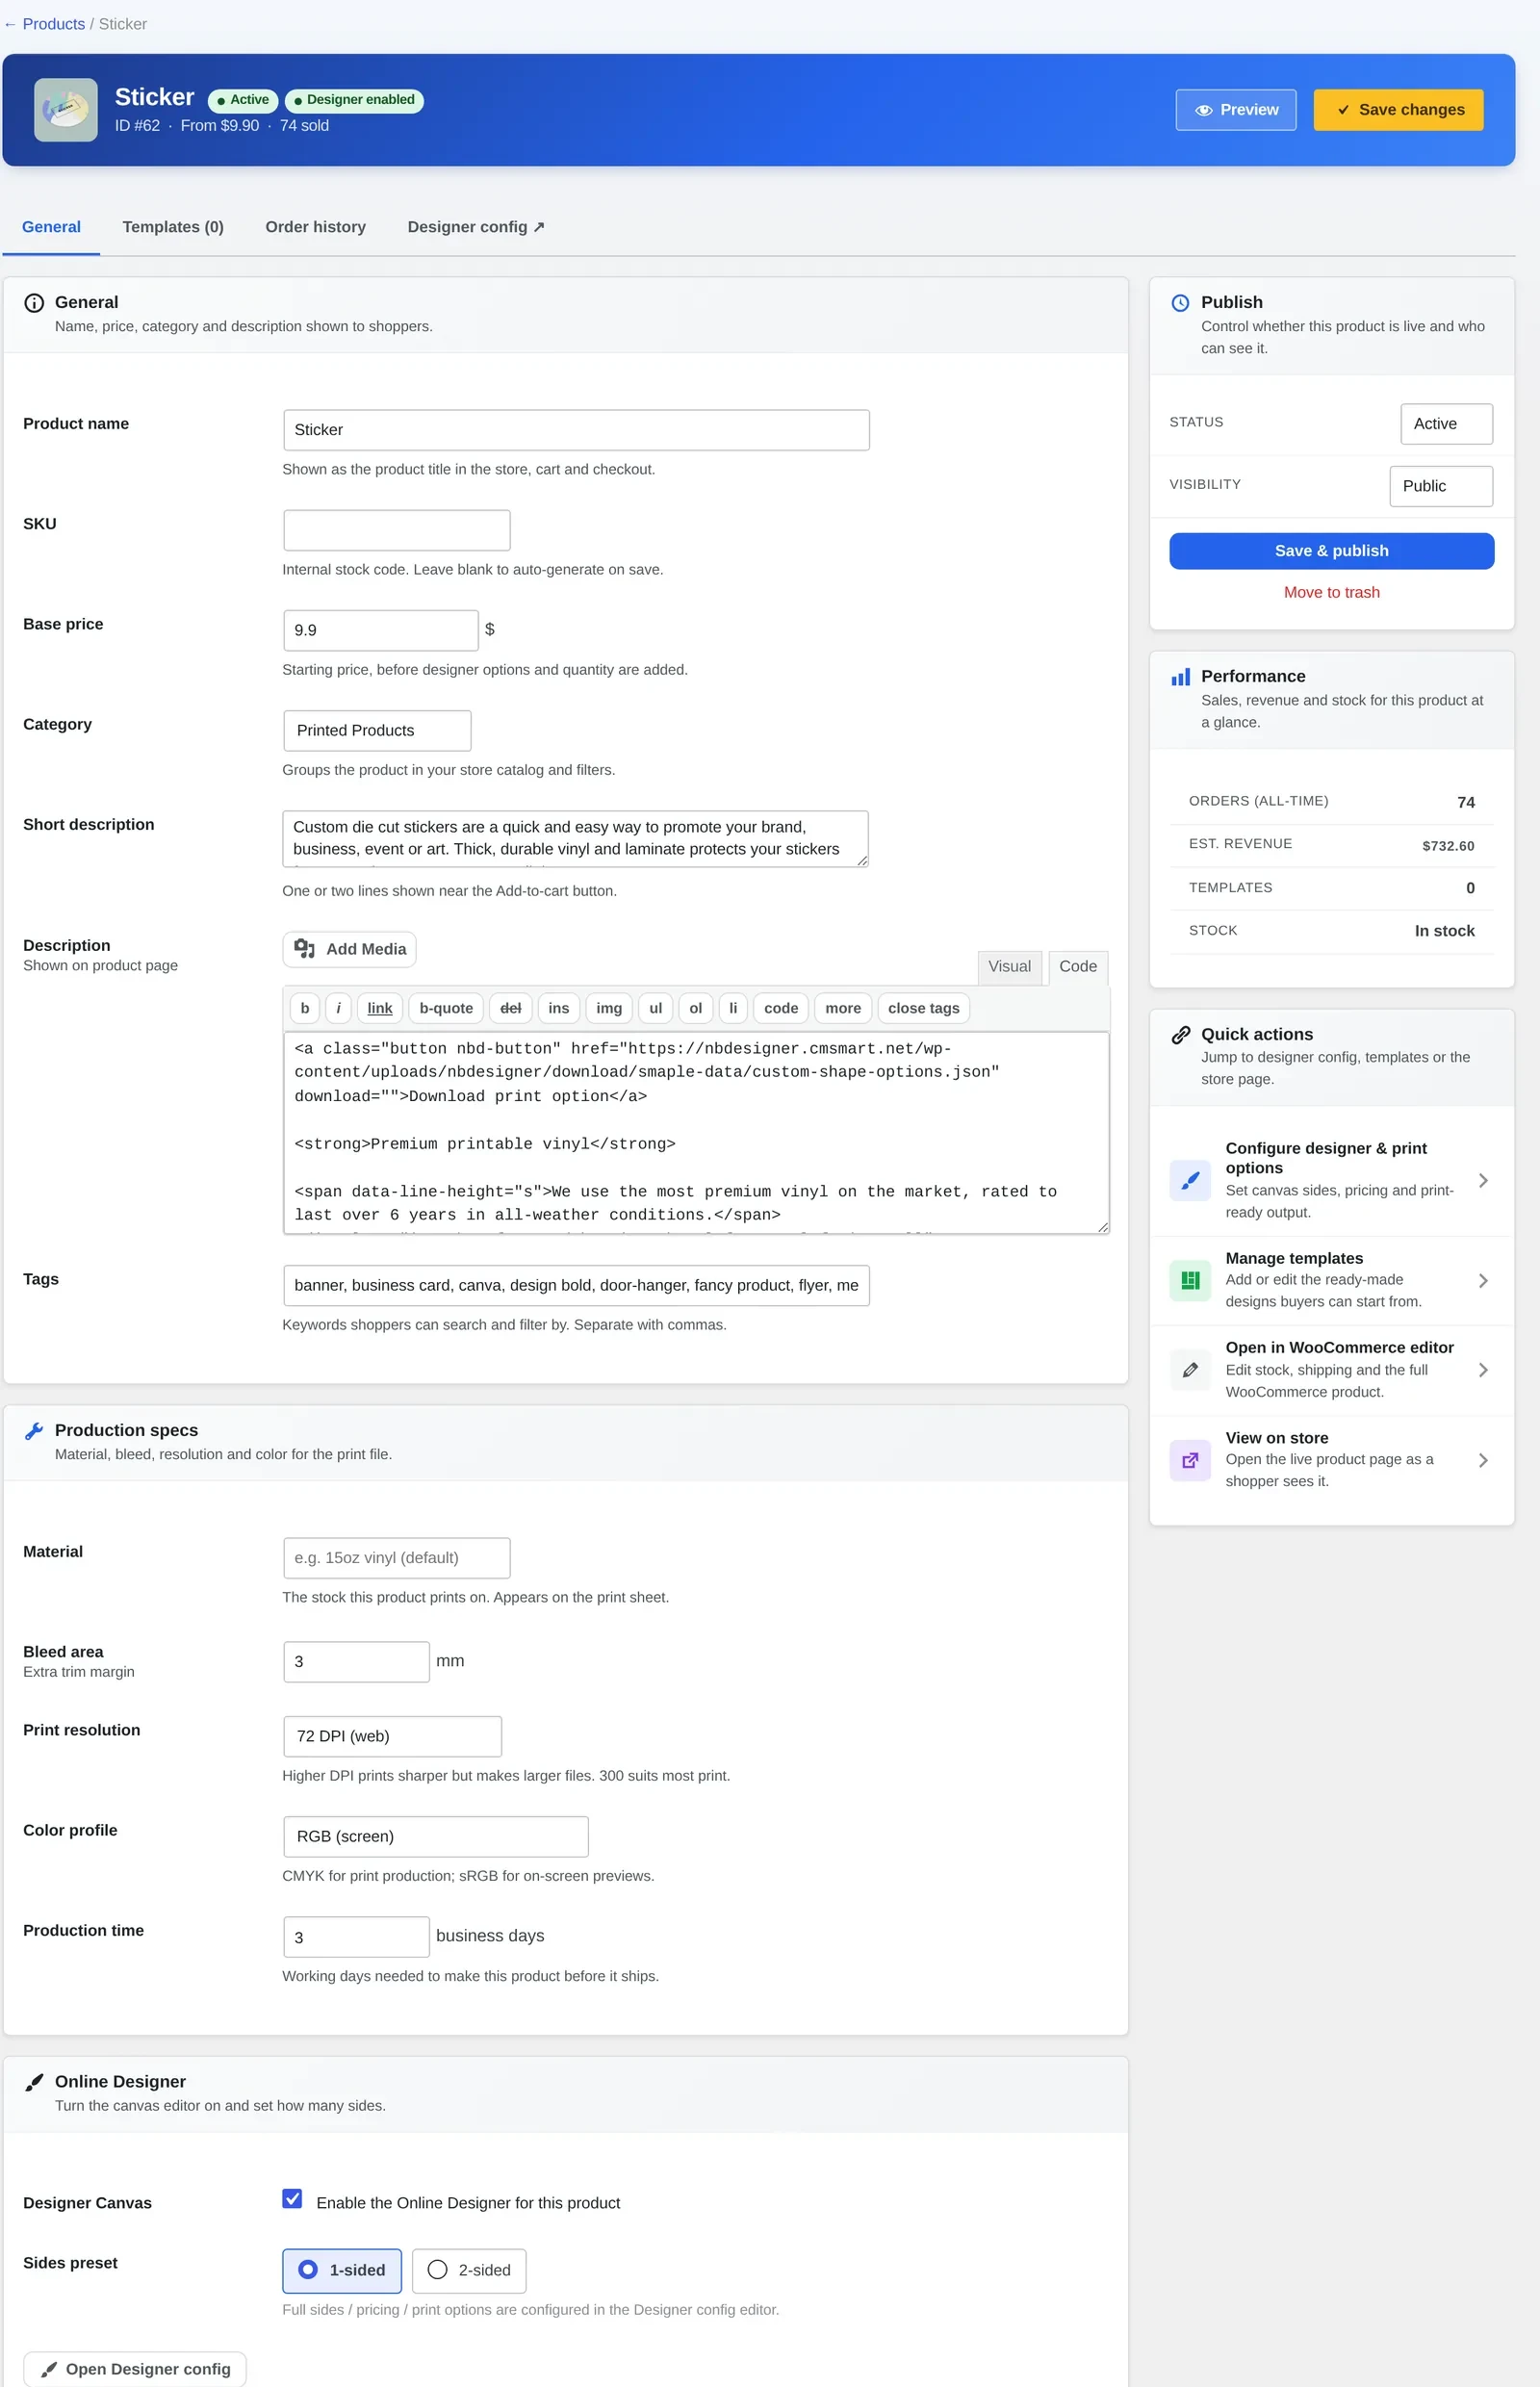
Set each product's production specs. Bleed, print resolution and color profile can be set per product, overriding the store default for anything that prints on different stock.
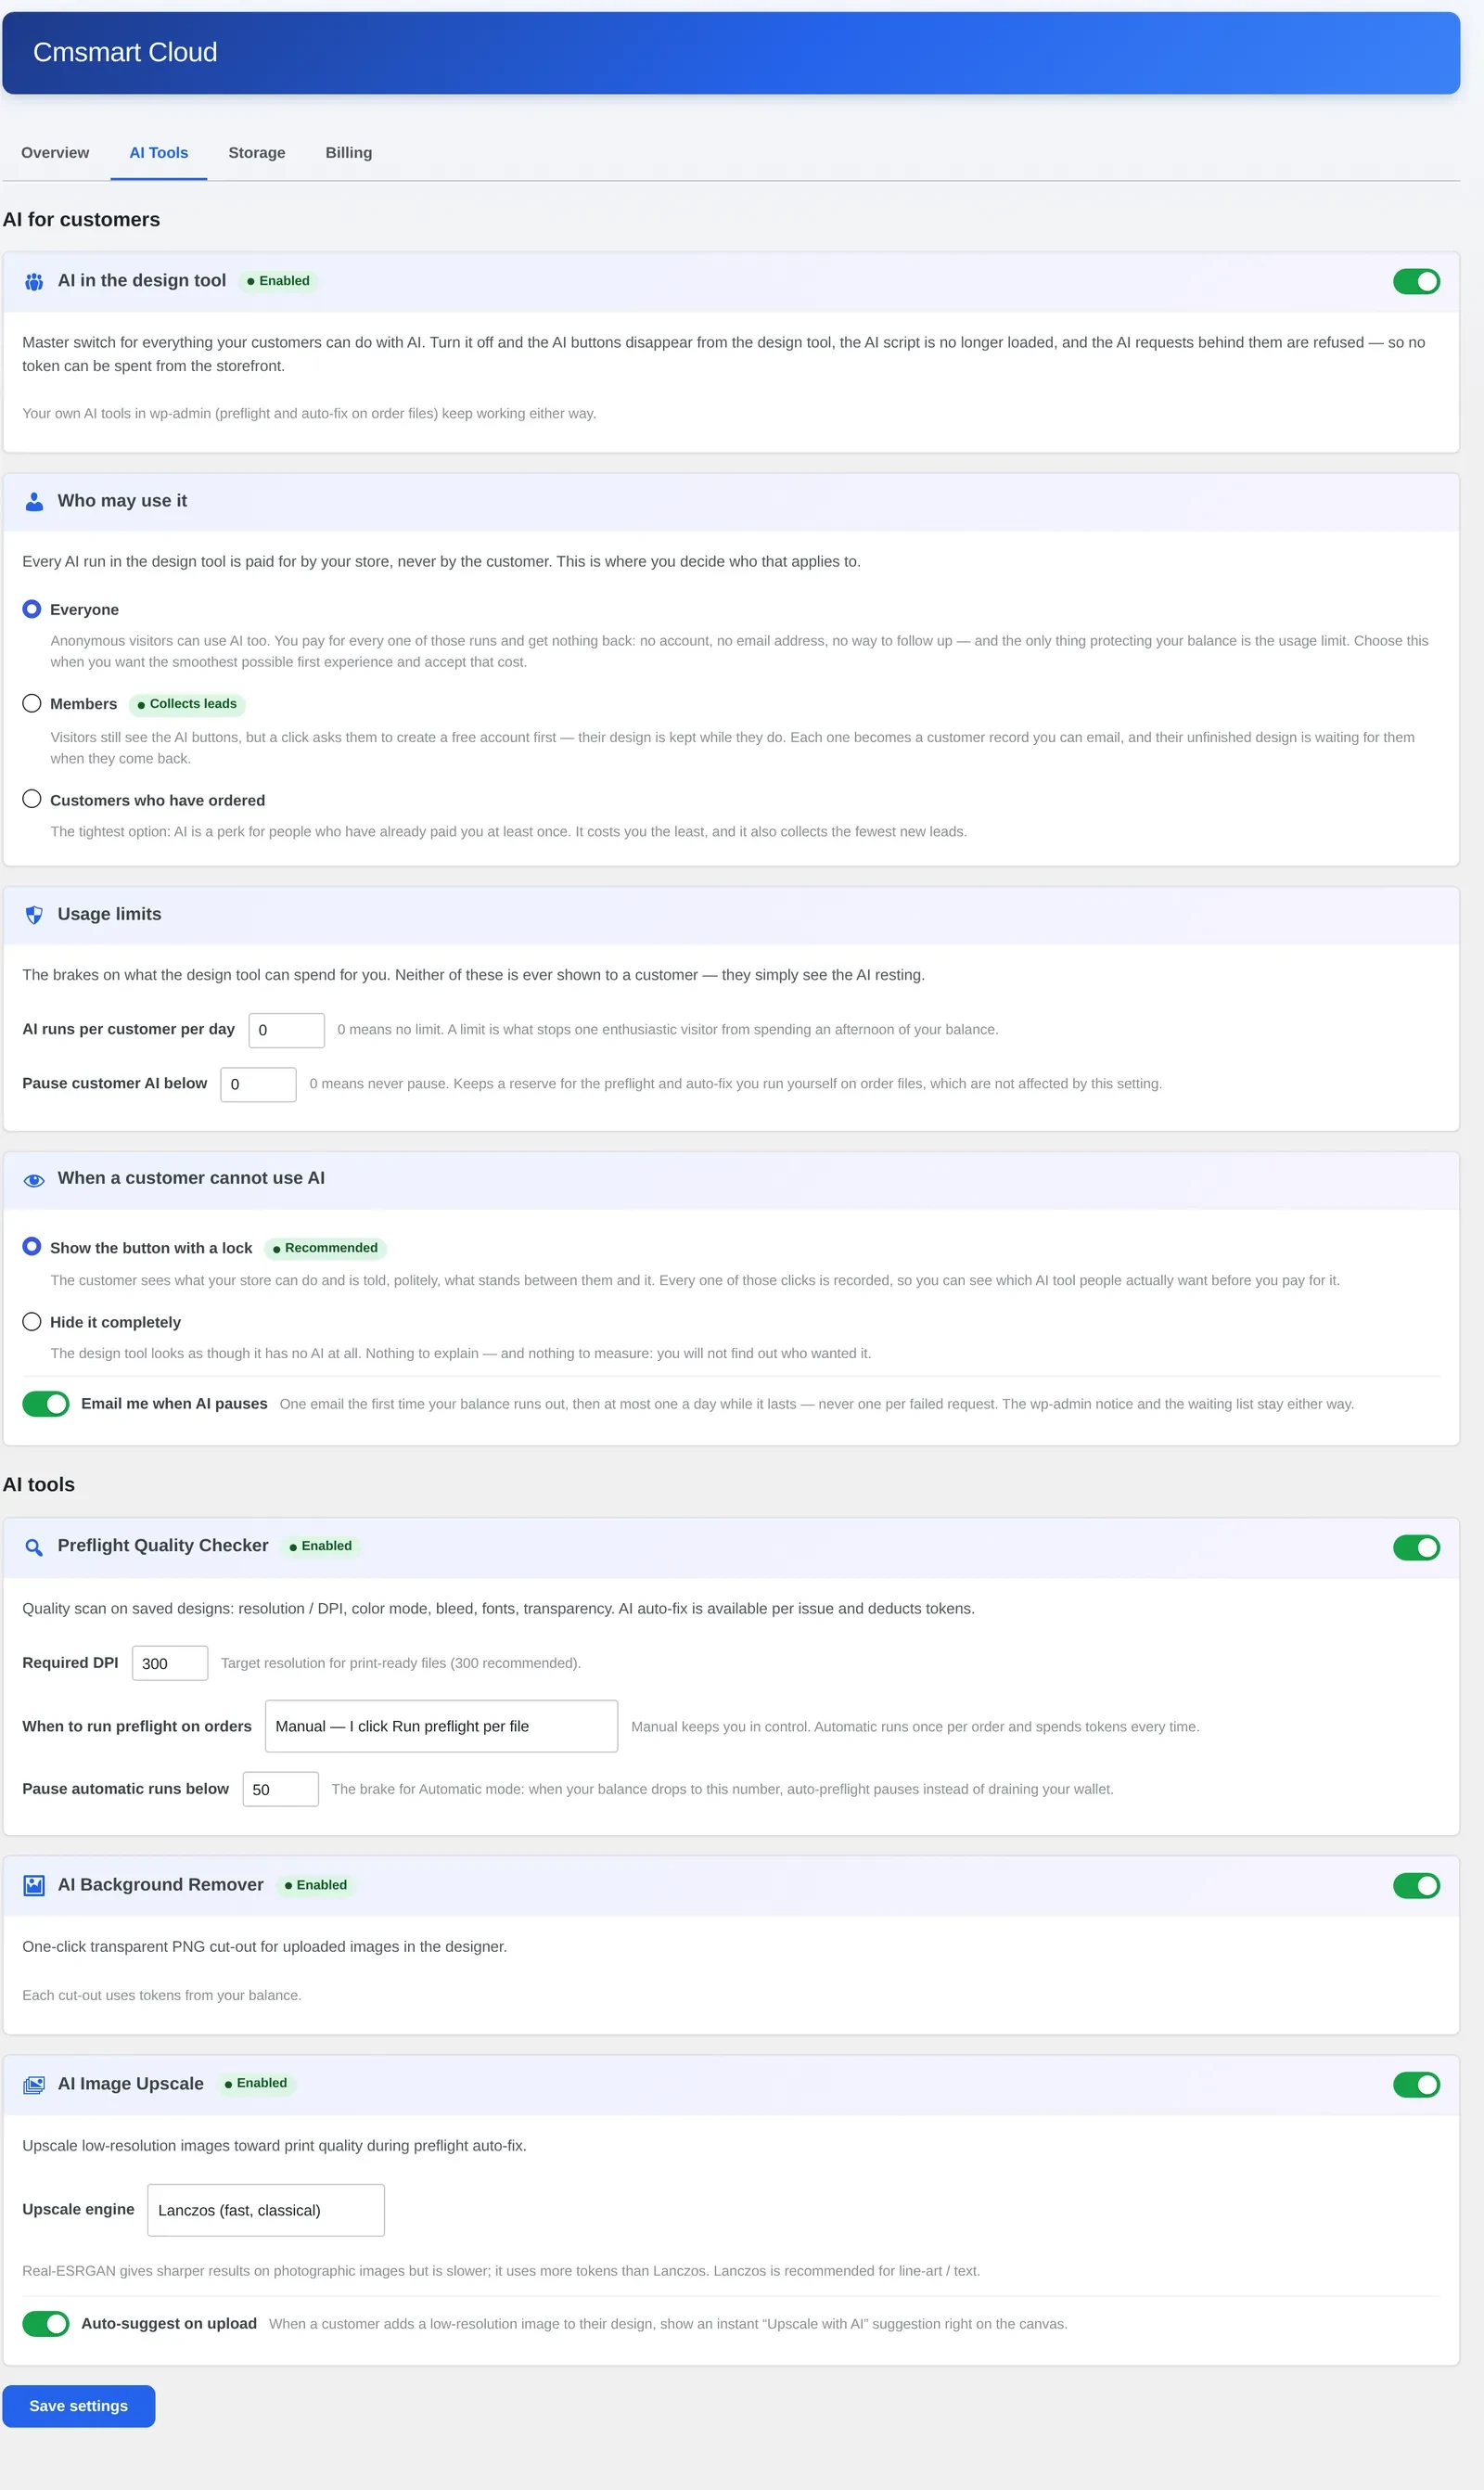
Turn on Cmsmart Cloud AI tools if you want them. Preflight quality checks, background removal and upscaling are optional add-ons configured under Cmsmart Cloud > AI Tools, billed from a token wallet separate from your license tier.
Place one full test order. Design a product end to end, check out, then confirm the order's print-ready PDF in Cmsmart > Orders matches your bleed, DPI and color settings before you launch to customers.
Step 2: the plugin active in Plugins, with quick links to Settings, the changelog and support. The demo shown here runs the 2.18.0-dev build that follows the 2.17.0 release this guide covers.Step 4: General settings — editor layout, default output DPI and measurement units.Step 5: Upload design settings — allowed file types, size limits and minimum DPI for customer uploads.Step 6: Output settings — watermark, bleed line and the fields that produce a print-ready PDF.Step 7: Printing Options — the price-matrix rule sets you apply to products or categories.Video: How to configure and use the price matrix feature (Cmsmart on YouTube).Step 8: Product manager — see and enable which products carry the Online Designer.Step 9: a single product's production specs — bleed, print resolution and color profile.Step 10: Cmsmart Cloud > AI Tools — optional preflight, background removal and upscaling.
Where do store owners go beyond the plugin with custom development?
The settings above cover what Cmsmart Product Designer does out of the box. Stores that need a deeper fit — ERP sync, non-standard pricing logic or a real-time 3D visualizer — get it as custom development, built on top of the same plugin rather than bolted on separately.
ERP/MIS and print-shop management sync. The Printing Options price matrix and order data cover WooCommerce itself; syncing orders to an external ERP or MIS system is custom integration work Cmsmart builds for your stack.
Non-standard pricing logic. If your pricing depends on rules the Printing Options editor can't express — tiered contracts, customer-group pricing, dynamic material costs — Cmsmart builds a custom pricing engine on top of the plugin's data model.
Migration from Fancy Product Designer or a different platform. Moving existing products, templates and order history into NBDesigner without losing print specs is a project Cmsmart has repeated across many stores.
Real-time 3D or vehicle-wrap visualizers. The core designer already offers a basic per-product 3D preview toggle on desktop, but it isn't shown on mobile and it isn't a real-time, rotate-and-zoom configurator. A live 3D wrap visualizer or a mobile 3D preview is custom development built alongside the plugin.
A DTF gang-sheet builder or other niche production tool. Specialized layout tools for a specific production process aren't in the core plugin; Cmsmart builds them as custom add-ons when a print shop's workflow needs one.
The delivery path is the same for all of these: discovery, solution design, build sprints, QA against your real catalog, launch, then ongoing support — see how that runs on our ecommerce project delivery page.
Cmsmart has built and supported Cmsmart Product Designer (NBDesigner) as a Netbase JSC division since 2012, across thousands of WooCommerce stores, so the settings in this guide reflect patterns we've seen go right and wrong many times over, not a single install.
How long does it take to install and configure NBDesigner?
Installing and activating the plugin takes minutes. A confident first pass through General, Upload design, Output and Printing Options usually takes two to three hours; add more time per product if each one needs its own production specs.
Can Cmsmart configure the plugin for us instead of our team doing it?
Yes. Our team can handle the install, licensing, settings and per-product configuration as a setup project, or just review a configuration you've already started, using the quote request above with your product list.
What DPI and color profile should we use for print-ready files?
300 DPI and a CMYK color profile with an ICC profile are the standard for most offset and digital print production, set in Output settings and confirmed per product in Production specs. 150 DPI or an RGB profile is fine for on-screen previews only, never for the file that goes to press.
Can NBDesigner connect to our ERP or MIS system?
Not out of the box — the plugin manages orders, designs and pricing inside WooCommerce. Syncing that data to an external ERP or MIS is custom integration work Cmsmart builds for stores that need it; see the custom development section above.
How do we safely deactivate or uninstall the plugin if we change our minds?
Go to Plugins, click Deactivate on Cmsmart/NBDesigner, then Delete once you've confirmed you no longer need it. Deactivating alone keeps your settings and product configuration in place in case you reactivate later; only use Delete once you're sure, since it removes the plugin's own settings.
Applies to Cmsmart Product Designer (NBDesigner) 2.17.0 · Updated October 2026. Screens below are from the live Cmsmart admin and the WooCommerce product designer front end, captured on this version.
In short
The outcome: a WooCommerce product designer configured for your business, so buyers only see the tools and colors you can actually produce, and every order lands with a print-ready file your team can use.
How it works: the Cmsmart › Settings tabs (General, Appearance, Design Tool, Colors, Upload design, Output, Printing Options), the per-product Setting Cmsmart box, and the order screens where your team reviews and approves artwork.
What it takes: about an hour to work through the tabs once, a few minutes per new product after that — or hand the setup to Cmsmart.
A WooCommerce product designer looks the same in every demo: a clean editor, a few templates, an instant preview. What decides whether it actually helps your business is what happens in the back end — the Cmsmart settings tabs, the per-product options, and the order screens your team opens every day.
This guide walks through the WooCommerce product designer settings in Cmsmart Product Designer (NBDesigner) 2.17.0, tab by tab, with the real admin screens and the order flow they produce — part of a wider web-to-print setup — so you can configure the designer around your products instead of leaving it on its defaults. WooCommerce now powers more than 4M+ online stores, including 31% of the top 1 million ecommerce sites (WooCommerce, 2026) — getting your product designer configured well is what lets your store compete inside that crowd instead of blending into it.
What does a WooCommerce product designer cost your print shop?
Cmsmart Product Designer ships with sensible defaults, but defaults are generic. Left unconfigured, a WooCommerce product designer invites uploads you can't print, colors outside your palette, and orders without a usable design file — a cost your staff pay for in rework, not your customers.
Unusable uploads. No file-type or resolution limit means low-resolution JPGs and stray file formats land in orders your press can't run.
Off-palette colors. A full color picker lets buyers choose shades your printer or supplier can't reproduce.
Manual exports. Without automatic PDF export, someone opens every order and builds the print file by hand before it can go to production.
Disputed orders. If the cart and order screen don't show the customer's actual design, "that's not what I ordered" becomes a support ticket.
One-size-fits-all products. The same tool set and DPI apply to a business card and a banner unless you set per-product options.
What does a well-tuned product designer look like for your store?
Set up well, the Cmsmart WooCommerce product designer feels invisible to buyers: they pick a template or upload their own file, see only the tools and colors you allow, and check out against a confirmed preview. Your team opens the order to a print-ready file, not a cleanup job.
Example scenario. A buyer opens an invitation product on your store and picks "Design here online" instead of uploading a file. They customize a template inside the editor, add it to the cart, and check out. Because Auto export design to PDF is switched on, a print-ready PDF is already queued by the time the order reaches your team — nobody has to open the design and export it by hand.
What a buyer sees when Appearance and Design Tool are configured: a clear choice between uploading a file and designing online.
What's the solution architecture behind Cmsmart's product designer?
Cmsmart configures the WooCommerce product designer in three layers: store-wide settings in Cmsmart › Settings, per-product options on each product's edit screen, and the order and approval screens your team uses in production. The plugin covers all three today; Cmsmart also builds custom tools, pricing and integrations on top where the settings run out.
What the Output tab's settings produce: a customer design turned into a print-ready PDF.
Store-wide settings (in the plugin). General, Appearance, Design Tool, Colors, Upload design, Output and Printing Options — the defaults every designer-enabled product uses.
Per-product configuration (in the plugin). The Setting Cmsmart box on each product: design area, bleed, safe zone, DPI, templates, pricing.
Order and approval screens (in the plugin). Cmsmart › Orders, the order detail timeline, and the Customer Design box for approving or declining artwork.
Print-ready output (in the plugin). Cmsmart Cloud rendering turns the design into a print-ready PDF that matches the order, a change since 2.16.0.
Rules the settings can't express (custom development). Printer-specific preflight, custom pricing logic, product-specific editor tools and ERP/MIS integration — built by Cmsmart on top of the plugin.
What's the business value of getting these settings right?
Every settings tab maps to a business outcome: fewer unusable files, colors you can actually print, a faster handoff to production, and fewer disputed orders. Cmsmart's WooCommerce product designer turns those outcomes into specific toggles instead of leaving them to chance.
Benefit
Setting
KPI to track
Print-quality files
General › Default output resolution - DPI; Upload design › Min. resolution DPI
Orders returned for low-resolution artwork
Files ready without manual export
Output › Auto export design to PDF
Staff minutes per order on file preparation
Fewer unusable uploads
Upload design › Allowed / Disallowed file types
Uploads that need re-supply
Colors you can print
Colors › Show all color (off = your palette only)
Color complaints and reprints
Fewer "not what I ordered" disputes
Appearance › Show customer design in cart, checkout and order
Disputes and refund requests
Rough out the time saved. (orders per month) × (minutes your team now spends manually exporting and checking each design) × (your loaded hourly rate) = the monthly staff time that Auto export design to PDF and the file-type/DPI rules give back. Add (reprints avoided per month) × (cost per reprint) for what the color and resolution settings are worth.
How do you set up the WooCommerce product designer in the back end?
You configure the Cmsmart WooCommerce product designer in two admin screens: the Cmsmart › Settings tabs below, and the Setting Cmsmart box on each product. Work through the tabs once, then check them against every new product before you launch it.
Set your output DPI and layout. In Cmsmart › Settings → General, choose the Modern design editor layout (Classic is deprecated) and set Default output resolution - DPI to 300, the figure most printers ask for; 150 is the plugin default. These apply to every designer-enabled product unless you override them per product.
Decide what buyers see in the editor. In Appearance, turn on Show bleed if your printer needs it, choose which Modern-layout panels (ruler, grid, color palette) show by default, and turn on Show customer design in cart, checkout and order so buyers confirm exactly what they're paying for.
Turn on the tools your product needs. In Design Tool, enable only the tabs a product needs — text, clipart and elements, image upload, free draw, QR codes. Fewer tools make the editor easier for buyers and keep designs inside what you can produce.
Lock the color palette. In Colors, turn off Show all color to restrict buyers to your own palette — the simplest way to keep designs inside the colors your press or supplier can reproduce.
Control what customers upload. In Upload design, set Allowed file types (and Disallowed file types), Min. resolution DPI for JPG/JPEG images, and file-size limits, so only files your production can use get through. Background on resolution rules is in the DPI and print quality guide.
Turn on automatic print-ready PDFs. In Output, switch on Auto export design to PDF so Cmsmart renders a print-ready PDF that matches the order when the buyer clicks Process; set the Order status for auto export design as a fallback check, and choose whether rendering runs on Cmsmart Cloud or your own server.
Set the per-product options. On each product's edit screen, the Setting Cmsmart box controls what's specific to that product: Enable Design or Enable Upload Design, the design and product area, bleed and safe zone, DPI, and which templates it offers. This is where a business card and a banner stop sharing the same rules — see the installation guide for setting up your first product, and the price matrix tutorial for per-option pricing.
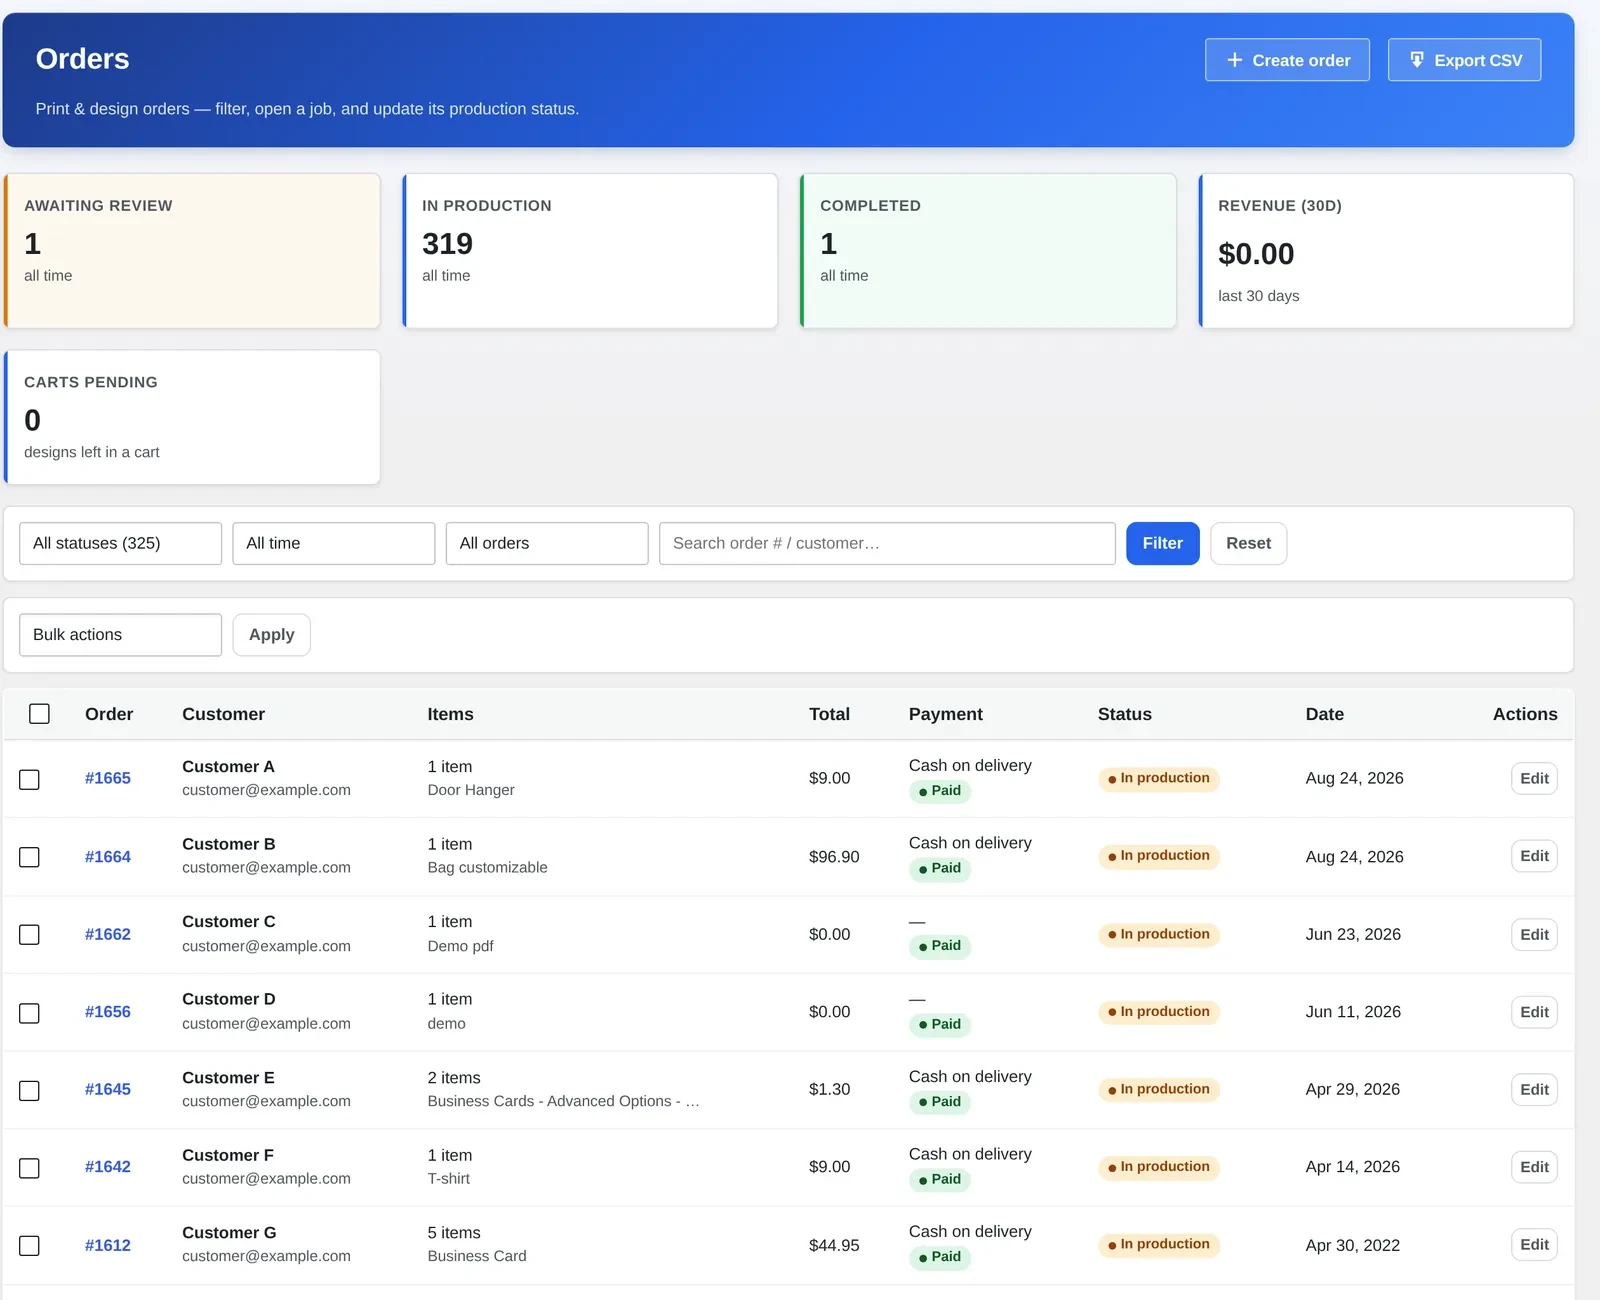
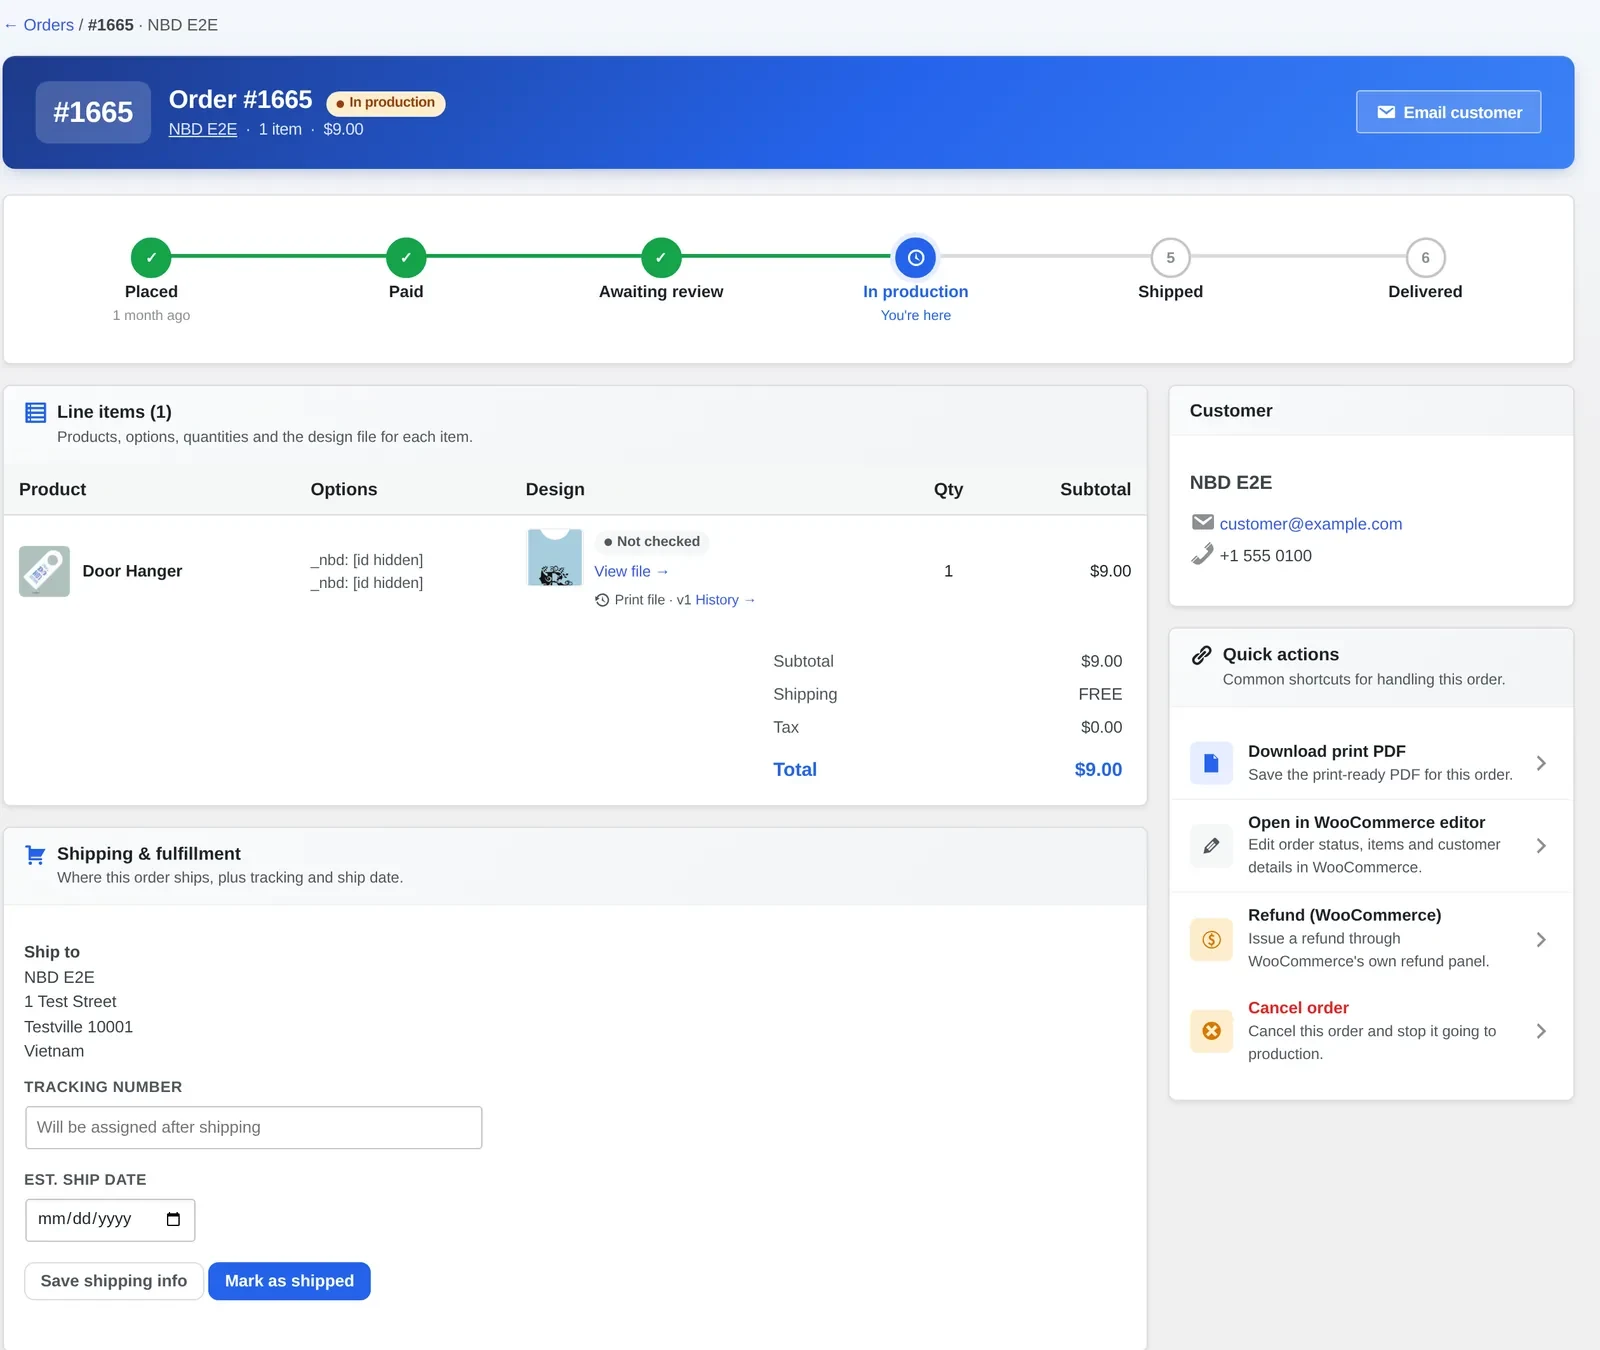
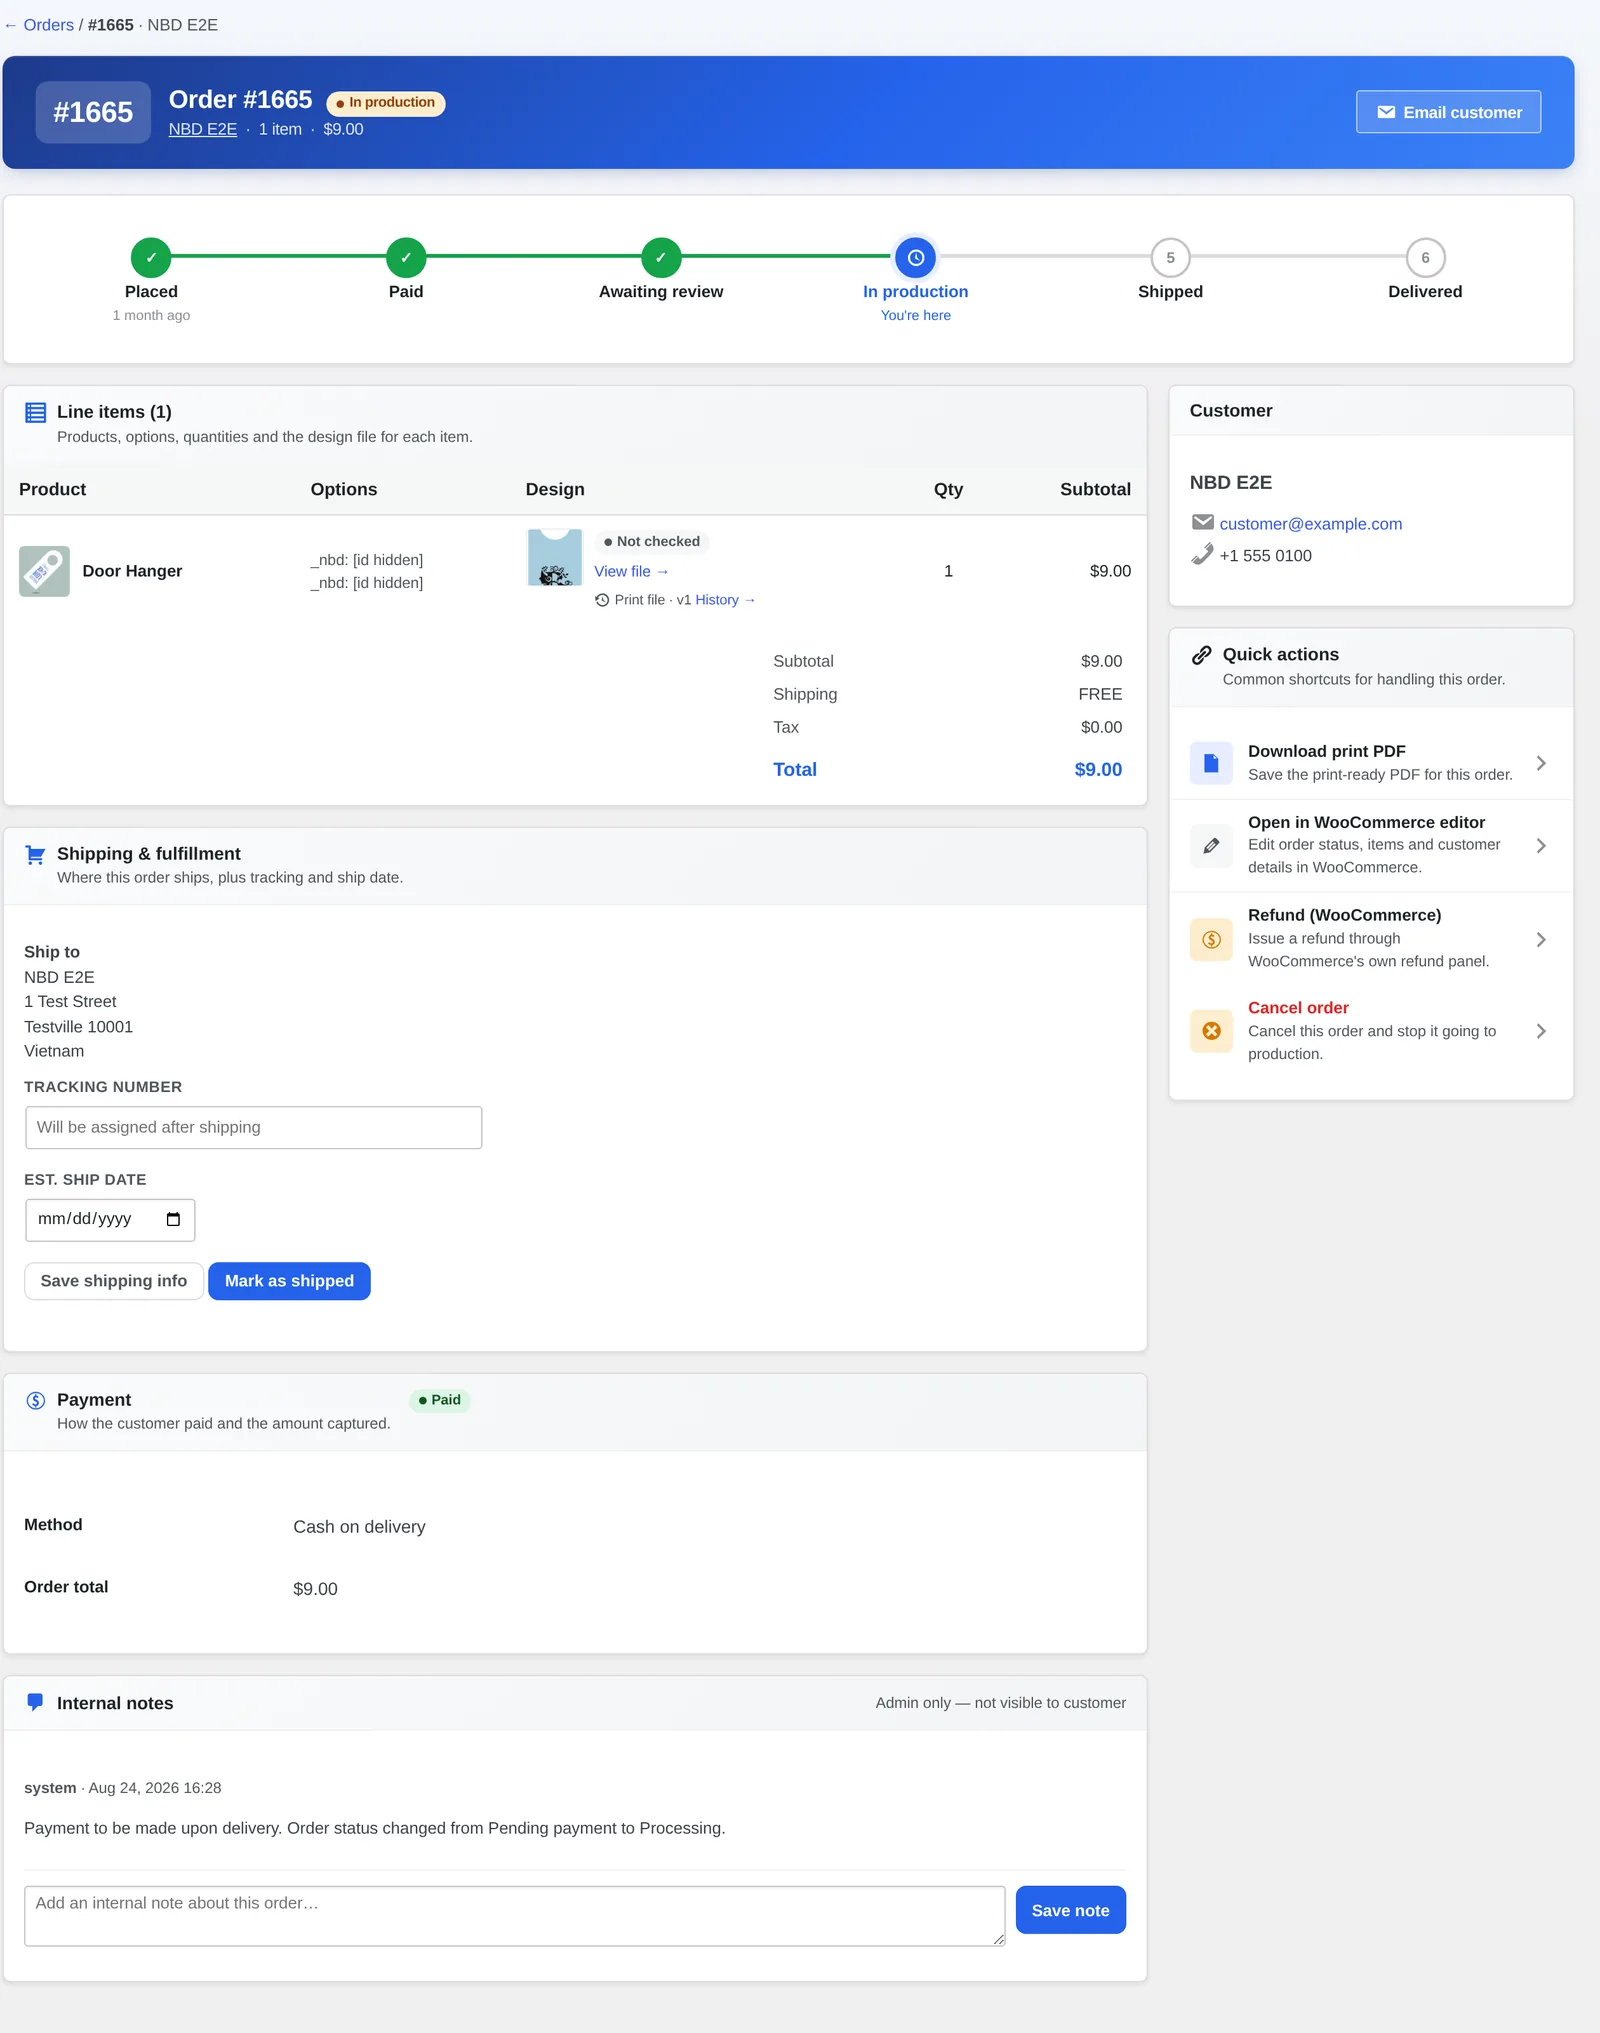
Review and approve orders as they arrive. Cmsmart › Orders lists every order with its production status; opening one shows the line item's design file, a production timeline, and quick actions including Download print PDF. On the WooCommerce order screen, the Customer Design box lets you approve or decline the artwork and notify the customer from the same place.
General: the layout, output DPI and unit defaults every product inherits.The Modern editor your Design Tool and Appearance settings produce for buyers.Output › Synchronize: the toggle that turns every order into a print-ready PDF automatically.Cmsmart › Orders: every order with its production status, filterable and searchable.Order detail: the production timeline, the line item's design file, and quick actions including Download print PDF.The Customer Design box on the order screen: approve or decline the artwork and notify the customer.Video: configuring a product for online design in the Cmsmart back end (Cmsmart on YouTube).
Cmsmart insight: turn on Auto export design to PDF and Show bleed together, and set the output DPI your printer asks for, before you take real orders. Turning them on later means your first orders still need manual exports. If you sync output files to a print server, test one order end to end first so folder names and permissions are right.
Going further with custom development
When the settings can't express a business rule, Cmsmart builds it as custom development on top of the WooCommerce product designer: product-specific tools, pricing engines, printer-tuned preflight, and integrations that send orders and files to your MIS or ERP. Delivery runs discovery, design, sprints, QA, launch and support.
Custom editor tools and templates. Complex products need guided design — we build tools, layouts and templates for your catalogue.
Pricing engine. Price by size, material and quantity without manual quotes — we build your formulas and B2B price lists.
Preflight tuned to your printer. Catch bleed, resolution and color problems before production — we configure and extend AI preflight checks for your specs.
Production integration. No re-keying between store and print floor — we connect orders and files to your MIS or ERP.
Cmsmart has configured and built on the WooCommerce product designer for stores since 2012, as part of Netbase JSC. The same team that sets up these settings tabs also builds the custom development most stores eventually need — pricing engines, preflight and production integrations.
Cmsmart has built ecommerce and web-to-print stores since 2012 as a division of Netbase JSC: 6,300+ client projects and 500+ custom development projects (WorkSuite project records, Sep 2026), rated 4.2 on Trustpilot (404 reviews). See our related projects.
Frequently asked questions
Where are the NBDesigner settings?
In WordPress admin under Cmsmart › Settings. Per-product options are in the Setting Cmsmart box on the product edit screen.
Which layout should I use?
Modern. Classic is deprecated and gets no new features.
How do I get print-ready PDFs automatically?
Switch on Auto export design to PDF in Output. It's queued when the buyer clicks Process, and the order artwork screen shows its status — Ready, Rendering, Failed or Not rendered — with a Regenerate option.
How do I limit which file types customers upload?
Fill in Allowed file types (and/or Disallowed file types) in the Upload design tab.
Can Cmsmart configure the settings for my products?
Yes. Setup and product designer customization are Cmsmart services; request a quote with your products and printer specs.
Can Cmsmart connect the designer to my MIS or ERP?
Yes, as custom development — we build the integration that sends orders and print files to your production system.
Make every order arrive ready to print
Tell us your products and your printer's specs. We configure and extend the Cmsmart Product Designer so buyers design within what you can produce and your team receives files it can use.
As you know, before deciding to buy a product, especially intellectual products such as software, we must always learn about how to use that product. However, with increasing demand, increasingly diverse customers, having a simple product easy to use and has many features that can be used immediately is extremely difficult. Therefore, before you buy products at CMSmart, we always try and provide the most detailed documentation, video guide for our customers, so that you can use the product simply and the easiest.
WordPress Online Design, as one of our the most outstanding products. The end-user will easily implement the design version she/he likes with our useful and easy-to-use feature. Besides, we also provide many tools to help the user get the quick steps to achieve the wanted features. Therefore, below are some detailed guidelines on using WordPress online design products that we would like to introduce to you. Here we go!
Design product with Woocommerce product designer plugin.
1. How to create a template?
First, how to go to the designer page? In the frontend, your customer can go to the designer page with some easy steps: Click "Start design" button, then access "Design Here Online"
Second, select a template you like to design
2. Insert and edit text on the template
Step 1: Move to Text Menu
Step 2: Select and click to add Text you like
Then, you can change the text color with document colors
Next, your customers can change the text font type they want.
3. Insert and edit clipart.
There are many interesting clip arts in WordPress online design that you can choose to insert for your design.
Step 1: Click the clipart menu and search: Enter the name of clipart to search.
Step 2: Click or drag&drop to add clipart.
Then, do you want to change color of clipart? Click your clipart on design, choose one color you like in document color.
4. Insert and edit the image.
How to insert a photo?
Step 1: Move to Photos menu
Step 2: Upload image
Way 1: You can upload files with "Image Upload" Button (Only accept file types have the file size from 0 Mb to 20 Mb)
Way 2: Use the image URL to insert Photos.
Another way: Insert photo in the image library.
5. Insert and edit the element.
Shape
Step 1, you move to the Element menu Custom Design Shapes. Then, you click or drag&drop to add shapes
Step 2, you can change the color of shape with document colors
Icons
Move to the Element menu and click "Icon" Button to insert Icon for your design. There are many Icons in the Icon library that you can choose.
Customize drawing with Draw Feature
6. Check the design
How can your customers check their designs in WordPress Online Design tool?
First: Go to your count -> view order
Click on the order number to view detail.
If display notification “Rejected! Click here to design again!”, the customer will design again.
If display notification “Approved!”, the customer’s designs are accepted.
Above is my introduction about "How to use Wordpress Online Design plugin in Frontend". I hope that this post, in my opinion, brought you some useful information. If you have any questions, please contact the Support Team or information below. If you want to know more about NB WordPress Design, you can try this product by access Live Demo or nbdesigner.cmsmart.net.
Do you want to receive coupon code from our promotion program? Please access promotion programs. Thank you for reading and keep following us to get more information in the next article! Bye, See you again!
Applies to Cmsmart Product Designer (NBDesigner) 2.17.0 · Updated October 2026. Printing Options is the part of the NBDesigner plugin that turns quantity breaks, material upcharges and add-ons into one price: the price the shopper sees before they design, and the price your office bills.
In short
Outcome: shoppers see one accurate price from product page to checkout, and your team stops re-quoting custom print orders by hand.
How it works: the NBDesigner plugin's Printing Options module attaches a price matrix to a product or a whole category, and the designer, cart and order screen all read it automatically.
What it takes: about half an hour to build your first option set, plus a plan for the pricing rules a price matrix can't express, which Cmsmart builds as custom development.
A customer opens your print shop's site, picks a door hanger or a run of stickers, and wants to know one thing before anything else: what will this cost at the quantity they need? If that answer lives in a spreadsheet, or in one staff member's head, it is slow, and it is often wrong by the time the order reaches production.
The NBDesigner plugin was built to answer that question automatically. Its Printing Options module lets you define quantity breaks, per-option charges and conditional fields once, against a product or a whole category, and have the price calculated correctly everywhere the item appears: product page, cart, checkout and the order screen.
This guide configures print pricing options on a live 2.17 install, shows what buyers and your back office actually see, and marks where Cmsmart's custom development picks up once your pricing logic goes beyond what the plugin ships with.
What does manual print pricing cost your shop?
Cmsmart sees the same pattern across web-to-print shops: pricing kept outside the system causes slow quotes, inconsistent discounts and totals that drift between the product page and checkout. The NBDesigner plugin's Printing Options module puts that logic back in one place, so the price a shopper sees is the price production bills.
Re-quoting by hand. Every custom order gets a manual price check against a spreadsheet, which does not scale past a handful of orders a day.
Inconsistent discounts. Two staff members quote the same bulk order differently because the quantity-break rule is remembered, not configured.
Checkout mismatches. A total calculated on the product page can drift from the number WooCommerce charges, which erodes trust right before payment.
Reconciliation time. Someone still checks that the order total matches the option that was actually selected before the job goes to press.
Cmsmart insight: the shops that struggle most with pricing usually treat quantity breaks as a note for the sales team rather than a rule in the system. The fix is rarely more discount tiers — it is moving the one rule you already use into Printing Options once, so every channel reads the same number.
Pricing confusion is not a minor annoyance at checkout. Baymard Institute's checkout research (2025) found that 40% of shoppers who abandon an online cart do so because extra costs were higher than they expected — exactly the gap a price that is configured once and read everywhere is built to close.
What could pricing look like for your buyers?
Imagine a shopper moving a quantity selector on your sticker product and watching the per-unit price drop at each break you configured, with no page reload and no call to your office. That is what a correctly configured Printing Options set gives every visitor who reaches the NBDesigner plugin's storefront.
Example scenario. A print shop sells door hangers with a base price and a quantity-break discount. A buyer raises the quantity on the product page; the displayed price updates to the matching break before they add the item to cart. At checkout, WooCommerce shows the same total, and the order arrives in the production queue with the option, the quantity and the design file already attached.
How does Cmsmart's pricing engine work inside the NBDesigner plugin?
Cmsmart built Printing Options as a layer between your products and WooCommerce: a price matrix you configure once, that the storefront, the designer and the order screen all read from the same place. What the plugin can calculate ships today; what a business rule needs beyond that is custom development.
Printing Options module. Define fields and a price matrix — quantity breaks with a discount per break — and apply the set to specific products or to a whole category.
Per-product base price. Each design-enabled product carries its own starting price, with an optional sale price, managed from the product manager.
Storefront read. The product page and the online designer read the active option set and show the resulting price before the shopper adds to cart.
Cart and checkout. WooCommerce carries the calculated price and the attached design through to checkout without re-entry.
Order record. The order screen keeps the line item, its options and its subtotal together with the print file, for anyone checking the job before it ships.
Custom development (not in the plugin today). A price that depends on two option fields together, on a customer's account tier, or on an ERP-synced cost basis is custom pricing-engine work Cmsmart builds on top of the NBDesigner plugin.
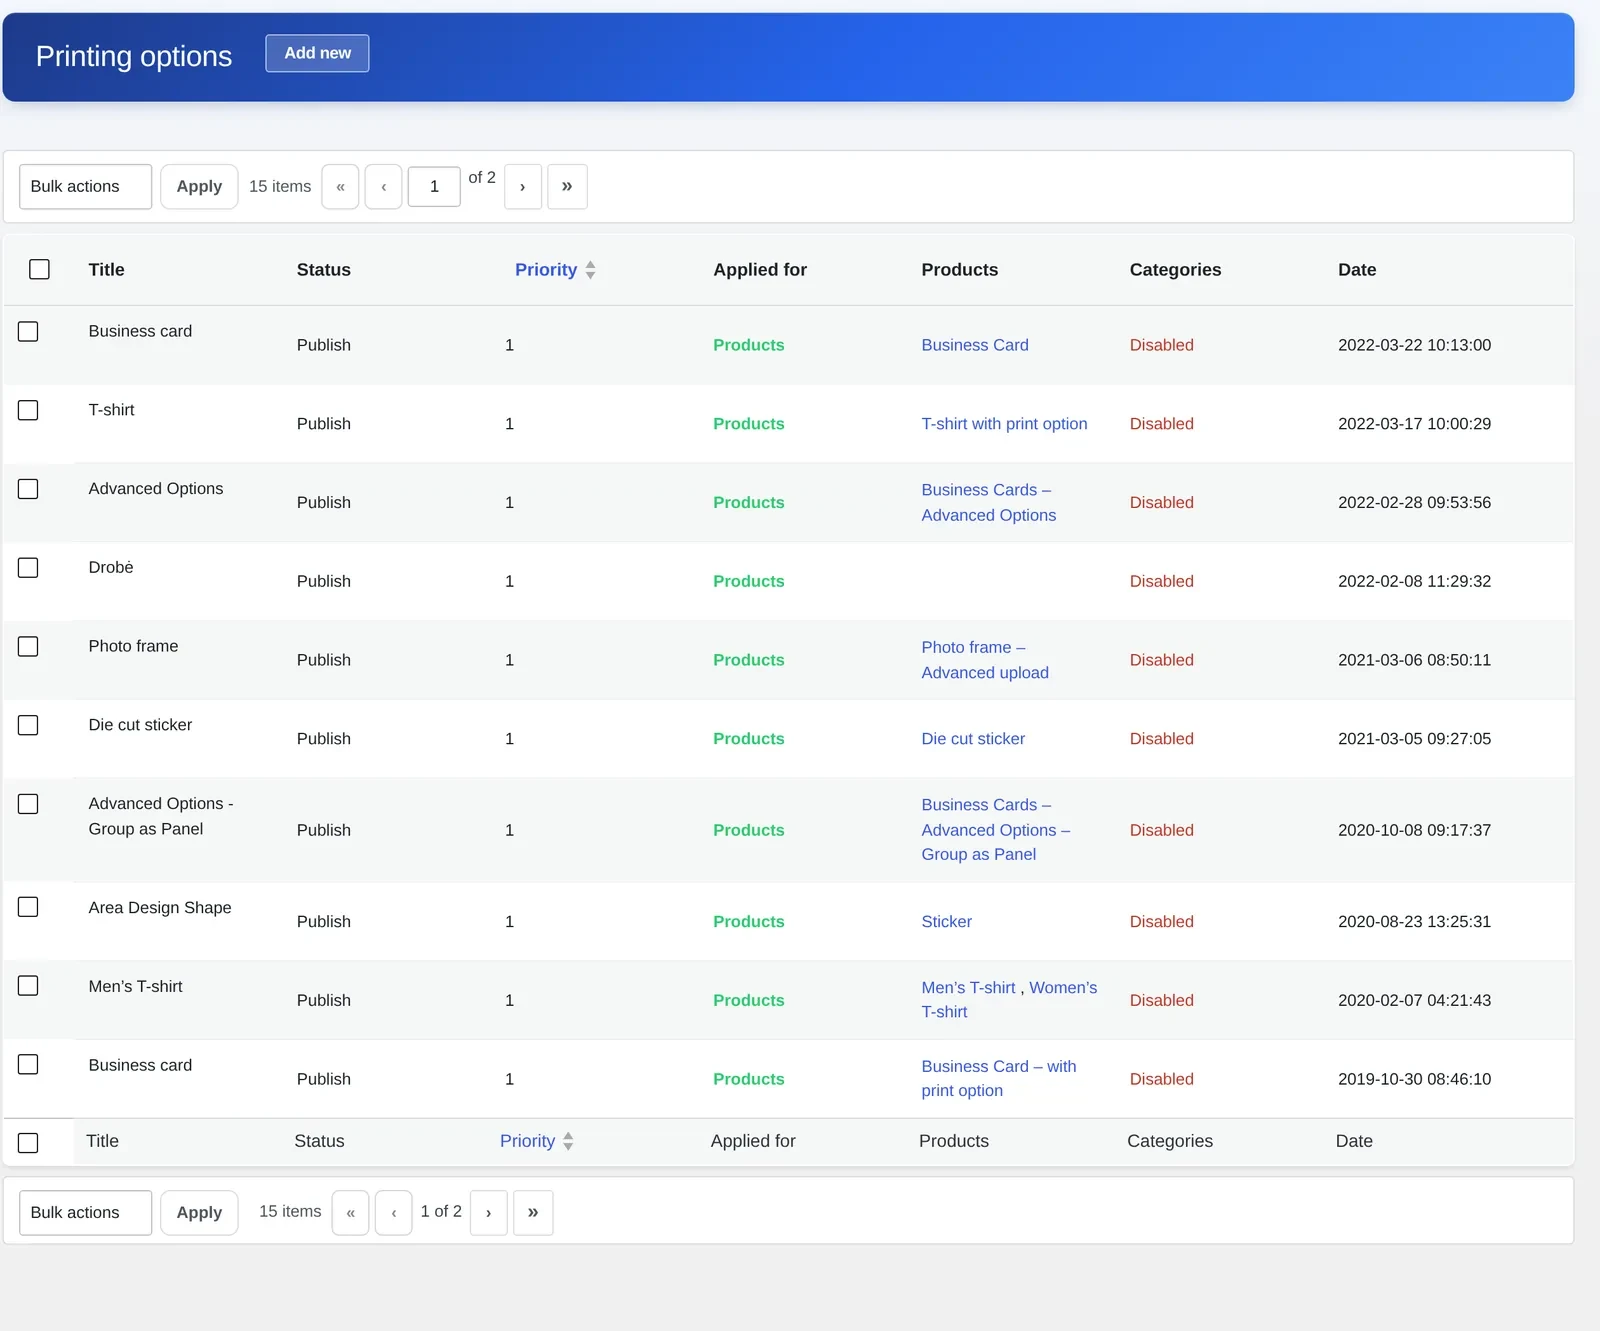
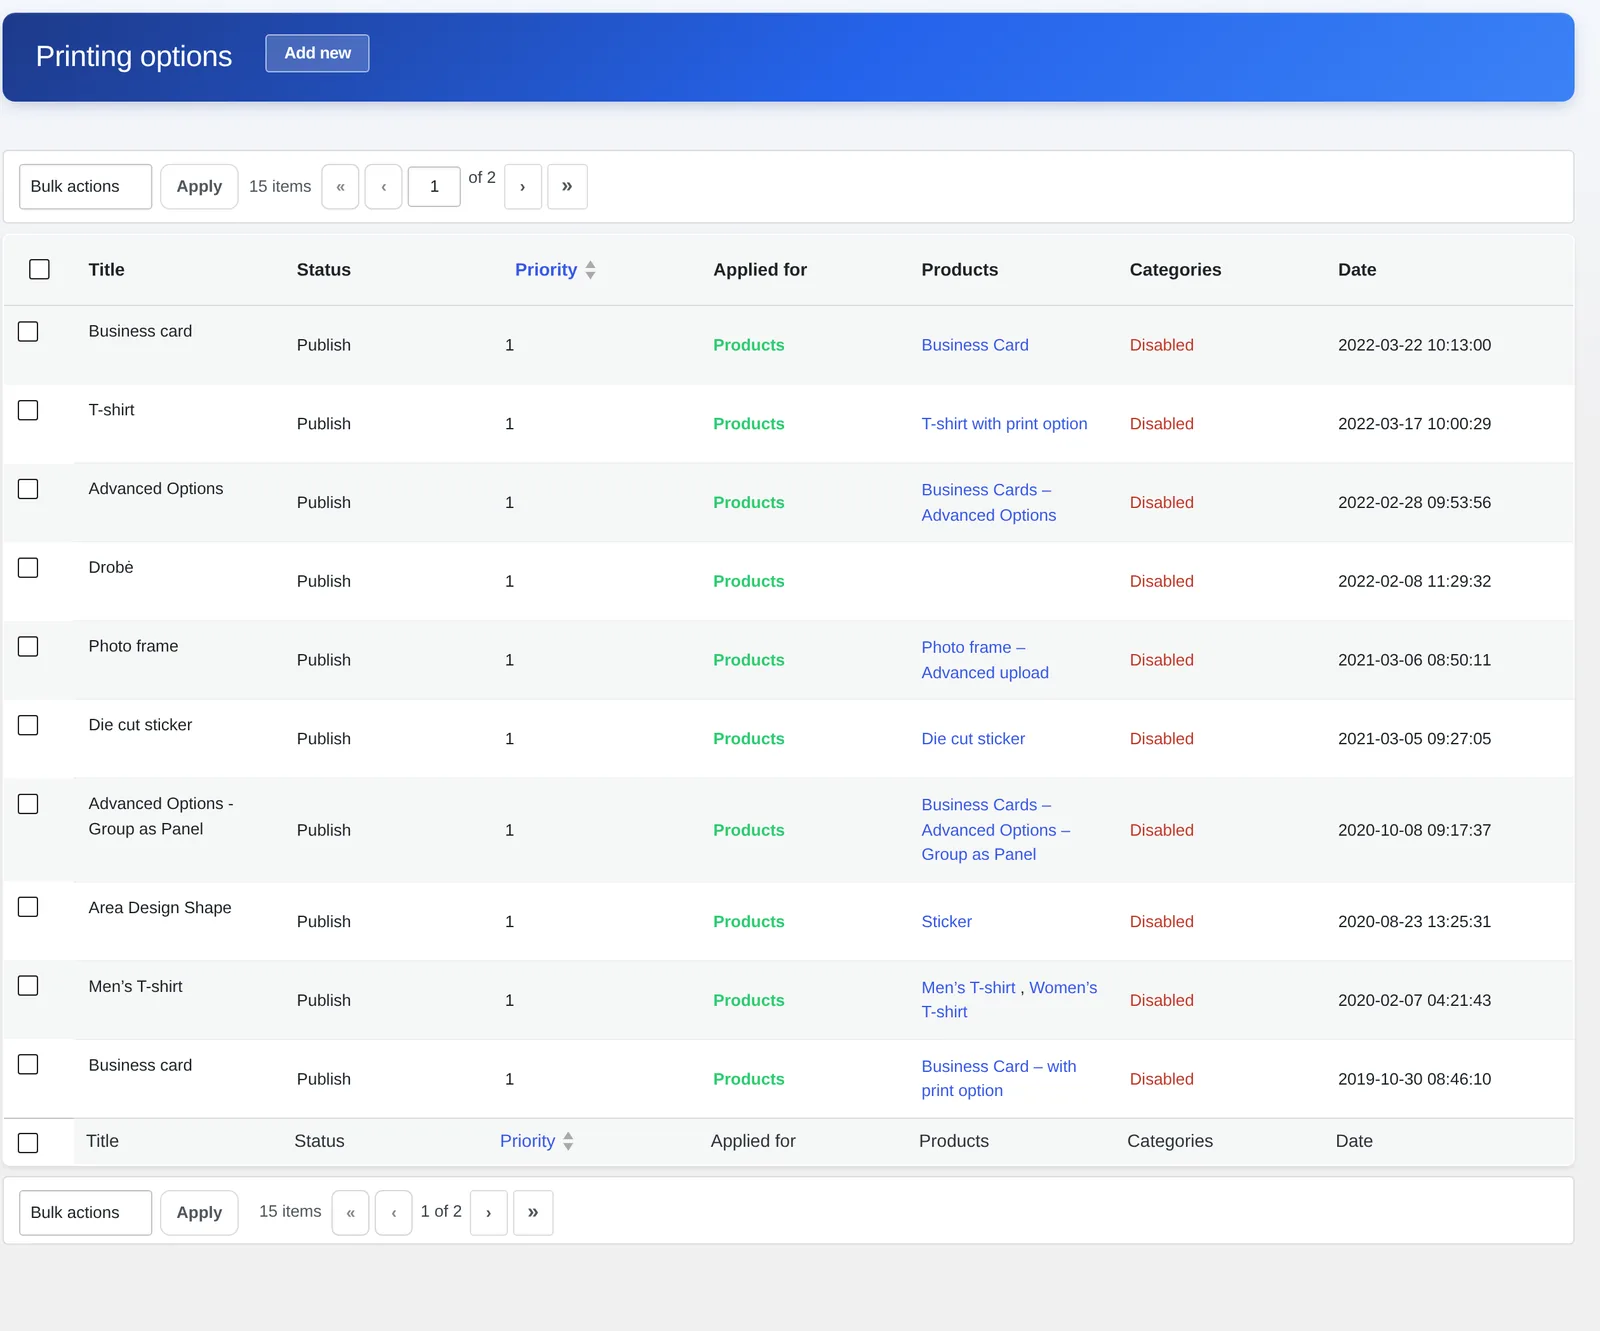
Cmsmart > Printing Options: every price-tiered option set, grouped by the products or categories it applies to.Inside an option: a discount type and a quantity-break table build the price matrix for that option.
What's the business value of configurable print pricing?
Cmsmart frames pricing value in mechanisms, not promises: fewer manual quotes, fewer checkout mismatches, and buyers who self-select a higher quantity instead of emailing for one. The NBDesigner plugin's Printing Options module is what makes those mechanisms possible without a developer touching code for every new product.
Manual pricing
Printing Options in the NBDesigner plugin
Quantity breaks live in a spreadsheet or a quote email
Quantity breaks are a price matrix attached to the product or category
Staff re-check the total before confirming an order
WooCommerce and the order screen already show the configured total
Every new product needs a fresh pricing conversation
An existing option set applies to a new product in minutes
Discounts vary by who answers the phone
The same rule prices every channel and every shopper
Faster quotes to checkout. Shows up as fewer emails before an order is placed. KPI to track: average time from first product view to completed checkout.
Fewer pricing errors. Shows up as fewer refunds or reprints caused by a wrong total rather than a production fault. KPI to track: reprint rate attributed to pricing, not production.
Orders at the quantity you want to sell. Shows up as buyers choosing a higher quantity break instead of asking for a quote. KPI to track: average order quantity on options-enabled products.
Rough ROI check: multiply your custom orders per month by the minutes a manual quote currently takes, by your fully loaded hourly staff cost. That is what correctly configured Printing Options gives back every month, before counting the orders you stop losing to a wrong or late quote.
The opportunity behind getting this right is not small: the global web-to-print market was valued at $36.3 billion in 2025 and is projected to reach $52.9 billion by 2034, a 4.15% CAGR, according to IMARC Group (2025). Shops that quote accurately and fast keep a larger share of that growth than shops still pricing by hand.
How do you set up print pricing options in the NBDesigner plugin?
Cmsmart's Printing Options module takes about half an hour to configure for a first product: build the fields, set a quantity-break discount, attach the set, then confirm the price on the storefront and the order screen. The NBDesigner plugin applies the same set to as many products as you choose.
In wp-admin, open Cmsmart > Printing Options and choose Add new, or open an existing option set to edit its price matrix.
Build the fields the shopper needs under Printing fields, then open Printing options > Quantity and choose a discount type, such as a percentage per item.
Add a quantity-break row for each tier, enter the discount for that tier, and mark one row as the default.
Under Apply for, attach the option set to specific products or to a whole category, and set a priority if more than one set could match the same product.
Publish the option set, open the product on the storefront, and confirm the price updates as the quantity changes before you place a test order.
Open Cmsmart > Product manager to confirm the product's base price matches what you intended, then check the test order's line item on the order screen.
For the designer-side fields a pricing rule can depend on — sides, DPI, upload limits — see the individual product settings guide instead of repeating every field here.
The product manager lists the configured base price, and any active sale price, for every design-enabled product.The price you configure is what the shopper sees before they open the online designer.The same price follows the order into cart and checkout, with the custom design attached to the line item.Video: How to configure and use the Price Matrix feature (Cmsmart on YouTube).
Going further: what custom pricing can Cmsmart build for you?
Cmsmart's project team builds pricing logic beyond what a price matrix covers: account-tier pricing, ERP-synced cost, PO-approval gates. The NBDesigner plugin stays the base your storefront runs on, and Cmsmart builds the rules your business actually operates under, as custom development, on top of it.
Rules a matrix can't express. A price that depends on two option fields together, on the customer's account tier, or on a negotiated B2B price list is custom pricing-engine development, not a Printing Options setting.
ERP or MIS-synced cost. Pull a live cost basis or a stock-dependent price from your ERP or MIS, so the storefront price never drifts from the production cost behind it.
Approval-gated quoting. For B2B accounts, route a configured price through a purchase-order approval step before the order is confirmed, building on the approved-artwork lock NBDesigner already applies to the design.
Pricing tied to print-ready output. Connect your pricing rules to the print-ready PDF that matches the order, rendered by Cmsmart Cloud at checkout, so production never has to re-check what was paid for.
Delivery runs the way every Cmsmart project does: discovery, solution design, sprints, QA and launch, with support afterward — see how we run ecommerce projects.
On the order screen, the line item subtotal matches what was configured — no manual reconciling before the job goes to press.
Why work with Cmsmart for your print pricing engine?
Cmsmart has built web-to-print storefronts since 2012, with 6,300+ client projects and 1,800+ live stores behind that experience. The NBDesigner plugin's Printing Options module is the product of that work, and the same team builds the custom pricing engines plugins can't cover.
Cmsmart is a Netbase JSC division operating since 2012, with 6,300+ client projects and 4,600+ projects delivered, serving stores in 80+ countries. Cmsmart holds a 4.2 Trustpilot rating from 404 reviews (verified on Trustpilot), and the team's project history is open on the Cmsmart platform page.
"I would like to highlight that the price is competitive, especially in relation to the quality of the software delivered." — Oscar Hernnan, Trustpilot review, 2024
Frequently asked questions about NBDesigner print pricing
Can one Printing Options set apply to several products at once?
Yes. Under Apply for, attach the option set to a whole category instead of a single product, and set a priority if more than one set could match the same item.
Does the price update live as a shopper changes quantity?
Yes, within the quantity breaks you configured — the storefront reads the matrix and recalculates the price before the item is added to cart.
Can print pricing depend on which customer is buying?
Not out of the box. Account-tier or negotiated B2B pricing is custom development Cmsmart builds on top of the plugin's Printing Options module.
Will the configured price match what the order screen shows?
Yes. The same calculation that prices the product and the cart carries through to the order record, so the line item subtotal and the print job agree.
How long does it take to set up a first option set?
Most shops build their first quantity-break option set in under half an hour; a full B2B pricing engine with ERP sync is a scoped custom development project.
Can Cmsmart connect print pricing to our ERP or MIS?
Yes, as custom development — Cmsmart syncs a live cost basis or a stock-dependent price from your ERP or MIS, so the storefront price never drifts from production cost.
Get pricing that quotes itself
Configure Printing Options once in the NBDesigner plugin, and let Cmsmart's project team build the pricing logic a spreadsheet can't: account tiers, ERP-synced cost, PO approvals.
This is the powerful tool of Web to Print stores. It is very useful for both printing shop owner and their customers. The free Media library is available on WooCommerce Online Designer Plugin and printing functions are the outstanding features compared to our competitors. NBdesigner is built for all types of printing company which helps customers draw their idea in the fastest way.
What is DPI?
DPI stands for ‘dots per inch’ – the number of printed dots there is in an inch of the printed document. DPI is used to describe the resolution number of dots per inch in a digital print and the printing resolution of a hard copy print dot gain, which is the increase in the size of the halftone dots during printing. This is caused by the spreading of ink on the surface of the media. The larger the DPI and the number of dots, the clearer the print is. In addition, with much more DPI, the level quality of the print would be higher. Most of the prints often opt for the resolution with DPI between 300 and 600. However, professional photography or large advertisements might be print at a very high DPI like 1200.
Configure and Display DPI?
Firstly, You need to log in to NBDesigner - Cmsmart, add file and enter information in the Backend. In "general" box, changing " fixed amount' into "Current value price" and increasing "additional price" from 0 to 0.01.
Secondly, you do not need to change something inbox "conditional", "appearance" and "online design".
And then, click on Update and view in Fronted.
Now, you can correct DPI as you like. Pressing the button " start and update design" and enjoy your product. Besides, Cmsmart creates a video for you to know more details, please watch this below video!
How to configure DPI and where does it display on Woocommerce product online design plugin?
I wish this article helped you fully understand the way configure DPI and where it displays. If you need any help figuring out, please feel free to contact us at CMSmart Support team We are always willing to help you. If you have any questions, please contact Mr. Vincent. He will answer your question. Using coupon code MAR_DL to get 18% OFF for this item. Discover detail product here: LIVE DEMO
Why you should carefully make a selection when choosing one layout on your website:
A good layout keeps users on the site because it makes important information easily accessible and intuitive to find. A bad layout frustrates users which then quickly leave the site because they can’t find what they are looking for. For this reason, it’s best to take as long as you need to find a good layout because users won’t give you more than a few seconds of their time. There’s a strong relationship between the layout and the engagement of users with the website. It determines how long they dwell on the website pages, how many pages they browse and how often they come back to the website. So, besides overcoming the problem of split-second choice, a good layout comes with additional benefits. Engaging visitors can be a rewarding effort.
Some highlight features of NBDesigner plugin you might concern:
A large number of Hotkeys: There are many hotkeys which helps customers work faster
QR code: You can create QR code and then add to your design
Create PDF: Quickly create a PDF file from a design file
Powerful Layers: Drag and drop to sort layers and change layers of items.
Download customer's design file to SVG: You can download your customer's design file to SVG
Upload design: Allow customers to upload your own design with different types of file
Freehand drawing: Especially, you also can use many available brushes to draw, you can create your own signature.
Custom design: Admin can create one or more templates and manage them easily in the admin panel
100% responsive & mobile friendly: Customers can design on any device such as desktop, tablet or mobile
Social sharing: Share your design via social channels such as Facebook, Twitter, Google+
Various Font: More than 600+ fonts are included in this product, so you can choose font styles as you want.
Import/Export design: Import or Export files directly from your source easier than ever
Easy to use: Admin can use this product easily. Especially, it is very friendly with customers and simple to use
Various Elements: There are 400+ shapes and 25,000+ icons available which you can express your feeling in the best way
Powerful help tool: Especially, you also can use many available brushes to draw, you can create your own signature
Frontend translate with multiple languages: Customers can understand and design easily with multiple languages feature
Compatible with WooCommerce: This plugin is an extension of the WooCommerce plugin that allows your customer to design product easily
Customer design again easily: Customer can design the rejected file easily and send it back to the admin
Easy manage products with online: Products with online design feature on Front-end will be added on the checkbox to distingue with Products without online design feature
Easily manage order of customer: Admin can see the design in detail, accept/decline design, and send email feedback to customers
Flexible config: You can set size upload, preview thumbnail size, thumbnail quality, show customer design in the cart, show customer design in order, admin notifications, and so on
Export design to JPG high revolution, CMYK mode, and ICC profile: JPG with high revolution and CMYK mode is the best choice for print in most of the case. And you can create PDF files with them
Add/ curve text and 200+ typography: A customer can add text with various colors, fonts, and sizes. Especially, they can curve text in their design and edit anything. There are 200+ typography available which save your time to find
Add clip art: Customers can select images from different many sources as their computer, Url, Facebook, Instagram, Dropbox, Webcam or Pixabay and Unsplash. With 1.500.000 beautiful images, you can search and find the one you love
How to setup Visual Design editor layout in Woocommerce product designer plugin?
As you could see, we provide 3 design editor layouts for your choices. Customer can design online on the product detail page and Admin can set it for all products You also could choose the design editor layout for each product.
Today, this article will show you how to setup Visual Design editor layout in NBDeisgner plugin. Kindly follow this tutorial video for more detail:
We hope you find this article helpful for your business. If you want to find more detailed information about our NBDesigner, kindly go to WOOCOMMERCE PRODUCT DESIGNER PLUGIN. If you have any questions about this product, please contact our Sales Consultant Manager, Vincent or CMSmart Support Team. He will answer all your questions. Don't forget to use coupon code MAR_DL to get 18% Discount for this item. Many thanks!
Applies to Cmsmart Product Designer (NBDesigner) 2.17.0 · Updated October 2026. Screens below are from a live NBDesigner demo store and a current product test run; the admin Template Manager picker itself is described from the 2.10.0 release notes because we did not re-capture that exact screen this round.
In short
Cmsmart's Global Template Store lets a buyer pick a ready-made design inside your product designer instead of starting from an empty canvas, so more visits turn into finished orders.
You assign a collection of templates to a product once, from that product's Templates tab; buyers then see a searchable template panel the moment they choose to design online.
It takes a product with the online designer already enabled, a template collection to assign, and about ten minutes the first time you set it up.
A buyer who opens your product designer to a blank canvas has to make every decision alone — layout, colors, wording — before they ever see a price. Cmsmart's product designer template store removes that first decision: it hands the buyer a finished, editable design the moment they click into the online designer, so they are personalizing in seconds instead of staring at an empty page.
That one change touches the whole front of your funnel: fewer abandoned designs, fewer support emails asking staff to recreate a layout by hand, and a shorter path from product page to cart. This guide covers what the template store does today, what it costs you when it is off, how to turn it on for a product, and where Cmsmart builds further on top of it.
What does it cost you when every buyer starts from a blank canvas?
A blank design area forces every buyer to be their own designer before they can buy anything. Cmsmart's product designer removes that barrier by opening straight into a template they can edit, so shoppers who were never going to design from scratch still complete an order.
Run a design-enabled product without any templates assigned and you tend to see the same handful of problems on repeat:
Design abandonment before Process. A buyer opens the designer, looks at an empty canvas, and closes the tab rather than build a layout from nothing.
Inbox-driven design requests. Buyers who do not trust their own layout skills email or chat a request instead, asking staff to recreate something close to your demo artwork — which is staff time your price does not cover.
Inconsistent artwork quality. Freehand layouts arrive off-center, with text too close to the bleed line or fonts that do not pair, which shows up later as reprints.
Slower time-to-cart. Every extra minute spent fighting a blank canvas is a minute closer to the buyer leaving the tab open and never coming back.
None of that is unique to custom-product stores. Checkout abandonment across ecommerce in general runs high for the same underlying reason — friction between wanting something and actually buying it: the average cart abandonment rate sits at 70.22% across the studies Baymard Institute tracks, and 17% of US shoppers specifically blame a process that felt too long or too complicated (Baymard Institute, updated September 2025). A design step with no starting point is exactly that kind of friction, placed before the buyer has even reached checkout.
What would a pick-a-template storefront look like for your shop?
With Cmsmart's Global Template Store turned on, a buyer never meets an empty canvas: the product designer opens with a curated layout already in place, ready to personalize and order in a couple of minutes.
Example scenario. A gift shop lists a photo mug. A shopper opens the product page at 9pm, skips the upload-a-file option, and opens the online designer instead. The Templates panel on the left already shows a birthday-themed layout assigned to that product. They search for a birthday layout, pick one, swap in two photos and a name, watch the price update, and check out — no emailed proof, no back-and-forth, and no blank canvas at any point.
Demand for that kind of self-serve personalization keeps climbing: the global print-on-demand market is projected to grow from $10.8 billion in 2025 to $57.5 billion by 2033, a 23.6% CAGR (Grand View Research, 2025). Shoppers increasingly expect a store to meet them with a starting point, not a blank tool.
The buyer's first decision: upload a finished file, or design here online — the template store lives inside the second path.
How does Cmsmart's product designer template store work?
Cmsmart's Global Template Store pairs a template library with your product's own design area: you assign a collection of templates to a product from its Templates tab, and the online designer shows that collection in a searchable panel the moment a buyer starts designing.
Four pieces work together, and it is worth being clear about which ones ship in the plugin today and which ones are delivery work:
Storefront entry point (in the plugin). The design-method chooser on the product page routes buyers to upload their own file or open the online designer.
Template library and assignment (in the plugin). Cmsmart's admin Template Manager holds the global collections; a product's Templates tab is where you pick which collection — if any — that product shows. Per the 2.10.0 release notes, collections load asynchronously and an assign-to-products action lets you apply one collection to several products at once — we do not have a fresh screenshot of that exact picker this round, so take this paragraph as a description of what it does rather than what it looks like today.
Searchable templates panel in the designer (in the plugin). Once a buyer is in the editor, a dedicated Templates tab sits alongside Text, Cliparts and Photos, with its own search box.
Print-ready output (in the plugin, same either way). Whether a buyer started from a template or a blank canvas, Process renders the same print-ready PDF that matches the order, and once that artwork is approved the approved-artwork lock stops it from being edited out from under production.
Inside the online designer: the Templates tab (top left) with a searchable grid, and a template already sitting on the canvas ready to personalize.
Cmsmart insight: in our delivery work, the shops that still see design abandonment are usually the ones that only assigned templates to one or two hero products. Give every design-enabled product at least two or three templates — even a thin collection beats a blank canvas.
Blank canvas only
Cmsmart Global Template Store
Starting point
Buyer stares at an empty design area
Buyer opens a ready-made layout and edits it
Where designs come from
The buyer supplies everything
A collection assigned from the product's Templates tab
Admin effort
None up front, but more support requests later
One-time: enable the designer, assign a collection
Finding a layout
Not applicable
Searchable template panel inside the designer
Print file
Rendered at Process
Rendered at Process — print-ready PDF that matches the order, either path
For the gallery view of everything in the library, see Cmsmart's templates library — it is the same collection your product's Templates tab draws from.
What's the business value of turning on the template store?
A template store turns design time into personalization time: buyers spend their minutes editing a layout instead of building one, which shows up as fewer abandoned designs, fewer support emails, and more consistent print-ready artwork.
Benefit
How it shows up in your business
KPI to track
Fewer abandoned designs
Buyers personalize a finished layout instead of closing the tab at an empty one
Designs started vs. designs that reach Process
Less manual design support
Fewer recreate-this-layout tickets, because a close layout is already a template
Design-related support tickets per 100 orders
More consistent print files
A template keeps text inside the safe zone and fonts paired on purpose
Reprint rate tied to layout/bleed issues
Faster time-to-cart
Editing beats building, so buyers reach Add to cart sooner
Median minutes from designer open to Process
Rough-cut math, with your own numbers: if N buyers a month start from a template instead of a blank canvas, and each one saves roughly M minutes of back-and-forth proofing email at your support rate of H per hour, that is N × M ÷ 60 × H in support time saved each month — before counting the orders that complete only because the buyer did not abandon a blank canvas. Plug in your own N, M and H to see what the switch is worth to your shop.
You are not alone in running this workflow on WooCommerce: more than 4 million stores run on it today, 31% of the top 1 million ecommerce sites by WooCommerce's own count (WooCommerce, 2026) — which is also why a template library that is easy to search and assign matters at that scale.
A design-enabled product ready for its template collection — Start Design opens straight into the online designer.
How do you set up the Global Template Store on a product?
You configure the template store once per product: turn on the online designer, open that product's Templates tab, assign a collection, then confirm it on the storefront — Cmsmart's Product Manager shows exactly how many templates each product already carries.
In wp-admin, go to Cmsmart → Products (Manager Products) to see every design-enabled product and how many templates each one already has.
Open the product you want to configure and confirm Designer Canvas → Enable the Online Designer for this product is checked, under the Online Designer section.
Choose a Sides preset (1-sided or 2-sided) so templates render on the sides your product actually prints.
Open the Templates tab on the product, or use the Manage templates quick action, which is where you add or edit the ready-made designs buyers can start from.
Pick a collection from Cmsmart's Global Template Store that matches the product (for example, invitations for a card product, marketing layouts for a banner product).
Assign the collection and save the product.
On the storefront, open the product and click Design here online to confirm the Templates panel loads with your assigned collection and that search returns results.
Run one test design through to Process and add it to the cart, so you can see the design carried through to checkout exactly as a buyer would.
Manager Products: a running count of templates per product, so you can see at a glance which ones still need a collection assigned.On the product itself: the Templates tab, the Manage templates quick action, and the Designer Canvas toggle that has to be on first.The same design, carried through to checkout — the template store's job ends the moment Process hands off to the cart.Video: how to design an admin template with the Cmsmart WooCommerce product designer plugin (Cmsmart on YouTube).
Going further: how does Cmsmart build custom development on top of the template store?
Cmsmart builds template experiences beyond the stock library as custom development — niche-specific collections, data-merge templates, brand-locked sets for multi-location accounts — fitted to your catalog instead of a generic demo.
The Global Template Store ships a general-purpose library. Most shops eventually want something sharper than a general-purpose library, and that is where Cmsmart's project teams come in:
Niche-specific template packs. A curated set built for your category — wedding stationery, trade-show banners, team apparel — instead of hunting through a generic library for a close match.
Data-merge templates. Layouts that pull a buyer's name, event date, or company logo into placeholders automatically, so personalizing is closer to filling a form than designing from scratch.
Brand-locked templates for B2B accounts. Multi-location or franchise buyers get templates whose logo, colors and legal copy are locked, while the order details stay editable — built for merchants as custom development, not a core setting.
Generated starting templates. A starting layout produced from a short prompt or an uploaded logo using AI tooling, handed to the buyer as their first template instead of a static library pick.
Cmsmart delivers this the same way as any other engagement: discovery, solution design, build sprints, QA, launch and ongoing support — see the delivery model on Cmsmart ecommerce projects, or the full scope of product-designer work on the product designer customization service page.
Cmsmart insight: before you roll a template collection out to every variant of a product, check that every font it uses is already in your font library under Settings. A template that looks right in the editor can fall back to a substitute font in the print-ready PDF if nobody proofed it first — easy to catch once, easy to miss at scale.
Why work with Cmsmart on your template strategy?
Cmsmart has built and supported web-to-print storefronts since 2012 as a Netbase JSC division, with thousands of client projects behind the product designer you are configuring today.
Cmsmart has delivered 6,300+ client projects and 4,600+ completed projects since 2012, with 1,800+ live stores running today across 80+ countries. Trustpilot rates Cmsmart 4.2 out of 5 across 404 reviews. One buyer who purchased a template through Cmsmart put it simply: "My first time with this developer and am very impressed with the template that I purchased and the quick turnaround and assistance" — Lillian Fidler, Trustpilot review. See related delivery work on Cmsmart projects, or start from the plugin itself on the Cmsmart Product Designer (NBDesigner) page, or explore the broader web-to-print solutions hub.
Frequently asked questions
What is the Global Template Store in Cmsmart Product Designer?
It is Cmsmart's library of ready-made designs that you assign to a product from its Templates tab; buyers then see those templates in a searchable panel inside the online designer instead of an empty canvas.
Does turning on templates stop buyers from designing from scratch?
No. The product page still offers both the upload-your-own-file option and the online designer, and inside the editor the Templates tab sits alongside Text, Cliparts and Photos — a buyer can ignore every template and build a layout from nothing if they want to.
Do I need to assign templates to every product?
No, but it helps. Manager Products shows a running template count per product, so you can see which design-enabled products still have zero templates assigned and prioritize the ones with the most traffic first.
Does a template change how the print-ready file is produced?
No. Whether a buyer starts from a template or a blank canvas, Process renders the same print-ready PDF that matches the order, and approved artwork is protected the same way either path.
Can Cmsmart build us a custom template collection instead of using the general library?
Yes — niche-specific packs, data-merge templates and brand-locked B2B collections are all custom development Cmsmart builds on top of the core template store; get a quote to scope it.
Applies to Cmsmart Product Designer (NBDesigner) 2.17.0 · Updated October 2026. Screens and flows below are from a live 2.17.0 install on nbdesigner.cmsmart.net, captured October 2026.
In short
A product builder for WooCommerce lets a shopper assemble a multi-part product — pick a component, type text, upload an image — and see one price before they add it to cart, instead of emailing you a spec and waiting for a quote.
Cmsmart Product Designer (NBDesigner) ships this as Component, Text and Image fields inside Printing Options, on top of the same per-product production specs, price matrix, approval box and print-ready PDF pipeline every other designer-enabled product uses.
Setup takes a product with the Online Designer turned on, a printing option set with the right fields applied to it, and ten minutes to test the storefront flow end to end.
A customer wants a gift box with three swappable items inside, a door hanger with their own wording, a sign built from interchangeable panels. Today they either pick from fixed bundles you pre-built, or email you a list and wait a day for a quote. Neither gets them to checkout.
Most WooCommerce stores selling configurable, multi-part products still run that quote back-and-forth by hand — checking stock, pricing each piece, retyping it into an invoice — instead of running a product builder for WooCommerce that prices the combination on the product page itself.
This guide walks through how Cmsmart's product builder fields put that configuration on the product page, what's built into the plugin today versus what we build as custom work, and what it's worth to stop quoting multi-part orders by hand.
What does it cost you when customers can't assemble a multi-part product online?
Every multi-part product without an on-page configurator becomes a manual quote: an email thread, a hand-built price, and a wait that costs you the sale. Cmsmart's product builder fields move that configuration onto the product page, so the price and the order happen in one visit instead of a back-and-forth.
If you sell anything built from parts — a gift box with selectable items, signage made of panels, stationery with a name and a photo — the pain shows up the same way on most stores:
Manual quoting. Staff price each component by hand and reply a day later, after the customer has checked a competitor.
Inconsistent pricing. Without a shared price matrix, two staff members quote the same combination differently.
Production specs that drift per product. Bleed, DPI and color profile get set from memory, so one batch prints fine and the next comes back off-color or cropped tight.
No proof step before the job is cut. A verbal "yes, that's fine" over email isn't a recorded approval, so a dispute after production falls on the shop.
Catalog sprawl. Every new combination becomes a new, separately listed product instead of one configurable product.
Put a number on it with your own data: (manual quotes per week) × (minutes per quote) × (your fully loaded hourly cost) + (reprint rate on multi-part orders) × (cost per reprint). On a shop doing even 15 manual quotes a week at 20 minutes each, that's 5 hours of staff time before a single order is placed.
What would it look like if buyers could assemble their own product online?
With Cmsmart, a buyer opens a configurable product, picks a component, adds their text or image, watches the price update, and checks out — the way they would for any other variation. No email, no wait, no manual quote.
The storefront side of a designer-enabled product: the buyer opens the online designer or uploads a file straight from the product page, with the price shown before they commit.
Example scenario. A gift-box shop sells a build-your-own stationery set. The product page offers a Component field for the box size, a Text field for a recipient's name, and an Image field for a small photo insert. The shopper picks the box, types the name, uploads the photo, and the price on the page updates with each choice — it's the price matrix from Printing Options doing the math, not a rule of thumb. They add to cart and pay. On your side, the order lands in Cmsmart > Orders with the configuration attached, ready for approval and a print-ready file — no email thread, no manual price.
How does Cmsmart's product builder for WooCommerce put a multi-part product together?
Cmsmart Product Designer (NBDesigner) assembles a configurable product from five building blocks — catalog and production specs, the Online Designer canvas, Printing Options with Component/Text/Image fields, the approval box, and print-ready output — all in the plugin today; logic between components is where custom development starts.
Catalog and production specs (in the plugin). Manager Products lists every designer-enabled product with its base price and attached templates; each product's own config page holds the material, bleed, print resolution, color profile and production time the renderer uses.
A product's own configuration page: production specs (material, bleed, DPI, color profile) sit above the Online Designer toggle, and apply to every component combination a buyer configures.
Online Designer canvas (in the plugin). The sides preset (1-sided/2-sided) and canvas are turned on per product, independent of the printing options layered on top.
Printing Options — Component, Text, Image fields (in the plugin). A "Product builder fields" group in the printing-option editor adds Component, Text and Image fields to an option set, next to the quantity breaks and price matrix, applied to one or more products or categories.
Approval box (in the plugin). Every submitted configuration lands on the order screen's Customer Design box to accept or decline before production. Since 2.17, an approved design is locked on the server, not just hidden from the UI.
Print-ready output (in the plugin). Create PDF and the print-ready PDF status (Ready / Rendering / Failed) use the same renderer and page geometry, including custom sizes — the file matches what the buyer configured.
The Customer Design box on the order screen: accept or decline a submitted configuration — of any number of components — before it reaches production.Print-ready PDF status after Create PDF: Ready, timestamped, rendered by the cloud renderer, with a Regenerate option if a design changes.The printing-option editor's "Product builder fields" group: Component, Text and Image sit alongside the online-design fields (sides, size, color) and the quantity/price-matrix section below.
Cmsmart insight: treat Component, Text and Image as building blocks for a price-matrix-driven configuration, not a full 3D "swap this part" visual configurator — the demo shows fields added to a printing option and applied to products, not a rendered 3D assembly. Visual swapping or one field hiding another is custom development on top, not a Printing Options setting.
Step
Manual multi-part quoting
Cmsmart product builder
Pricing a combination
Staff member prices each part by hand, from memory or a spreadsheet
Price matrix in Printing Options prices every combination the same way, every time
Buyer sees the price
After an email round-trip, often a day later
On the product page, as they pick each component
Production specs
Set per order, by whoever is building the job
Saved once per product: material, bleed, DPI, color profile
Proof before production
A verbal "looks fine" over email, not recorded
Customer Design approve/decline box on the order, with an approved-artwork lock
Print file
Rebuilt by hand per order
Create PDF / print-ready PDF status, rendered to match the order
What's the business value of a self-serve product builder?
A product builder turns a manual quote into a self-checkout: less staff time per order, consistent pricing, and a production file that matches what the buyer actually configured — which shows up as fewer reprints and faster turnaround, not just a nicer product page.
Benefit
How it shows up in your business
KPI to track
Less manual quoting
Staff stop pricing combinations by hand over email
Manual quote requests per week
Consistent pricing
Every buyer sees the same price for the same combination
Price-support tickets / disputes
Fewer reprints
Production specs and approval are recorded per order, not per memory
Reprint rate on configured orders
Higher completion
Buyers finish configuring instead of abandoning an email thread
Add-to-cart rate on configurable products
Personalization pays for the setup work: in Deloitte Digital's 2024 personalization survey, consumers reported spending on average 37% more with brands that deliver meaningful, personalized interactions — a self-serve component builder is that kind of interaction, applied to a physical product (Deloitte Digital, 2024). The platform underneath isn't niche either: WooCommerce reports it now powers 31% of the top one million ecommerce sites, so a configurator built on it inherits a large, well-supported checkout and extension ecosystem (WooCommerce.com).
ROI worksheet (use your own numbers):
Staff time saved: (manual quotes/week) × (minutes/quote) × (hourly cost) = weekly hours back
Reprints avoided: (current reprint rate − expected rate with recorded specs) × (orders/month) × (cost per reprint)
Conversion: (abandonment on "email for a quote" products) × (traffic) × (average order value) = recoverable revenue
How do you set up Component, Text and Image fields for a product?
You configure a WooCommerce product builder in three stages: turn on the Online Designer and production specs for the product, add the Component/Text/Image fields and pricing in Printing Options, then apply that option set to the product and test the storefront flow before it goes live.
Manager Products: every product with the online designer turned on, its base price, and how many templates are attached — this is where setup starts.
In Cmsmart > Manager Products, open the product (or add a new one) you want to configure as a multi-part build.
Under Online Designer, enable the designer canvas for the product and pick a sides preset (1-sided or 2-sided).
Under Production specs, fill in material, bleed area, print resolution, color profile and production time — these travel with every render of this product, including every component combination.
Go to Cmsmart > Printing Options and add a new option set (or edit an existing one) for this product or its category.
In the option editor's Printing fields panel, open the "Product builder fields" group and add the Component, Text and/or Image fields your product needs.
Add any matching fields from "Online design fields" the product also needs — Side list, Size, Color/Material — if those vary independently of the components.
In Printing options, set quantity breaks and the price matrix so every field combination resolves to one price.
Under Apply for, select Products or Categories and pick which products use this option set.
Save, then open the product on the storefront, run through a full configuration and Process it to confirm the price and layout are what you expect.
Open the resulting order, use the Customer Design box to accept or decline the configuration, then check Create PDF / the print-ready PDF status before the job goes to production.
Printing Options: each option set — including Component/Text/Image combinations — is applied to specific products, not switched on globally.Video: How to create a Component in the Product builder of NBDesigner (Cmsmart on YouTube)
Deep settings for sides, size and color fields that aren't specific to the product builder are covered in our per-product design settings guide; general upload/output settings (file types, DPI minimums, ICC/CMYK export) live under Settings > Upload design and Settings > Output.
Going further with custom development
The Component, Text and Image fields give you the building blocks; Cmsmart builds the logic and visuals that turn them into a tailored configurator — conditional fields, inventory-aware components, 3D swaps or ERP-linked bundle SKUs — as a custom project on top of your store.
Once a shop is running Component/Text/Image fields in production, the requests we hear most are about logic and presentation the fields don't do on their own:
Conditional components. One component's choice should show, hide or restrict another field — a box size limiting which inserts are offered. We build and validate that logic server-side.
Inventory-aware components. Each component maps to a real SKU with real stock; we wire the fields to WooCommerce stock so an out-of-stock part is hidden instead of ordered.
Visual component swaps. The buyer sees the part change on a mockup or 3D model as they pick it, instead of reading a dropdown label.
ERP/MIS sync for bundle SKUs. Component combinations map to production SKUs in your MIS or ERP, so a configured order routes straight into your existing queue.
AI preflight tuned to multi-part jobs. Cmsmart Cloud's AI tools run per layer today; we tailor preflight rules to flag issues specific to how your components print and assemble.
Every custom build follows the same path: discovery, a solution design you sign off on, build sprints, QA against your real products, launch and ongoing support — the process behind our ecommerce project work.
Cmsmart has built WooCommerce product customization since 2012 as a division of Netbase JSC, with thousands of delivered projects and a Trustpilot rating buyers can check independently — not a claim made only on our own site.
Cmsmart is a Netbase JSC division building ecommerce customization since 2012, with 6,300+ client projects, 4,600+ projects delivered, 1,800+ live stores running today, and a 4.2 out of 5 rating from 404 reviews on Trustpilot (verify on Trustpilot). One customer who had us extend their product configuration put it this way:
"CMS smart (Selena) have customized NB designer perfectly for us and now work as we like." — Ari van Esch, Trustpilot
What's the difference between Component, Text and Image fields and the Online Designer canvas?
The Online Designer canvas is the full design tool — drawing, layers, clip art, templates. Component, Text and Image are printing-option field types you add on top, letting a buyer pick a part, type a short text value, or attach an image as part of pricing an option set. Our WooCommerce product customizer overview covers how the two layers combine.
Can a buyer configure more than one component on a single product?
Yes — an option set can include multiple Component, Text and Image fields together with sides, size and color fields, and the price matrix resolves the combination to one price. How many fields make sense is a product-design decision, not a plugin limit.
Does the price update automatically as a buyer picks components?
Yes, through the price matrix and quantity breaks configured on the printing option set — that's the same pricing engine used for every other printing option, not a separate system for component fields.
Does a configured product still go through approval and print-ready output?
Yes. Every order — single-field or multi-component — lands on the Customer Design box for accept/decline, and once approved it's locked on the server; Create PDF and the print-ready PDF status apply the same way regardless of how many fields the buyer filled in.
Can Cmsmart add conditional logic between our components?
Not as a built-in setting today — showing or hiding one field based on another's value is custom development we build on top of the existing fields, scoped to how your specific products are configured.
Ready to let customers build their own product?
We'll review your catalog, map it to Component, Text and Image fields where they fit, and scope the custom logic where they don't — so your product builder matches how your products are actually made.